Madesa G25832F9VKSU
Madesa Vik 70cm 2-Door Wall-Mounted Display Cabinet Instruction Manual
Model: G25832F9VKSU
Introdución
This manual provides comprehensive instructions for the assembly, installation, and maintenance of your Madesa Vik 70cm 2-Door Wall-Mounted Display Cabinet. Please read all instructions carefully before beginning assembly and retain this manual for future reference. This cabinet is designed to be wall-mounted and does not include feet.

Image: The Madesa Vik 70cm 2-Door Wall-Mounted Display Cabinet, showcasing its rustic and gray finish with clear glass doors.
Información de seguridade
- Wall Mounting is Mandatory: This cabinet is designed for wall installation only. It must be securely fixed to a suitable wall structure to prevent tipping and injury.
- Instalación profesional recomendada: If you are unsure about wall mounting procedures or the suitability of your wall, consult a qualified professional.
- Límites de peso: Do not exceed the maximum weight capacity for each shelf. Overloading can compromise the cabinet's stability and structural integrity.
- Seguridade infantil: Keep children away from the assembly area. Ensure all small parts and hardware are out of reach.
- Manipulación do vidro: Exercise caution when handling glass components to avoid breakage and injury.
- Ventilación: Assemble in a well-ventilated area.
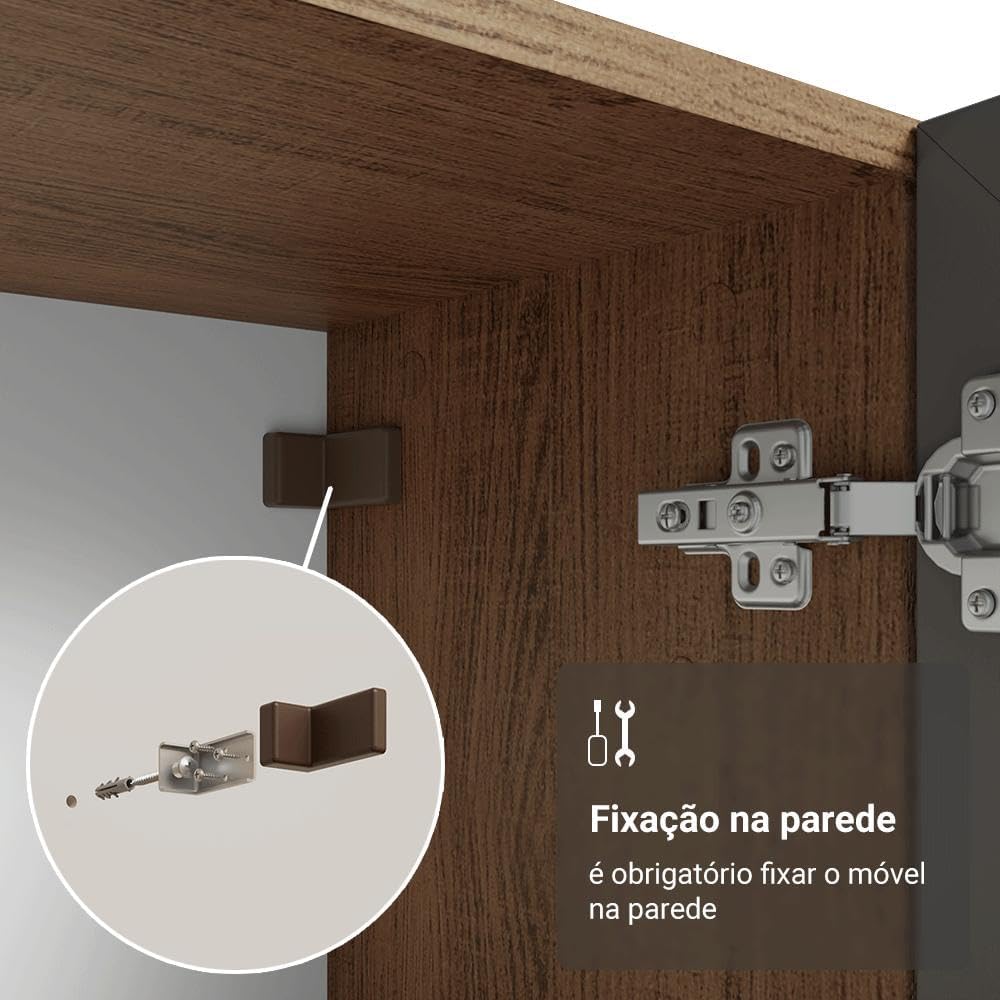
Image: Detail showing the wall fixation mechanism, emphasizing the mandatory wall attachment for stability.
Contido do paquete
Before beginning assembly, verify that all components listed below are present and undamaged. If any parts are missing or damaged, contact Madesa customer support.
- One (1) Madesa Vik 70cm 2-Door Wall-Mounted Display Cabinet structure
- Two (2) Glass Doors
- Assembly Hardware Kit (screws, dowels, hinges, handles, wall mounting brackets)
- Manual de montaxe (este documento)
Ferramentas necesarias para a montaxe
The following tools are typically required for assembling and installing the display cabinet:
- Destornillador Phillips
- Martelo
- Drill (with appropriate drill bits for wall material)
- Nivel
- Cinta métrica
- Lapis
Especificacións
| Característica | Detalle |
|---|---|
| Número de modelo | G25832F9VKSU |
| Dimensións (alto x ancho x fondo) | 141 cm x 70 cm x 31 cm |
| Peso | Aproximadamente 26 kg |
| Material | Madeira de enxeñería |
| Remate | Rustic (structure), Gray (doors) - Matte finish with soft-touch texture |
| Portas | 2 Glass Doors with soft-close hinges |
| Asas | Aged gold point handles (metal) |
| Tipo de montaxe | Wall-mounted (suspended) |
| Características especiais | 7-layer Polyester paint, American style design, chamfered fronts |

Image: Diagram illustrating the product dimensions (141cm H x 70cm W x 31cm D) and internal shelf spacing with weight limits.

Image: Diagram highlighting key features such as American-style doors, clear glass, aged gold handles, soft-close hinges, and the suspension profile.
Instrucións de configuración e montaxe
Follow the detailed assembly manual included in your package for step-by-step instructions. The general process involves:
- Desembalar e identificar as pezas: Carefully unpack all components and compare them against the parts list in the included assembly manual.
- Assemble the Cabinet Structure: Follow the instructions to assemble the main body of the cabinet using the provided hardware.
- Instalar estantes: Insert the internal shelves into their designated positions. Note the weight limits per shelf as indicated in the dimensions diagram.
- Attach Wall Mounting Brackets: Secure the suspension kit and wall mounting brackets to the back of the cabinet as per the manual.
- Preparar a parede para a montaxe:
- Choose a suitable wall location, ensuring it can support the weight of the cabinet and its contents.
- Mark the desired height and position for the wall mounting rail/brackets using a level and measuring tape.
- Fai buratos guía e insire os ancoraxes de parede axeitados (non sempre están incluídos, pode que teñas que mercalos por separado dependendo do tipo de parede).
- Securely attach the wall mounting rail/brackets to the wall.
- Montar o armario: Carefully lift the cabinet and hook it onto the installed wall mounting rail/brackets. Ensure it is level and securely seated.
- Instalar portas: Attach the glass doors using the soft-close hinges. Adjust the hinges as needed for proper alignment and smooth closing.
- Fixar as asas: Secure the aged gold point handles to the doors.
Important Note: Madesa does not provide assembly services. It is the responsibility of the customer to ensure proper and safe assembly and installation.

Image: Close-up of the suspension kit, which includes the support profile for fixing the furniture to the wall.
Instrucións de funcionamento
The Madesa Vik display cabinet is designed for storing and displaying various items such as dinnerware, glassware, and decorative objects.
- Apertura e peche de portas: Gently pull the aged gold point handles to open the glass doors. The soft-close hinges ensure a smooth and quiet closing action. Avoid forcing the doors.
- Capacidade do estante: Refer to the dimensions diagram in the Specifications section for recommended weight limits per shelf. Distribute weight evenly to maintain stability.
- Mostrando elementos: Arrange items carefully on the shelves. Ensure that items are stable and do not obstruct the closing of the doors.

Image: The display cabinet showcasing various items like jars, glasses, and decorative pieces on its shelves.
Mantemento e coidados
Proper care will help maintain the appearance and longevity of your Madesa Vik display cabinet.
- Limpeza:
- For the wooden surfaces, wipe with a soft, damp pano. Evite produtos de limpeza abrasivos ou produtos químicos agresivos.
- For glass doors, use a glass cleaner and a soft, lint-free cloth.
- Dry all surfaces immediately after cleaning to prevent water marks.
- Evite a luz solar directa: A exposición prolongada á luz solar directa pode causar decoloración ou esvaecemento do acabado.
- Control de humidade: Mantén un nivel de humidade estable na habitación para evitar deformacións ou rachaduras na madeira.
- Comprobar os elementos de fixación: Comprobe periodicamente todos os parafusos e elementos de fixación para asegurarse de que estean ben axustados. Volva apertalos se é necesario.
- Evitar a sobrecarga: Do not place excessively heavy items on the shelves.
Resolución de problemas
| Problema | Causa posible | Solución |
|---|---|---|
| O armario parece inestable ou tambaleante. | Not securely mounted to the wall; loose wall anchors or fasteners. | Ensure the wall mounting brackets are firmly attached to the wall and the cabinet is properly seated. Check all internal fasteners. If necessary, consult a professional for wall mounting. |
| As portas non pechan con suavidade ou están desalinhadas. | Hinges are not properly adjusted or are loose. | Adjust the screws on the soft-close hinges to align the doors. Refer to the assembly manual for hinge adjustment details. Tighten any loose hinge screws. |
| Glass is scratched or damaged. | Improper handling or cleaning. | Use only soft cloths and appropriate glass cleaner. For significant damage, contact Madesa for replacement parts. |
| Shelves sag or appear weak. | Estantes sobrecargados. | Reduce the weight on the shelves. Distribute items more evenly. Ensure shelf supports are correctly installed. |
Información da garantía
Madesa products are manufactured with quality materials and craftsmanship. For specific warranty terms and conditions regarding manufacturing defects, please refer to the warranty documentation provided with your purchase or visit the official Madesa websitio. Garda o comprobante de compra para reclamacións de garantía.
Note: Extended warranty plans mentioned during purchase are separate from the manufacturer's standard product warranty and are typically offered by third-party providers.
Atención ao cliente
If you have any questions, require assistance with assembly, or need to report missing/damaged parts, please contact Madesa customer support:
- Websitio: www.madesa.com.br (Please check for an English version or international contact options)
- Refer to your purchase documentation for specific contact numbers or email addresses.
When contacting support, please have your model number (G25832F9VKSU) and proof of purchase readily available.