
1. Introdución
This manual provides detailed instructions for the installation, operation, and maintenance of your plplaaoo 100A MPPT Solar Charge Controller. This advanced controller is designed to optimize energy harvest from your solar panels and manage battery charging efficiently for 12V, 24V, 36V, and 48V solar power systems. Please read this manual thoroughly before installation and use to ensure proper function and safety.
2. Instrucións de seguridade
Observe as seguintes precaucións de seguridade durante a instalación e o funcionamento:
- Ensure all wiring is correctly connected and securely fastened to prevent loose connections and overheating.
- Always disconnect the solar panel and battery power before installing or adjusting the controller.
- Use appropriate tools and wear protective gear, including eye protection, during installation.
- Install the controller in a well-ventilated area, away from flammable gases and liquids.
- Non desmonte nin intente reparar o controlador vostede mesmo. Póñase en contacto con persoal cualificado para o servizo técnico.
- Ensure the battery bank is properly sized and compatible with the controller's voltage clasificacións actuais.
- Avoid short-circuiting the solar panel, battery, or load terminals.
3. Características do produto
- Seguimento do punto de máxima potencia (MPPT): Achieves up to 98% conversion efficiency by intelligently tracking the maximum power point of solar panels under varying conditions.
- Vol. AutomáticotagAdaptación electrónica: Automatically detects and adapts to 12V, 24V, 36V, or 48V battery systems.
- Multifunctional Control: Supports various operating modes including PWM charging, constant current output, and voltage regulación.
- Integrated USB and DC Outputs: Features dual 5V 1A USB ports and a 2A DC output for charging external devices.
- Protección integral: Includes safeguards against overvoltage, overcurrent, overtemperature, overload, short circuits, and reverse polarity.
- Interface fácil de usar: Equipped with a backlit LCD display for real-time monitoring and intuitive buttons for configuration.
- Construción duradeira: Features an aluminum heatsink for efficient cooling and robust design for harsh environments (0°C to 60°C).
- Compatibilidade da batería: Compatible with gel, sealed lead-acid, and lithium batteries.
4. Contido do paquete
- 1 x plplaaoo 100A MPPT Solar Charge Controller
- 1 x Manual de usuario
5. Produto rematadoview e Compoñentes
Familiarize yourself with the main components and interface of the solar charge controller.

Figura 5.1: Fronte view of the solar charge controller, highlighting the LCD screen and various connection terminals.
The controller features an intuitive LCD display and clearly labeled ports for easy connection. The display provides real-time information about the system's status.
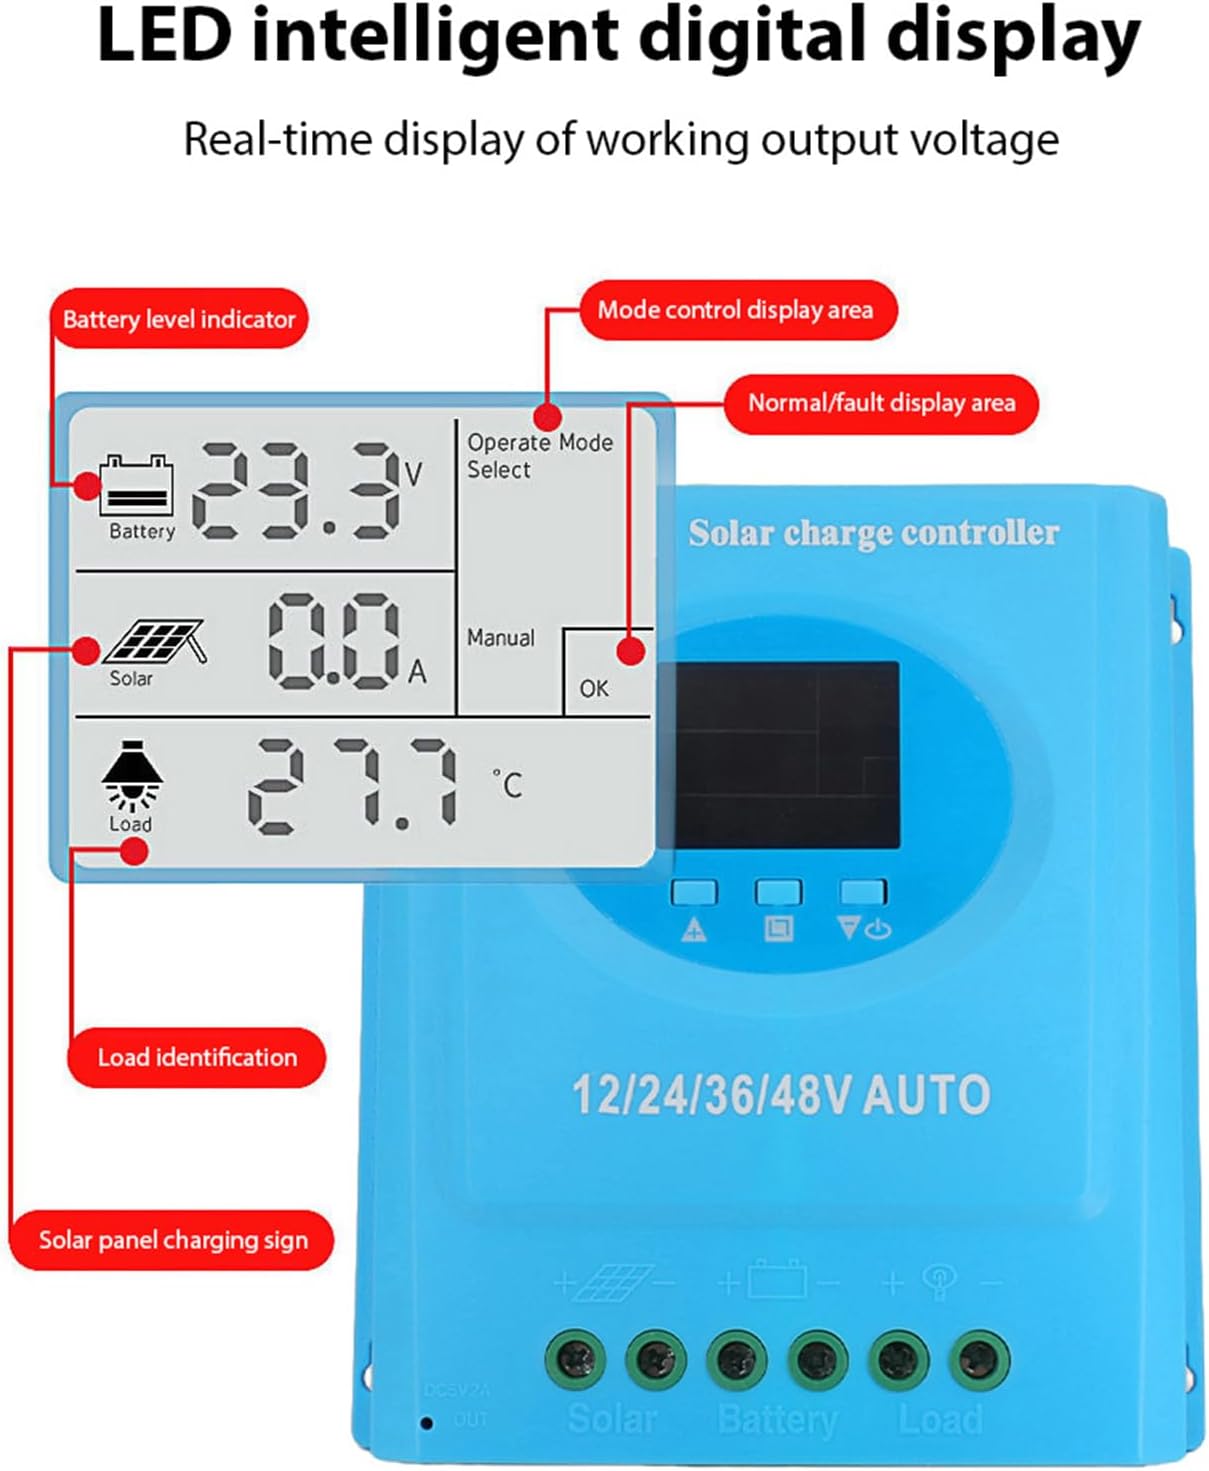
Figura 5.2: Detallado view of the controller's connection ports.

Figura 5.3: Detallado view of the LCD display, indicating battery level, solar panel charging sign, load identification, operating mode, and real-time voltage.
5.1. Portos de conexión
- Interface USB dual: Two 5V 1A USB ports for charging mobile devices.
- Solar Panel Port: Connects to your solar panels (positive and negative).
- Porto da batería: Connects to your battery bank (positive and negative).
- DC Load Port: Connects to your DC loads (positive and negative).
- Porto de saída de CC: Additional DC output.
6. Configuración e instalación
Follow these steps for proper installation of the solar charge controller. Ensure all power sources are disconnected before beginning.
6.1. Método de cableado
Connect the components in the following order to prevent damage:
- Conecte a batería: Connect the battery to the controller's battery terminals (positive to positive, negative to negative). The controller will automatically detect the battery voltage.
- Conecta o panel solar: Connect the solar panel to the controller's solar panel terminals (positive to positive, negative to negative).
- Conecta a carga de CC: Connect the DC load to the controller's load terminals (positive to positive, negative to negative).
Importante: Conecta sempre primeiro a batería, despois o panel solar e, finalmente, a carga. Desconecta na orde inversa.

Figura 6.1: Solar energy system wiring diagram. Note the correct polarity for all connections.
6.2. Montaxe
Mount the controller vertically on a flat surface in a well-ventilated area, ensuring adequate clearance for air circulation around the heatsink. Avoid direct sunlight, high temperatures, and humid environments.
7. Instrucións de funcionamento
Once installed, the controller will automatically begin operating. The LCD display provides real-time system status.
7.1. Información da pantalla LCD
The LCD screen displays various parameters:
- Indicador de nivel de batería: Shows the current charge status of the battery.
- Solar Panel Charging Sign: Indicates when the solar panels are actively charging the battery.
- Load Identification: Shows the status of the connected DC load.
- Operating Mode Display Area: Displays the current operating mode (e.g., manual, automatic).
- Normal/Fault Display Area: Indicates normal operation or displays error codes if a fault occurs.
- Real-time Working Output Voltage: Mostra o volume actualtage do sistema.
7.2. Funcións dos botóns
The controller typically features multiple buttons for navigation and setting adjustments:
- Botón de menú: Used to enter and exit the menu settings.
- Botóns arriba / abaixo: Used to navigate through menu options and adjust parameter values.
- Botón Aceptar: Used to confirm selections and save settings.
Refer to the on-screen menu for specific parameter adjustments such as battery type, load control mode, and charging thresholds.
8. Mantemento
Un mantemento regular garante un rendemento óptimo e unha maior duración do seu controlador de carga solar.
- Limpeza: Periodically clean the controller's exterior with a dry cloth to remove dust and debris. Ensure ventilation openings are clear.
- Comprobación de conexión: Inspeccione anualmente todas as conexións de cableado para comprobar se están ben apertadas e corroídas. Volva apertalas se é necesario.
- Verificación ambiental: Ensure the installation environment remains within the specified operating temperature range and is free from excessive moisture or dust.
- Inspección da batería: Regularly check the battery terminals for corrosion and ensure the battery is in good condition.
9 Solución de problemas
Se tes problemas co teu controlador de carga solar, consulta os seguintes problemas e solucións comúns:
| Problema | Causa posible | Solución |
|---|---|---|
| Controller not powering on / LCD blank |
|
|
| A batería non se está cargando |
|
|
| A carga non funciona |
|
|
| Amosouse o código de erro | Fallo específico do sistema. | Refer to the controller's display for the specific error code and consult the full product documentation or contact support for detailed interpretation and resolution. |
10. Especificacións
| Parámetro | Valor |
|---|---|
| Modelo | plplaaoozi6egog4wm-0A |
| Marca | plplaaoo |
| Corrente nominal | 100A |
| Sistema Voltage | 12V / 24V / 36V / 48V Automatic Adaptation |
| Tipo de carga | MPPT (Seguimento do punto de máxima potencia) |
| Eficiencia de conversión | Ata o 98% |
| Saída USB | Dual 5V 1A ports |
| Saída CC | 2A |
| Temperatura de funcionamento | 0°C a 60°C |
| Dimensións (aprox.) | 19.5 cm x 18.3 cm x 6.8 cm (7.7 polgadas x 7.2 polgadas x 2.7 polgadas) |

Figura 10.1: Approximate dimensions of the solar charge controller.
11. Garantía e soporte
Para obter información sobre a garantía, asistencia técnica ou consultas sobre o servizo, póñase en contacto co seu vendedor ou directamente co fabricante. Garde o recibo de compra como proba de compra.