
1. Introdución
This manual provides detailed instructions for the installation, operation, and maintenance of your Varstrom 48V 500W Ebike Hub Motor Conversion Kit. Please read this manual thoroughly before attempting installation or operation to ensure proper function and safety. This kit is designed to convert a standard pedal bicycle into an electric bicycle, offering enhanced performance and efficiency.
2. Información de seguridade
Always prioritize safety when working with electrical components and bicycles. Failure to follow safety guidelines can result in serious injury or damage to the product.
- Instalación profesional recomendada: If you are unsure about any step, seek assistance from a qualified bicycle mechanic or ebike specialist.
- Desconexión de alimentación: Always disconnect the battery before performing any installation, maintenance, or troubleshooting.
- Seguridade eléctrica: Avoid exposing electrical components to water or extreme moisture. Ensure all connections are secure and properly insulated.
- Comprobación dos freos: After installation, thoroughly test your bicycle's brakes to ensure they are functioning correctly.
- Uso do casco: Always wear a helmet and appropriate safety gear when riding an ebike.
- Normativa local: Be aware of and comply with all local laws and regulations regarding ebike usage, speed limits, and power output.
- Manexo da batería: Handle the battery with care. Do not puncture, short-circuit, or expose it to extreme temperatures. Use only the charger provided or recommended by Varstrom.
3. Contido do paquete
Verify that all components listed below are present in your package. If any items are missing or damaged, contact your seller immediately.

Figure 3.1: Varstrom Ebike Conversion Kit Package Contents
- Rear Wheel & Hub Motor (Pre-assembled)
- Controlador
- Brake Lever or Hydraulic Brake Sensor (Optional)
- Acelerador de polgar
- Estuche do controlador
- Varstrom LCD Display (Optional)
- Batería (opcional)
- Cable de extensión
- PAS (Sensor de asistencia ao pedaleo)
- Cable 1T4
- Faro frontal
- Plastic Straps
- Sticker (Motor Specification Label)
4. Produto rematadoview e Especificacións
The Varstrom 48V 500W Ebike Hub Motor Conversion Kit provides a powerful and efficient solution for electrifying your bicycle. It features a brushless gear drive motor, various display options, and compatibility with different bicycle types.
4.1. Compoñentes clave

Figure 4.1: Main Components of the Conversion Kit
- Motor do cubo: 48V 500W brushless gear drive motor, available for front or rear wheel installation. Features helical nylon gears for durability and quiet operation.
- Controlador: Manages power delivery to the motor. Max current 22A/30A.
- Visualización: Optional LCD displays (VD03, EKD01, VD04) provide ride data, PAS level control, and optional features like remote locking/unlocking and navigation.
- Sensor PAS: Pedal Assist Sensor detects pedaling motion to provide motor assistance.
- Acelerador: Provides on-demand power assistance.
- Brake Levers/Sensors: Cut off motor power when brakes are applied for safety.
4.2. Especificacións do motor

Figure 4.2: Varstrom Hub Motor Specifications Overview

Figure 4.3: 125XVH Rear Hub Motor (Performance Version) Specifications
| Especificación | Valor |
|---|---|
| Tipo de motor | Motor sen escobillas de transmisión por engrenaxes |
| Potencia nominal | 500 vatios |
| Potencia máxima | 864 vatios |
| Voltage | 48 voltios (DC) |
| Velocidade máxima | 45-50 KM/H (approx. 31 MPH) |
| Par máximo | 65 Nm |
| Eficiencia | ≥80 % |
| Compatible Dropout Size | 135-145mm Rear Dropout |
| Compatibilidade do tipo de freo | Freo de disco / Freo en V |
| Tipo de casete | ≤10-Speed Cassette |
| Grao de ruído | <60 dB |
| Clasificación impermeable | IPX5 |
| Temperatura de funcionamento | -20 °C ~ 45 °C |
4.3. Battery Specifications (Optional)
If your kit includes a battery, refer to the following specifications. Note that battery models and capacities may vary.
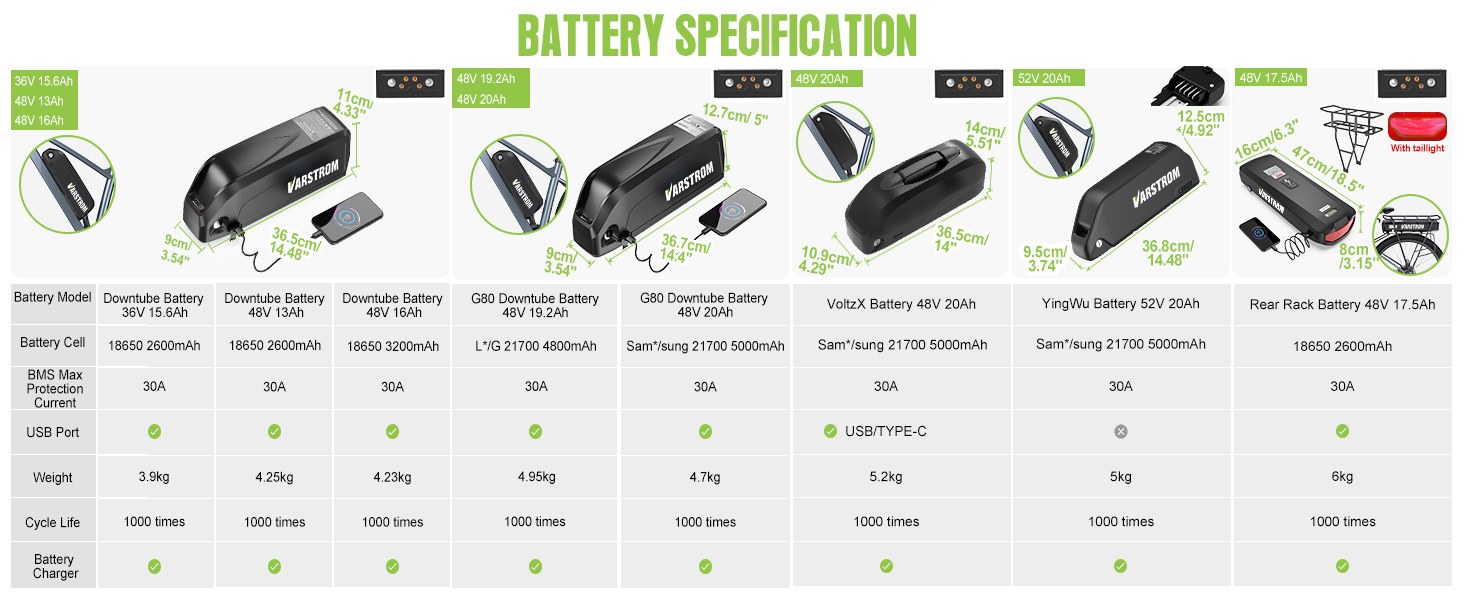
Figure 4.4: Varstrom Ebike Battery Specifications
4.4. Opcións de visualización

Figure 4.5: Varstrom Display Options (VD03, EKD01, VD04)
The kit may come with one of the following display options, each offering different features:
- VD03 Display: 1.5" LCD screen, 9 PAS levels, IP67 waterproof, English language support.
- EKD01 Display: 2.4" TFT screen, 9 PAS levels, IP67 waterproof, navigation function, multi-language support, remote locking/unlocking via app.
- VD04 Display: 3.5" IPS screen, 9 PAS levels, IP67 waterproof, navigation function, multi-language support, remote locking/unlocking via app.
5. Guía de instalación
Careful installation is crucial for the safe and reliable operation of your ebike kit. Follow these steps sequentially.
5.1. Comprobacións previas á instalación
- Bicycle Compatibility: Ensure your bicycle frame has the correct dropout spacing (135-145mm for rear hub motor, 100mm for front hub motor).
- Tamaño da roda: Confirm the wheel size of your kit matches your bicycle (20", 26", 27.5", or 700C).

Figure 5.1: Dropout and Brake Compatibility

Figure 5.2: How to Choose the Correct Wheel Size
5.2. Motor Wheel Installation
- Remove your existing bicycle wheel.
- Install the new motor wheel into the appropriate dropout (front or rear). Ensure the motor cable exits towards the frame.
- Secure the wheel with axle nuts, ensuring it is centered and tight.
- If using disc brakes, install the disc rotor onto the motor hub. If using V-brakes, ensure the rim is properly aligned.
5.3. Montaxe do controlador
Mount the controller in a secure, protected location on your bike frame, typically using the provided controller case and plastic straps. Ensure it is away from moving parts and potential water splashes.
5.4. Conexións de cableado
Refer to the wiring diagram below for connecting all components to the controller. Ensure all connectors are firmly seated and waterproofed where applicable.

Figure 5.3: Easy Installation Wiring Diagram
- Conecte o cable do motor ao controlador.
- Install the PAS sensor on the left side of the bottom bracket. Ensure the sensor and magnet disc are correctly aligned and spaced. Connect the PAS sensor cable to the controller.
- Mount the thumb throttle on the handlebar and connect its cable to the controller.
- Install the brake levers (or brake sensors) on the handlebars and connect their cables to the controller.
- Mount the display on the handlebar and connect its cable to the controller.
- Conecta o faro ao porto designado do controlador ou ao cable 1T4.
- If using an optional battery, connect it to the controller.
5.5. Xestión de cables
Use the provided plastic straps to neatly secure all cables along the bicycle frame. Ensure cables do not interfere with steering, braking, or pedaling, and are protected from moving parts.
6. Instrucións de funcionamento
Familiarize yourself with the operation of your new ebike system before riding.
6.1. Acendido/apagado
To power on the system, press and hold the power button on your display. To power off, press and hold the power button again.
6.2. Sistema de asistencia ao pedaleo (PAS)
The PAS system provides motor assistance based on your pedaling. Use the '+' and '-' buttons on your display to adjust the PAS level. Higher levels provide more assistance.
6.3. Funcionamento do acelerador
The thumb throttle provides instant motor power, allowing you to ride without pedaling. Use it cautiously, especially when starting from a standstill.
6.4. Funcións de visualización
Your display provides important information and control over your ebike system. Functions may vary slightly depending on your specific display model (VD03, EKD01, VD04).
- Visualización de velocidade: Current speed, average speed, max speed.
- Nivel de batería: Indica a carga restante da batería.
- PAS Level Indicator: Mostra o nivel actual de asistencia ao pedaleo.
- Odómetro/Distancia percorrida: Tracks total distance or trip distance.
- Control de faro: Turn the headlight on/off via the display.
- Códigos de erro: Displays diagnostic codes if a system fault occurs.
- Quick-Switch 25 km/h Mode: For compliance with certain road legality requirements, some displays offer a quick switch to limit speed to 25 km/h (typically by holding '+' and '-' buttons together).
- App Connectivity (EKD01/VD04): Supports remote locking/unlocking and advanced ride data tracking via the 'BIKEGO+' app.
7. Mantemento
Regular maintenance ensures the longevity and optimal performance of your Varstrom ebike kit.
- Limpeza: Regularly clean the motor, controller, and battery with a damp pano. Evite lavar a alta presión directamente sobre os compoñentes eléctricos.
- Coidado da batería: Garda a batería nun lugar fresco e seco. Cárgaa regularmente, mesmo se non a estás a usar, para manter o estado da batería. Evita descargar a batería por completo.
- Inspección de cableado: Periodically check all cables and connectors for wear, damage, or loose connections. Ensure waterproof connections are sealed.
- Inspección de motores: Listen for unusual noises from the motor. Ensure the wheel spins freely when power is off.
- Sistema de freos: Regularly inspect and maintain your bicycle's brake system. Ensure brake levers/sensors are functioning correctly to cut motor power.
- Presión dos pneumáticos: Maintain correct tire pressure for safety and efficiency.
8 Solución de problemas
Esta sección aborda problemas comúns cos que podes atoparte. Para problemas máis complexos, ponte en contacto co servizo de atención ao cliente.
| Problema | Causa posible | Solución |
|---|---|---|
| O sistema non se acende | Battery not charged or connected; Loose wiring; Faulty display/controller | Check battery charge and connection; Inspect all wiring; Contact support if issue persists. |
| O motor non axuda | PAS sensor misaligned or damaged; Brake levers engaged; Low battery; Faulty motor/controller | Check PAS sensor alignment and connection; Ensure brake levers are not engaged; Charge battery; Contact support. |
| A pantalla mostra o código de erro | Specific component fault | Refer to your display's specific manual for error code meanings or contact support with the code. |
| Ruído inusual do motor | Loose components; Internal motor issue | Check for loose parts; Discontinue use and contact support if noise persists. |
9. Garantía e soporte
Varstrom products are manufactured to high-quality standards. For warranty information, please refer to the documentation provided with your purchase or contact your seller directly. Keep your proof of purchase for warranty claims.
For technical support or assistance with installation and troubleshooting, please contact the Varstrom customer service team or your authorized dealer. Provide your product model number (125XVH-500) and a detailed description of the issue when seeking support.