
1. Introdución
This manual provides detailed instructions for the installation, operation, and maintenance of your Varstrom 48V 750W Rear Hub Motor Ebike Conversion Kit, model 125XVH-750. This kit is designed to convert a standard pedal bicycle into an electric bicycle, enhancing your riding experience with electric assistance. Please read this manual thoroughly before installation and use to ensure proper function and safety.
The Varstrom 125XVH-750 kit features a 48V 750W rear hub motor engineered for efficient and quiet operation. It is compatible with 26", 27.5", and 700C bicycle frames that have a 135mm rear dropout spacing. The motor delivers a powerful boost, enabling a top speed of up to 37 miles per hour (60 km/h) and an RPM of 442±10. Its construction includes helical nylon gears for superior durability, wear resistance, and quiet performance, maintaining over 78% efficiency. The motor supports both disc brakes and V-brakes, offering versatility for various bicycle types and riding conditions.

Imaxe 1.1: Acabadoview of the Varstrom 48V 750W Rear Hub Motor Ebike Conversion Kit components, including the motor, wheel, controller, display, and various accessories.
2. Información de seguridade
Always prioritize safety when installing and operating your ebike conversion kit. Failure to follow safety guidelines can result in serious injury or damage to the product.
- Use casco: Always wear an approved bicycle helmet when riding your ebike.
- Comprobacións previas á viaxe: Before each ride, check brakes, tire pressure, battery charge, and ensure all connections are secure.
- Cumprir as leis de tráfico: Follow all local traffic laws and regulations for bicycles and electric bicycles.
- Condicións meteorolóxicas: Exercise caution when riding in wet or adverse weather conditions. The motor is IPX5 waterproof, but prolonged heavy rain is not recommended.
- Seguridade eléctrica: Do not attempt to open the motor or controller housing. Disconnect the battery before performing any maintenance or installation. Avoid exposing electrical components to water unnecessarily.
- Límites de peso: Be aware of the weight capacity of your bicycle frame and the added weight of the conversion kit.
- Nenos: This kit is not intended for use by children without adult supervision.
3. Contido do paquete
The Varstrom 48V 750W Rear Hub Motor Ebike Conversion Kit typically includes the following components. Please verify all items are present upon unboxing.
- Rear Wheel with Integrated Hub Motor
- Controlador
- Brake Levers (or Hydraulic Brake Sensors)
- Acelerador de polgar
- Estuche do controlador
- PAS (Sensor de asistencia ao pedaleo)
- 1T4 Cable (Main wiring harness)
- Faro frontal
- Adhesivo
- Plastic Straps
- Optional: Varstrom LCD Display (VD03, EKD01, or VD04)
- Optional: Battery

Image 3.1: Visual representation of the typical package contents for the Varstrom ebike conversion kit.
4. Especificacións
Key technical specifications for the Varstrom 125XVH-750 Rear Hub Motor and associated components:

Image 4.1: Detailed motor specifications, including dimensions, power, speed, and environmental ratings.
| Característica | Especificación |
|---|---|
| Marca | Varstrom |
| Modelo | 125XVH-750 |
| Tipo de motor | Gear Drive Brushless Rear Hub Motor |
| Potencia nominal | 750 W |
| Potencia máxima | 1056 W |
| Voltage | 48 V |
| Velocidade máxima | 55-60 KM/H (37 MPH) |
| Par máximo | 80 Nm |
| Buraco do radio | 36H * 12G |
| Compatibilidade dos freos | Freo de disco / Freo en V |
| Compatibilidade de casetes | ≤10 velocidades |
| Eficiencia | >80% |
| Grao de ruído | <60 db |
| Clasificación impermeable | IPX5 |
| Temperatura de funcionamento | -20 °C ~ 45 °C |
| Rear Dropout Spacing | 135-145 mm |
| Controller Rated Voltage | 48 V |
| Controller Rated Power | 750 W |
| Controller Limit Current | 22 ± 1A |
| Controller Rated Current | 11 ± 1A |
| Controller Under-Voltage Protección | 39 ± 1 V |
| Controller Over-Voltage Protección | 62.4 V |
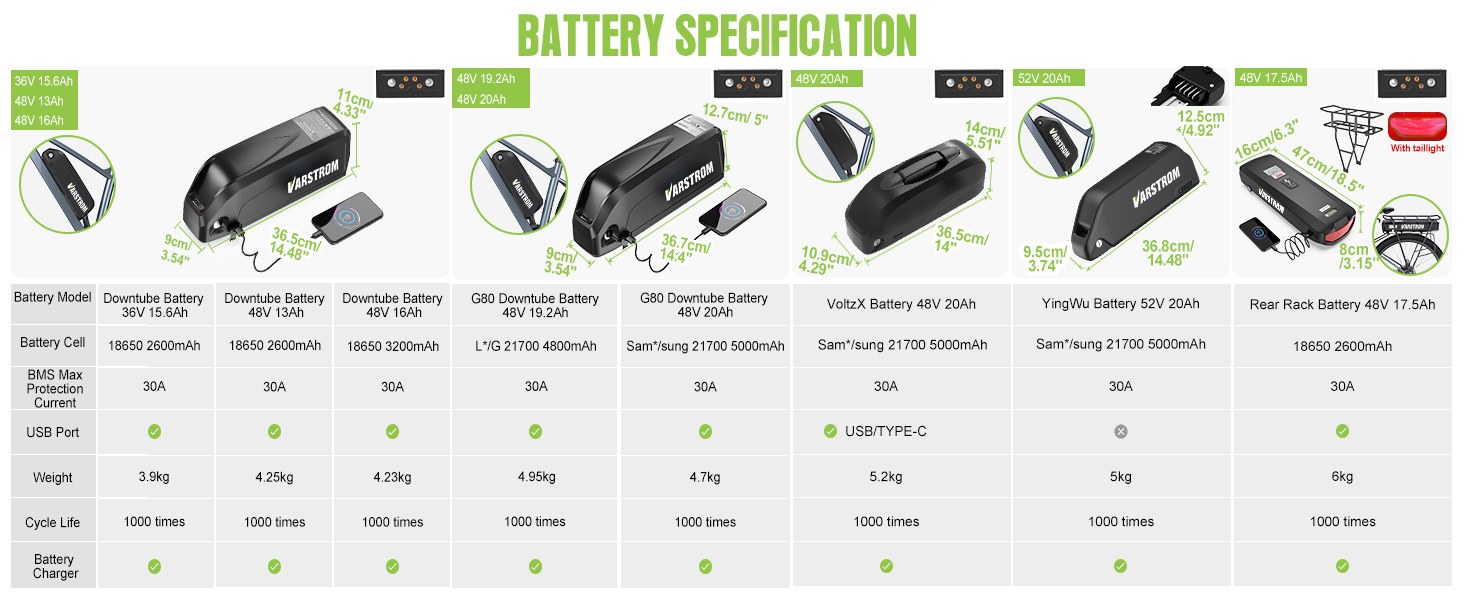
Image 4.2: Specifications for optional Varstrom batteries, including capacity, cell type, weight, and cycle life.
5. Configuración e instalación
Careful installation is crucial for the performance and safety of your ebike. If you are unsure about any step, consult a professional bicycle mechanic.
5.1. Bicycle Compatibility
Ensure your bicycle frame is compatible with the Varstrom 125XVH-750 kit. The motor is designed for 26", 27.5", and 700C wheel sizes and requires a rear dropout spacing of 135-145mm.

Image 5.1: Instructions for determining the correct wheel size for your bicycle by checking tire markings.

Image 5.2: Visual guide to selecting the correct wheel size (26", 27.5", 28"/29"/700C) based on rim diameter and compatible tire width.

Image 5.3: Illustration of rear dropout spacing (135-142mm) and compatibility with V-brakes and disc brakes.
5.2. Component Installation and Wiring
Follow the wiring diagram carefully to connect all components. Ensure all connections are secure and waterproof where applicable.

Image 5.4: Comprehensive wiring diagram illustrating the connection points for the controller, motor, battery, display, throttle, brake levers, PAS sensor, and headlight.

Image 5.5: Simplified installation overview and detailed information on the PAS sensor, including its function and recommended left-side installation.
- Roda do motor do cubo traseiro: Replace your bicycle's rear wheel with the motor wheel. Ensure the dropout spacing is correct (135-145mm) and secure the wheel properly.
- Controlador: Mount the controller securely, preferably in the provided controller case, in a location protected from impact and moisture.
- Sensor PAS: Install the PAS sensor on the left side of the crank arm. The KD-2PS-L sensor, equipped with 12 magnets, detects pedal rotation for pedal assistance.
- Brake Levers/Sensors: Install the brake levers or hydraulic brake sensors. These are crucial for safety as they cut off motor power when brakes are applied.
- Acelerador do polgar: Mount the thumb throttle on the handlebar for manual power control.
- Pantalla (opcional): If using an optional display, mount it on the handlebar.
- Faro principal: Install the headlight for improved visibility.
- Batería (opcional): Securely mount the battery according to its design (e.g., downtube, rear rack). Ensure it is fully charged before first use.
- Cableado: Connect all components using the 1T4 cable and other provided wiring. Ensure all connectors are firmly seated and that cables are routed safely, away from moving parts and potential pinch points. Use plastic straps to tidy up wiring.
6. Instrucións de funcionamento
Once installed, familiarize yourself with the operation of your Varstrom ebike kit.
6.1. Acendido/apagado
Typically, the system is powered on by pressing and holding the power button on the display or controller. Repeat to power off.
6.2. Funcións de visualización
The optional Varstrom displays (VD03, EKD01, VD04) provide various information and control options.

Image 6.1: Comparison table detailing features of the VD03, EKD01, and VD04 display options, including screen size, PAS levels, waterproofing, and connectivity.
- Axuste do nivel de PAS: Use the '+' and '-' buttons on the display to adjust the Pedal Assist System (PAS) level. There are 9 PAS levels, with higher levels providing more motor assistance.
- Velocidade e distancia: The display shows current speed, trip distance, total distance, and other riding metrics.
- Indicador de batería: Monitor the battery charge level on the display.
- Función Bluetooth: EKD01 and VD04 displays support Bluetooth connectivity, allowing for remote locking/unlocking and advanced ride data tracking via the 'BIKEGO+' app.
- Navigation Function: The VD04 display includes a navigation feature.
- Quick-Switch to 25 km/h Street-legal Mode: For compliance with certain regulations, you can activate a 25 km/h speed limit mode by holding the '+' and '-' buttons simultaneously on compatible displays.

Imaxe 6.2: Primeiro plano view of the VD03 display, highlighting its 1.5" LCD screen, 9 PAS levels, and Bluetooth functionality.

Imaxe 6.3: Primeiro plano view of the EKD01 display, showcasing its 2.4" TFT screen, IP67 waterproof rating, and navigation support.

Imaxe 6.4: Primeiro plano view of the VD04 display, highlighting its 3.5" IPS screen, Bluetooth, and navigation capabilities.
6.3. Funcionamento do acelerador
The thumb throttle provides on-demand power. Apply the throttle gently to accelerate. Release the throttle or apply brakes to cut power.
7. Mantemento
Regular maintenance ensures the longevity and safe operation of your ebike conversion kit.
- Coidado da batería: Cargue a batería regularmente, mesmo cando non a estea a usar, para manter o seu estado. Garde a batería nun lugar fresco e seco. Evite descargala completamente.
- Limpeza: Keep the motor, controller, and battery free from dirt and debris. Use a damp pano para limpeza; evite lavar a alta presión directamente sobre os compoñentes eléctricos.
- Conexións: Periodically check all electrical connections for tightness and corrosion. Ensure waterproof connectors are properly sealed.
- Freos: Regularly inspect brake pads and cables (or hydraulic fluid) and adjust as needed. Ensure the brake cut-off sensors are functioning correctly.
- Pneumáticos: Maintain correct tire pressure and inspect tires for wear or damage.
- Mantemento xeral de bicicletas: Continue to perform regular maintenance on your bicycle's mechanical components, such as chain lubrication, gear adjustments, and bearing checks.
8 Solución de problemas
This section addresses common issues you might encounter. For problems not listed here, contact Varstrom support.
| Problema | Causa posible | Solución |
|---|---|---|
| O motor non axuda | Batería baixa ou apagada Conexión eléctrica solta Palancas de freo activadas Problema co sensor PAS | Check battery charge and power on Inspect all wiring connections Asegúrate de que as pancas de freo estean completamente soltas Check PAS sensor alignment and wiring |
| A pantalla non se acende | Batería baixa ou apagada Conexión solta da pantalla | Check battery charge and power on Ensure display cable is securely connected |
| Reduced power or range | Carga baixa da batería Presión dos pneumáticos baixa Riding in high PAS levels constantly Degradación da batería | Carga completamente a batería Infle os pneumáticos á presión recomendada Use lower PAS levels when possible Considere a substitución da batería se é antiga |
| Ruídos pouco comúns do motor | Loose spokes Obxecto estraño no motor Problema motor interno | Comprobe a tensión dos raios Inspect for debris near motor Contact Varstrom support if issue persists |
9. Garantía e soporte
For warranty information, please refer to the documentation provided with your purchase or contact Varstrom directly. Keep your proof of purchase for warranty claims.
If you require technical assistance or have questions regarding your Varstrom ebike conversion kit, please visit the official Varstrom websitio web ou póñase en contacto cos seus canais de atención ao cliente.