
1. Introdución
Thank you for choosing the Hama Usedom Weather Station. This device provides digital display of indoor and outdoor temperature, humidity, time, date, and a weather forecast. It features a DCF radio-controlled clock for automatic time adjustment and a frost alarm. Please read this instruction manual carefully before initial use to ensure proper operation and safety.
2. Instrucións de seguridade
- Protexa o produto da sucidade, da humidade e do sobreenriquecido.
- Non deixe caer o produto nin o expoña a golpes fortes.
- Non abra o dispositivo nin continúe facéndoo funcionar se está danado.
- Manteña este produto, como todos os produtos eléctricos, fóra do alcance dos nenos.
- Eliminar o material de embalaxe inmediatamente segundo a normativa local aplicable.
- Non modifiques o produto de ningún xeito. Facelo anula a garantía.
- Use o produto só para o propósito previsto.
- Non use o produto nas proximidades inmediatas de quentadores ou outras fontes de calor nin baixo a luz solar directa.
3. Contido do paquete
Comprobe que o paquete contén os seguintes elementos:
- 1x Hama Usedom Weather Station (Main Unit)
- 1x Outdoor Sensor
- 1x Unidade de alimentación
- 2x AA Mignon Batteries (for sensor)
- 1 x manual de instrucións

Image: The main weather station unit, the outdoor sensor, and the power adapter included in the package.
4. Produto rematadoview
4.1 Unidade principal

Image: Front display of the weather station, showing various readings and icons.
- Visualización do tempo
- Date and Day display
- Iconas de predición do tempo
- Indicador de temperatura e humidade interiores
- Visualización da temperatura e humidade exteriores
- Frost alarm indicator
- DCF radio signal indicator
4.2 Back Panel Controls
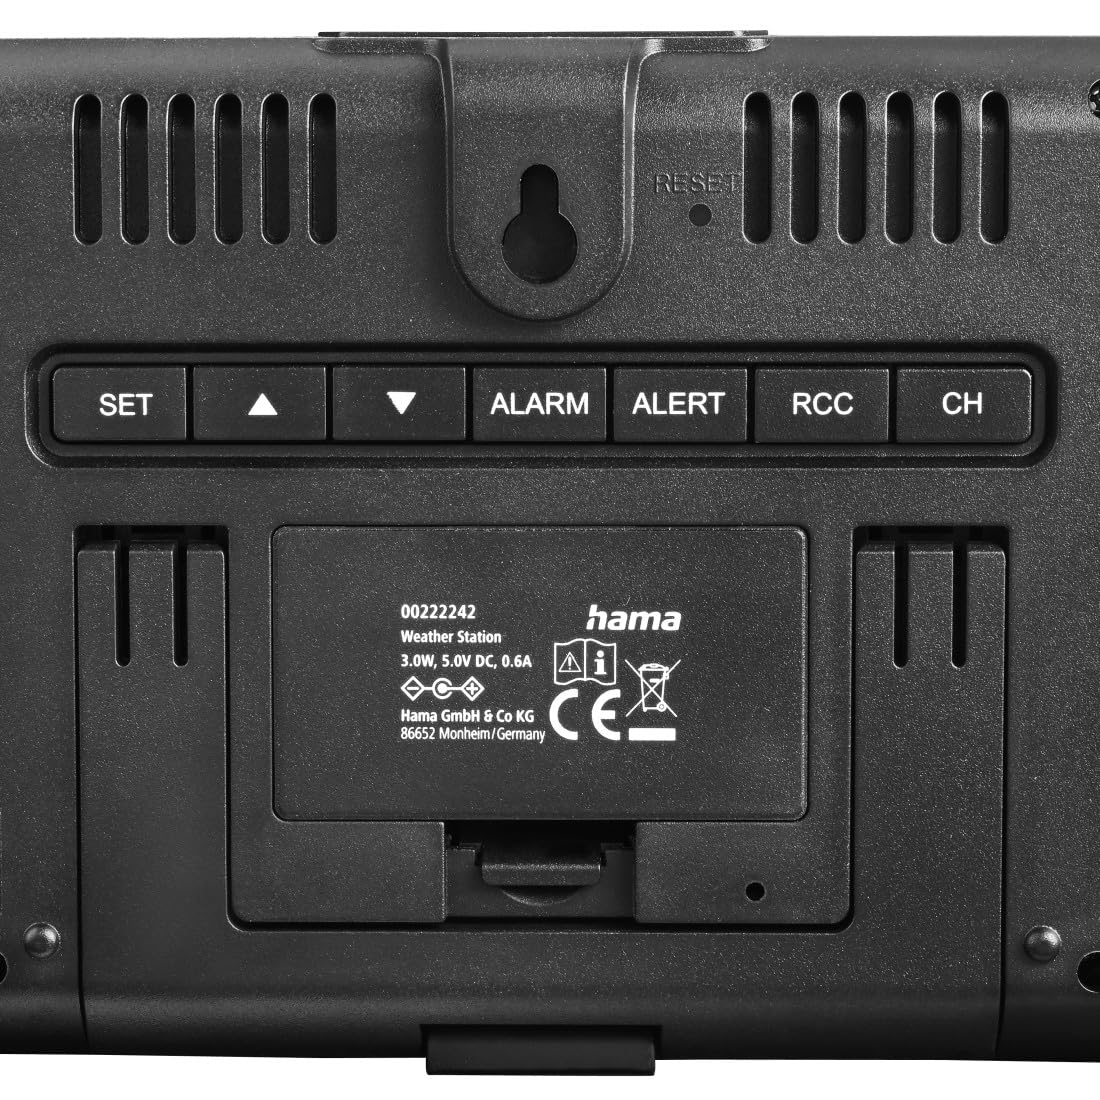
Imaxe: Traseira view of the main unit, highlighting the control buttons and power input.
- SET button: Enters setting mode.
- ▲ (UP) button: Increases values, navigates menus.
- ▼ (DOWN) button: Decreases values, navigates menus.
- ALARMA button: Sets or activates/deactivates alarm.
- ALERTA button: Sets temperature alerts.
- RCC button: Manually initiates DCF signal reception.
- CH button: Switches between outdoor sensor channels.
- RESET button: Resets the device to factory settings (use a thin object to press).
- SNOOZE / LUZ button (top): Activates backlight, snoozes alarm.

Image: Close-up of the SNOOZE/LIGHT button on top of the main unit.
4.3 Sensor exterior
The outdoor sensor measures external temperature and humidity and transmits data wirelessly to the main unit.

Image: The outdoor sensor positioned on a window sill.
5. Configuración
5.1 Battery Installation (Outdoor Sensor)
- Abra o compartimento das baterías na parte traseira do sensor exterior.
- Insert the two AA Mignon batteries, ensuring correct polarity (+/-).
- Pecha o compartimento da batería de forma segura.
5.2 Alimentación da unidade principal
The main unit can be powered via the included power supply unit.
- Connect the power supply unit to the main unit's power input.
- Enchufe a fonte de alimentación nunha toma de corrente adecuada.
- The display will light up, and the unit will begin searching for the DCF signal and outdoor sensor.
Nota: The main unit can also use 2x AA batteries (not included) for backup power, but it is primarily designed to be powered by the adapter for continuous display illumination.
5.3 Sincronización inicial
After powering on, the weather station will automatically attempt to synchronize with the DCF radio signal and connect to the outdoor sensor.
- Place the main unit and outdoor sensor close to each other during initial setup.
- The DCF signal icon will flash during reception. Once successful, the icon will appear solid, and the correct time will be displayed. This process may take several minutes.
- The outdoor temperature and humidity will appear on the display once the sensor connects.
5.4 Colocación do sensor exterior
Para obter lecturas precisas no exterior, teña en conta o seguinte:
- Mount the outdoor sensor in a shaded, dry location, protected from direct sunlight and rain.
- Avoid placing it near heat sources (e.g., vents, windows that get direct sun) or large metal objects that could interfere with the signal.
- Ensure the sensor is within the effective transmission range (typically up to 30 meters in open areas) of the main unit.
6. Funcionamento da estación meteorolóxica
6.1 Mostrar información
The main display shows:
- Data e hora: Automatically set by the DCF signal.
- Indoor Temperature/Humidity: Medido pola unidade principal.
- Outdoor Temperature/Humidity: Received from the outdoor sensor.
- Pronóstico do tempo: Based on atmospheric pressure changes, displayed with icons (sunny, partly cloudy, cloudy, rainy).
- Alarma de xeadas: An icon will appear when the outdoor temperature is between -1°C and +1°C.
6.2 Axuste manual da hora e da data
If the DCF signal is not available or you wish to set the time manually:
- Manteña premido o SET button for approximately 3 seconds to enter setting mode.
- The setting value will flash. Use the ▲ or ▼ botóns para axustar o valor.
- Preme SET again to confirm the setting and move to the next parameter (e.g., 12/24 hour format, hour, minute, year, month, day, temperature unit °C/°F).
- After setting all parameters, press SET para saír do modo de configuración.
6.3 Configuración da alarma
- Preme o ALARMA botón unha vez para mostrar a hora da alarma.
- Manteña premido o ALARMA button for approximately 3 seconds to enter alarm setting mode.
- Usa o ▲ or ▼ botóns para axustar a hora e os minutos.
- Preme ALARMA para confirmar cada configuración.
- Para activar/desactivar a alarma, prema o botón ALARMA botón repetidamente ata que apareza/desapareza a icona da alarma.
6.4 Snooze and Backlight
Preme o SNOOZE / LUZ button on the top of the unit:
- When an alarm sounds, press this button to activate the snooze function (alarm will sound again after a few minutes).
- At any other time, press this button to temporarily illuminate the display backlight.
6.5 Configuración da alerta de temperatura
The device allows setting alerts for specific outdoor temperatures.
- Preme o ALERTA button to cycle through alert settings (e.g., high temperature alert, low temperature alert).
- Manteña premido o ALERTA botón para entrar no modo de configuración de alertas.
- Use ▲ or ▼ to adjust the desired temperature threshold.
- Preme ALERTA para confirmar e pasar á seguinte configuración.
- To activate/deactivate an alert, press ALERTA repeatedly until the alert icon appears/disappears.
7. Mantemento
- Limpe este produto só cun lixeiro damp, pano sen pelusa e non use produtos de limpeza agresivos.
- Asegúrate de que non entre auga no produto.
- Replace batteries in the outdoor sensor when the low battery indicator appears on the main unit.
- If the product is not used for an extended period, remove the batteries.
8 Solución de problemas
| Problema | Causa posible | Solución |
|---|---|---|
| Sen pantalla na unidade principal. | Sen electricidade ou baterías descargadas. | Ensure power adapter is connected or replace backup batteries. |
| Outdoor readings not displayed or incorrect. | Sensor out of range, low sensor batteries, or interference. | Move sensor closer, replace sensor batteries, or reposition to avoid interference. Press CH button to re-sync. |
| DCF time not synchronizing. | Weak signal, interference, or incorrect time zone setting. | Move unit to a window, away from electronics. Manually initiate DCF search with RCC button. Set time manually if necessary. |
| Weather forecast seems inaccurate. | Weather forecasts are based on atmospheric pressure changes and are estimates. | This is normal. The forecast is a prediction based on local pressure trends, not a satellite forecast. |
9. Especificacións
| Número de modelo | 00222242 |
| Tipo de visualización | LED (VA Display) |
| Fonte de alimentación (unidade principal) | Power Adapter (5.0V DC, 0.6A), 2x AA Mignon Batteries (backup) |
| Fonte de alimentación (sensor) | 2x AA Mignon Batteries (included) |
| Tecnoloxía de conectividade | Radiofrecuencia (433 MHz) |
| Precisión da temperatura | ±0.5 °C |
| Características especiais | DCF Radio Controlled Clock, Frost Alarm, Adjustable Brightness, Large Display |
| Dimensións (unidade principal) | Aprox. 15.6 cm (largura) x 11.4 cm (altura) x 3.1 cm (profundidade) |
| Dimensións (sensor) | Aprox. 4.4 cm (largura) x 10.2 cm (altura) x 3 cm (profundidade) |

Image: Dimensional drawing of the main unit and outdoor sensor.
10. Garantía e soporte
Hama GmbH & Co KG provides a manufacturer's warranty for this product. For detailed warranty conditions, please refer to the warranty card included with your product or visit the official Hama websitio.
For technical support or service inquiries, please contact your local Hama customer service or visit www.hama.com para máis información.


