
1. Introdución
This manual provides detailed instructions for the installation, operation, and maintenance of your MakeSkyBlue 60A MPPT Solar Charge Controller V124 with CloudBOX. This advanced controller is designed for stable, efficient, and intelligent solar charging in various applications, including home, RV, cabin, and off-grid power systems.
Características principais:
- Upgraded 60A MPPT Controller with CloudBOX: New generation controller for stable, efficient, and intelligent solar charging.
- Advanced MPPT Charging Technology: True 100% MPPT algorithm and intelligent DSP control for faster, more precise power point tracking, improving efficiency by up to 30% compared to PWM controllers.
- Smart Battery Management: Automatic detection of 12V/24V/48V systems and 3-stage charging (Bulk, Absorption, Float). Supports AGM, Gel, and Flooded batteries.
- Sistema de protección integral: Protection against overcharge, over-discharge, overheating, reverse polarity, and short circuit.
- User-Friendly & Expandable Design: LCD display for real-time data and charging status. Supports parallel connection.
2. Información de seguridade
Lea atentamente todas as instrucións e advertencias antes da instalación e o funcionamento. O incumprimento destas instrucións pode provocar descargas eléctricas, incendios ou lesións graves.
Precaucións xerais de seguridade:
- Instale o controlador nunha zona ben ventilada, lonxe de materiais inflamables.
- Asegúrese de que o sistema estea ben conectado a terra.
- Do not disassemble or attempt to repair the controller. Contact qualified personnel for service.
- Keep children away from the solar power system components.
Seguridade eléctrica:
- Always disconnect the solar panel array and battery bank before installing or servicing the controller.
- Empregar disyuntores e fusibles axeitados para todas as conexións.
- Ensure all wiring is correctly polarized (+ to + and - to -). Reverse polarity can damage the controller and other components.
- Use insulated tools to prevent accidental short circuits.
- Verify that the solar panel open-circuit voltage (VOC) does not exceed the controller's maximum input voltage (160 VDC).
3. Produto rematadoview
The MakeSkyBlue 60A MPPT Solar Charge Controller V124 is a robust device designed for optimal solar energy harvesting. It features a durable aluminum casing for heat dissipation and an intuitive LCD display for monitoring.
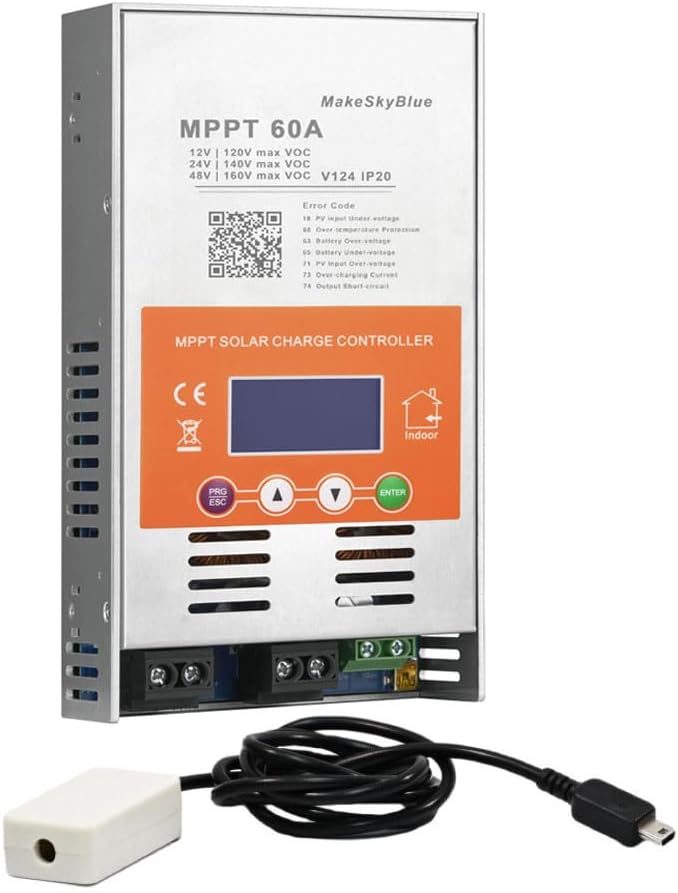
Figure 1: MakeSkyBlue 60A MPPT Solar Charge Controller V124 with CloudBOX
Compoñentes:
- MPPT Solar Charge Controller Unit
- CloudBOX (for remote monitoring/control)
- Manual de usuario
Descrición FÍSICA:
The controller features a metallic enclosure with ventilation slots and a cooling fan for temperature management. The front panel includes an LCD display and control buttons. Connection terminals for solar input, battery, and DC load are located at the bottom.

Figure 2: Controller Dimensions (8.46 x 4.52 x 1.96 inches)
Pantalla LCD:
The LCD provides real-time data and status indicators. It typically shows:
- Entrada PV Voltage (PV)
- Batería Voltage (BATT)
- Charging Current (CHARGE)
- Load Output (LOAD)
- Operating Mode (e.g., 24H for continuous load, 00H for light control)
- Temperature (TEMP)
- Error Codes (FAULT)
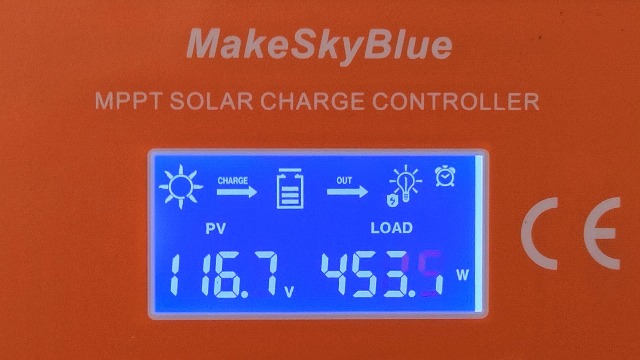
Figure 3: LCD Display Interface
4. Configuración e instalación
Unha instalación axeitada é fundamental para o funcionamento seguro e eficiente do seu controlador de carga solar. Siga estes pasos atentamente.
4.1 Montaxe do controlador:
- Choose a dry, well-ventilated indoor location, protected from direct sunlight, high temperatures, and moisture.
- Ensure adequate clearance (at least 75mm) around all sides of the controller for proper airflow and heat dissipation.
- Securely mount the controller to a stable surface using appropriate screws.

Figure 4: Temperature Protection and Mounting Considerations
4.2 Conexións de cableado:
Connect the components in the following order to prevent damage:
- Conecte a batería: Connect the battery to the controller's battery terminals (+ to + and - to -). Ensure a secure connection. The controller will automatically detect the system voltage (12 V/24 V/48 V).
- Conecta os paneis solares: Connect the solar panel array to the controller's PV input terminals (+ to + and - to -). Ensure the PV open-circuit voltage non supera os 160VDC.
- Conectar a carga de CC (opcional): Connect your DC loads to the controller's load terminals (+ to + and - to -).

Figura 5: Diagrama de cableado típico do sistema
4.3 Parallel Connection (Optional):
The controller supports parallel connection for expanding your solar power system. Refer to the official video for detailed instructions on parallel setup and communication line configuration.
Video 1: HHJ60-PRO Paralleling Guide. This video demonstrates the installation and configuration of multiple controllers for parallel operation, including wiring and communication settings.
5. Instrucións de funcionamento
After successful installation, the controller will power on and display the main interface. Use the control buttons to navigate and adjust settings.
5.1 LCD Display Navigation:
Use the "Up" and "Down" arrow buttons to cycle through different display interfaces, showing PV voltage, batería voltage, charging current, load status, temperature, and error codes.
Video 2: MPPT Controller Connected | Real-Time LCD Display Demo. This video illustrates how to navigate the LCD display to view real-time system data.
5.2 Configuración de parámetros:
To enter the settings interface, press the "PRG/ESC" button. Use the "Up" and "Down" arrows to adjust values and "ENTER" to confirm. Key settings include:
- d00 (Load Operating Mode): Configure how the DC load operates (e.g., 24H for continuous, 00H for light control, 1H-23H for timed operation).
- d01 (Charging Voltage): Establece o volume de carga de aumentotage.
- d02 (Float Charging Voltage): Establecer o volumen de carga flotantetage.
- d03 (Low Voltage Protección): Set the battery low voltaglimiar de desconexión (LVD).
- d04 (Battery Voltage Calibración): Calibrate the displayed battery voltage if it differs from a multimeter reading.
- d05 (Parallel Communication Code): Define the communication address for parallel operation (lowest code acts as master).
- d06 (Battery Type): Select the battery type (e.g., Sealed, Gel, Flooded, Lithium Iron Phosphate). Choosing "USE" allows manual settings for d01, d02, and d03.
- d07 (System Voltage): Configure the system voltage (e.g., 12V, 24V, 48V).
Video 3: D01-D06 Parameter Setting Information. This video guides you through adjusting various operational parameters of the controller.
6. Mantemento
Un mantemento regular garante un rendemento óptimo e unha maior duración do seu controlador de carga solar.
- Limpeza: Manteña o controlador limpo e libre de po e residuos. Use un pano seco para limpar.
- Conexións: Comprobe periodicamente todas as conexións do cableado para comprobar se están ben apertadas e se presentan corrosión.
- Ventilación: Asegúrate de que as aberturas de ventilación non estean bloqueadas para permitir unha disipación axeitada da calor.
- Actualizacións de firmware: Consulte o do fabricante websitio web para ver se hai actualizacións de firmware dispoñibles para mellorar o rendemento ou obter novas funcións.
7 Solución de problemas
If you encounter issues with your controller, refer to the following common problems and their solutions. The LCD display may show error codes to help diagnose the problem.
Códigos de erro:
| Código | Descrición | Posible causa/solución |
|---|---|---|
| E1 | Sobrevol de entrada PVtage | Array fotovoltaico voltage exceeds maximum allowed. Reduce the number of solar panels in series. |
| E2 | PV input under-voltage | Array fotovoltaico voltage is too low. Check solar panel connections, ensure sufficient sunlight. |
| E3 | Protección contra sobretemperatura | Controller is overheating. Ensure adequate ventilation and ambient temperature. |
| E4 | Batería excesiva de voltage | Batería voltage supera o conxunto sobre-voltage protection. Check battery settings (d01, d02). |
| E5 | Batería baixo voltage | Batería voltage is below the set low voltage protection. Charge battery or reduce load. |
| E6 | Sobrecorriente de entrada PV | PV array current exceeds maximum allowed. Check PV array configuration. |
| E7 | Curtocircuíto de saída | Short circuit detected on the load output. Disconnect load, check wiring, and reconnect. |
| E8 | Sobrecarga de saída | Load current exceeds maximum allowed. Reduce the connected load. |
Consellos xerais para a resolución de problemas:
- If the controller is not charging, ensure solar panels are receiving adequate sunlight and all connections are secure.
- If the load is not working, check the load operating mode (d00) and ensure the battery has sufficient charge.
- For persistent issues, power cycle the controller by disconnecting the solar panels, then the battery, waiting a few minutes, and reconnecting in the correct order (battery first, then solar).
8. Especificacións
| Característica | Especificación |
|---|---|
| Modelo | 60A-V124 |
| Sistema Voltage | 12V/24V/48V Auto-detection |
| Vol. de entrada PV máxtage | 160VDC |
| Corrente de carga nominal | 60A |
| Tipos de baterías compatibles | AGM, Gel, Flooded, Lithium |
| Algoritmo de carga | 3-Stage (a granel, absorción, flotación) |
| Tipo de visualización | LCD |
| Material | Aluminio |
| Peso do elemento | 3.5 libras |
| Dimensións do paquete | 8.46 x 4.52 x 1.96 polgadas |
| Compoñentes incluídos | Solar Charge Controller, CloudBOX, User Manual |
9. Garantía e soporte
For warranty information, technical support, or service inquiries, please contact MakeSkyBlue customer service through the retailer where the product was purchased or visit the official MakeSkyBlue websitio. Teña á man o modelo do produto e a data de compra cando contacte co servizo de asistencia.