
Introdución
The TSV Quartz Clock Movement Replacement Kit provides a silent, non-ticking mechanism designed for repairing, replacing, or creating wall clocks and grandfather clocks. This kit includes a musical chime feature, multiple sets of clock hands, and all necessary mounting accessories. It offers accurate timekeeping with a smooth, quiet sweep movement, powered by AA batteries. This manual will guide you through the installation, operation, and maintenance of your new clock movement.
Información de seguridade
- Manexo da batería: Use only AA batteries. Do not mix old and new batteries, or different types of batteries. Insert batteries with correct polarity (+/-). Remove batteries if the clock will not be used for an extended period.
- Risco de asfixia: Small parts are included. Keep out of reach of children.
- Instalación: Ensure the clock hands are handled gently to prevent bending. Avoid excessive force during installation.
- Ambiente: This product is designed for indoor use only. Avoid exposure to extreme temperatures or humidity.
Contido do paquete
Comprobe que todos os compoñentes estean presentes no seu paquete:
- 1 x Quartz Clock Movement Mechanism
- 1 x Speaker for Chime Function
- 3 Sets of Clock Hands (Hour, Minute, Second)
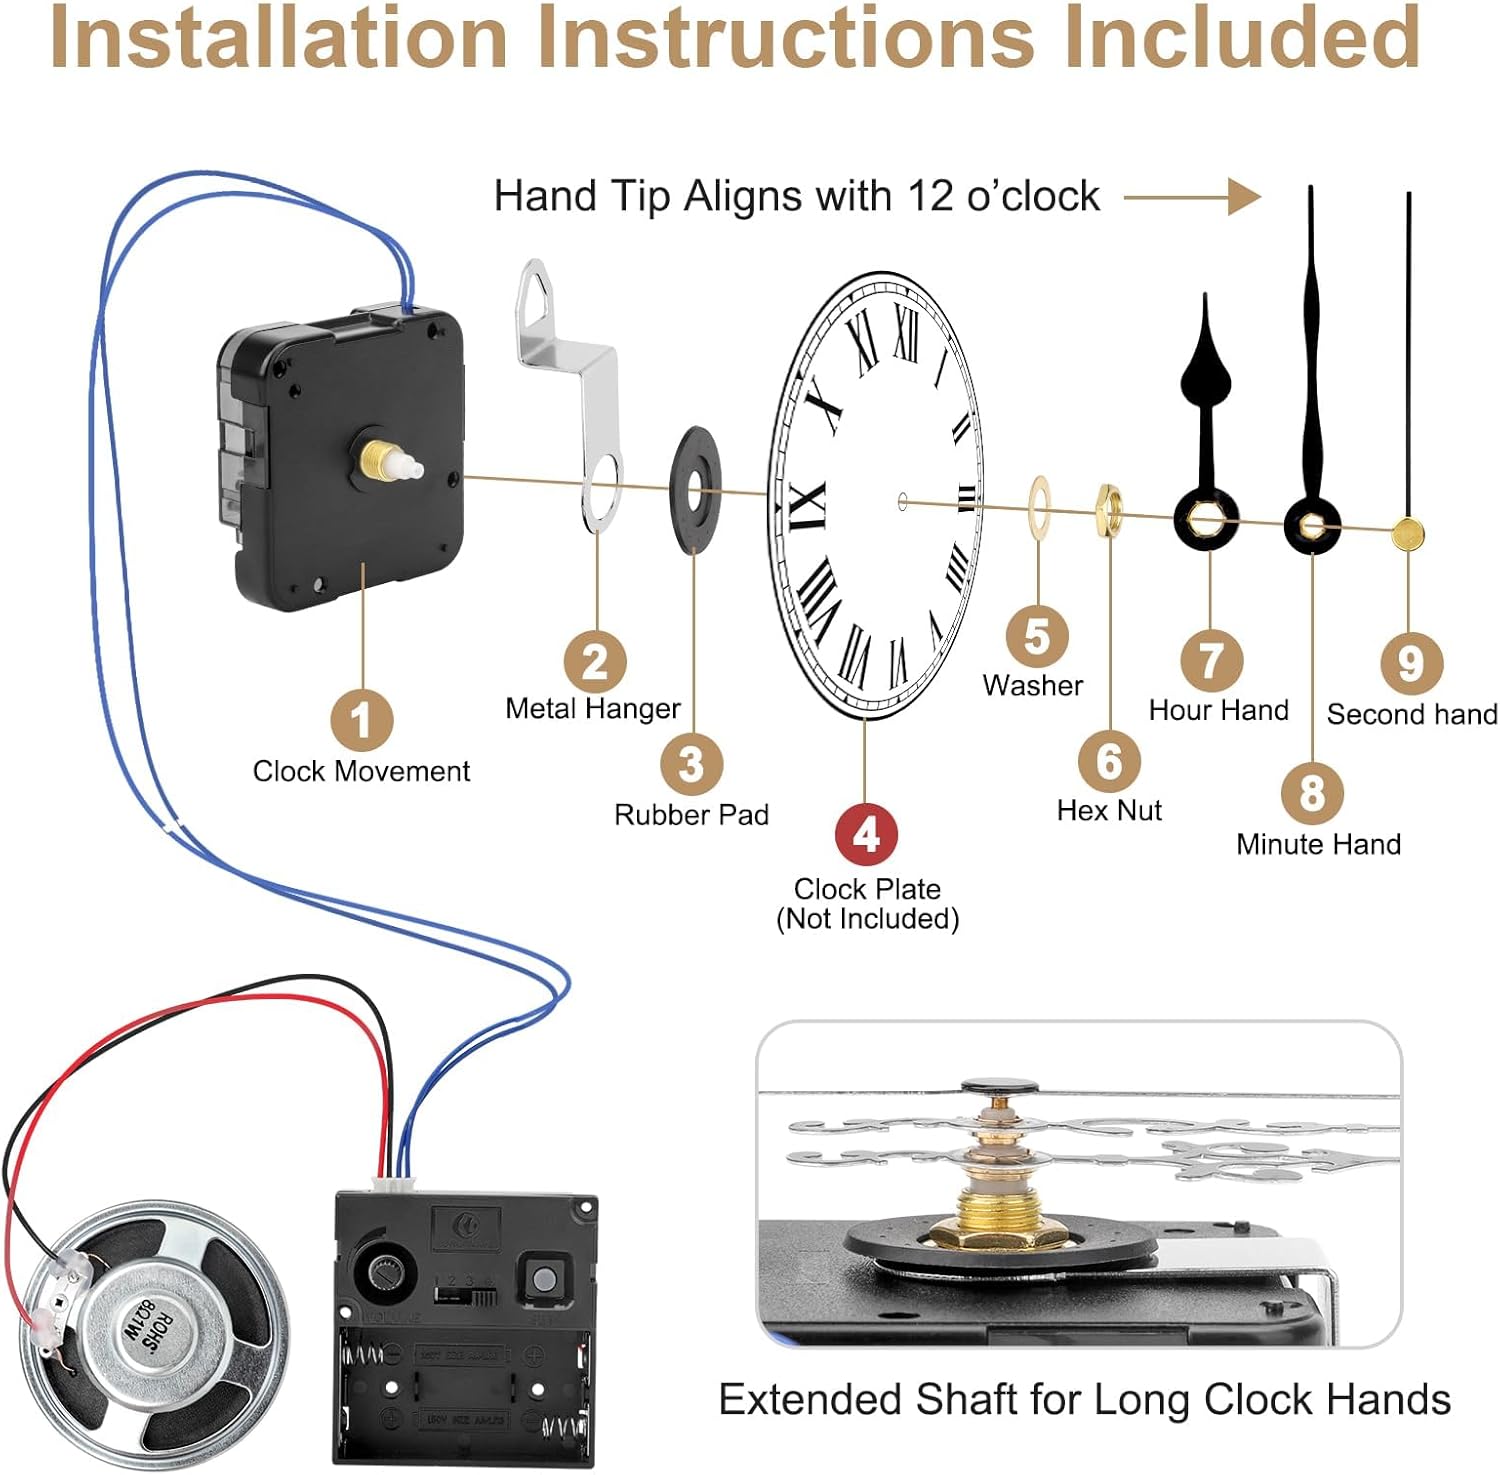
- Mounting Accessories (Metal Hanger, Rubber Pad, Washer, Hex Nut)
- Manual de usuario (este documento)
Nota: As pilas AA non están incluídas e deben mercarse por separado.
Especificacións
| Característica | Detalle |
|---|---|
| Marca | TSV |
| Número de modelo | H4C1570-L002626715FBA |
| Cor | Negro |
| Lonxitude do eixe | 13.55 mm (0.53 polgadas) |
| Threaded Shaft Length | 5.5 mm (0.22 polgadas) |
| Compatibilidade | Suitable for clock panels less than 7/64 inch thick |
| Fonte de enerxía | Alimentado por pilas (pilas AA, non incluídas) |
| Características especiais | Chime, Silent Clock |
| Tipo de visualización | Analóxico |
| Tipo de montaxe | Soporte de parede |
| Material do marco | Aluminio e Plástico |
| Peso do elemento | 100 g |
| Dimensións do paquete | 15.29 x 6.4 x 3.71 cm |
Please refer to the image below for detailed dimensions of the clock movement and speaker.

Ensure the shaft length and threaded shaft length are compatible with your clock face thickness. The kit is suitable for clock panels less than 7/64 inch thick.

Instrucións de configuración
Follow these steps to install the clock movement and hands:
- Prepare the Clock Face: Ensure your clock face has a central hole suitable for the clock movement shaft. The kit is compatible with clock panels less than 7/64 inch thick.
- Install the Movement: Insert the clock movement (1) through the back of the clock face.
- Secure the Movement: Place the rubber pad (3) over the shaft on the front of the clock face, followed by the washer (5) and then tighten the hex nut (6) to secure the movement. Do not overtighten.
- Attach Clock Hands:
- Gently press the hour hand (7) onto the shaft, aligning it with the 12 o'clock position.
- Next, press the minute hand (8) onto the shaft, also aligning it with the 12 o'clock position.
- Finally, press the second hand (9) onto the shaft.
Importante: Ensure the hour and minute hands are parallel to each other and do not touch. Avoid bending the hands during installation. The tip of the hand should align with the 12 o'clock mark.
- Instalar batería: Open the battery compartment on the back of the clock movement. Insert one AA battery (not included), ensuring correct polarity.
- Connect Speaker: Plug the speaker wires into the designated port on the clock movement.
- Establecer hora: Use the time adjustment knob on the back of the movement to set the correct time.
Instrucións de funcionamento
Configuración do tempo
- After installing the battery, the clock will automatically reset to 6:00 AM.
- Use the time adjustment knob on the back of the movement to set the current time.
Función de timbre
The clock movement includes a musical chime feature with adjustable settings:

- Control de volume rotativo: Adjust the chime volume using the rotary knob located on the clock movement.
- Chime Time Setting: Press the gray SET button to advance the chime time by one hour.
- Important Note for Chime: During the first hour after setup, the 4x4 mode may not work correctly. After this initial hour, the chime function will operate normally. For example, if the chime is set at 10:25, it will activate at 11:00.
- Automatic Night Mode: The clock automatically silences the chime from 10:00 PM to 5:59 AM when the strike is set correctly.
Opcións de carrillón
You can select from various chime melodies:
- Ave Maria: Plays Ave Maria chime and strikes on the hour.
- 4x4 Westminster: Plays Westminster chime and strikes on the hour, with additional chimes at 15, 30, and 45 minutes.
- Westminster: Plays Westminster chime and strikes on the hour.
- Bim Bam: Strikes on the hour (e.g., 1 strike at 1:00, 2 strikes at 2:00).
Mantemento
- Substitución da batería: Replace the AA battery approximately once a year, or when the clock starts losing time or the chime weakens. Always replace with a fresh, high-quality AA battery.
- Limpeza: Use a soft, dry cloth to clean the clock movement and hands. Do not use liquid cleaners or abrasive materials.
- Almacenamento: Se garda o reloxo durante un período prolongado, retire a pila para evitar fugas e danos.
Resolución de problemas
| Problema | Causa posible | Solución |
|---|---|---|
| O reloxo non funciona / As agullas non se moven | Dead or incorrectly installed battery. Hands are stuck or bent. | Check battery polarity and replace with a fresh AA battery. Ensure hands are not touching each other or the clock face. Gently straighten any bent hands. |
| Chime not working or incorrect | Speaker not connected. Chime time not set correctly. 4x4 mode in initial hour. | Ensure speaker wires are securely plugged in. Use the SET button to adjust chime time. Wait for the first hour after setup for 4x4 mode to function correctly. |
| Reloxo perdendo ou gañando tempo | Low battery. Movement malfunction. | Replace the battery with a fresh one. If the problem persists, the movement may need replacement. |
| Hands are loose or fall off | Hands not pressed firmly enough during installation. | Carefully re-attach the hands, ensuring they are pressed firmly onto the shaft without bending. |
Información da garantía
Specific warranty details for this product are not provided in the available information. Please refer to the retailer's return policy or contact the seller directly for warranty inquiries.
Apoio
For further assistance or technical support, please contact the seller or refer to the product listing on the platform where it was purchased. Ensure you have your model number (H4C1570-L002626715FBA) and purchase details ready.