1. Introdución
This manual provides detailed instructions for the setup, operation, and maintenance of your VOOPEAK 4G Trail Camera, model TC31A. Designed for outdoor surveillance and wildlife observation, this camera features 32MP photo resolution, 1080P HD video recording, 850nm invisible infrared night vision, 4G cellular connectivity, and an IP66 waterproof rating.
Please read this manual thoroughly before using the camera to ensure optimal performance and longevity.
2. Información de seguridade
- Do not attempt to disassemble or modify the camera. Unauthorized modifications can void the warranty and cause damage.
- Use only specified batteries (8 AA batteries). Mixing old and new batteries or different types of batteries is not recommended.
- Ensure the battery compartment is securely closed to maintain the IP66 waterproof rating.
- Keep the camera away from extreme temperatures, direct sunlight for prolonged periods, and corrosive materials.
- Elimina as baterías segundo a normativa local.
3. Contido do paquete
Verifica que todos os elementos estean presentes no teu paquete:
- VOOPEAK TC31A 4G Trail Camera
- Cable de carga USB-C
- Mounting Strap/Bracket
- Manual de instrucións
- Integrated SIM Card (pre-installed)
Note: 8 AA batteries and a Micro SD card (up to 64GB) are not included and must be purchased separately.
4. Produto rematadoview
Familiarize yourself with the main components of your VOOPEAK TC31A Trail Camera.

Figura 4.1: Fronte view of the VOOPEAK TC31A 4G Trail Camera, showing the lens, PIR sensor, and integrated screen.

Figura 4.2: Interno view of the camera, highlighting the LCD screen, navigation buttons, and mode switch (OFF/SETUP/ON).

Figure 4.3: Close-up of the camera's internal compartment, showing the integrated SIM card slot and the Micro SD card slot (card not included).
- Lente principal: Captures 32MP photos and 1080P HD videos.
- Sensor de movemento PIR: Detects movement up to 20 meters.
- Infrared LEDs (2x 850nm): Provides invisible night vision for clear black and white images in low light.
- Pantalla LCD de 2 polgadas: For menu navigation, settings adjustment, and on-site photo/video review.
- Botóns de control: Navegar polos menús e confirmar as seleccións.
- Interruptor de modo: OFF, SETUP, ON.
- Integrated 4G SIM Card: Enables cellular connectivity for remote access.
- Ranura para tarxeta Micro SD: Admite ata 64 GB para almacenamento local.
- Antena externa: Enhances 4G signal reception.
- Compartimento de batería: Contén 8 pilas AA.
- Porto USB-C: For connecting to a computer or external power source (not for charging internal batteries).
5. Configuración
5.1 Instalación da batería
- Open the camera's side latches and open the housing.
- Localiza o compartimento da batería.
- Insira 8 pilas AA novas, asegurándose de manter a polaridade correcta (+/-).
- Close the battery compartment and secure the latches firmly to maintain waterproofing.
5.2 Instalación da tarxeta Micro SD
- With the camera powered OFF, locate the Micro SD card slot.
- Insira unha tarxeta Micro SD (clase 10 ou superior, ata 64 GB) na ranura ata que encaixe no seu lugar.
- Para retirala, empurre a tarxeta de novo ata que saia de golpe.
5.3 SIM Card Activation (Integrated)
The camera comes with an integrated 4G SIM card. To enable cellular functions and cloud services:
- Download the "TrailCam Go" application on your smartphone (available on iOS and Android app stores).
- Follow the in-app instructions to register your camera and activate the integrated SIM card. This typically involves scanning a QR code on the camera.
- Choose a suitable data plan for your needs. A trial period or special offer may be available for the first month.
5.4 Montaxe da cámara
The camera can be mounted using the provided strap or bracket.
- Localización: Escolle un lugar estable, como unha árbore ou un poste, que ofreza unha vista despexada. view da área de monitorización desexada.
- Altura: Mount the camera at a height appropriate for the subjects you wish to capture (e.g., animal eye level).
- Orientación: Ensure the camera is level and pointed correctly. Avoid pointing directly at the sun to prevent overexposure.

Figura 5.1: Example of the camera mounted on a tree using the provided strap.
6. Instrucións de funcionamento
6.1 Initial Configuration via LCD Screen
- Switch the mode selector to "SETUP". The LCD screen will turn on.
- Use the navigation buttons to browse the menu.
- Axusta configuracións como:
- Modo: Foto, Vídeo, Foto + Vídeo.
- Resolución fotográfica: Up to 32MP.
- Resolución de vídeo: 1080P HD.
- Sensibilidade PIR: Low, Medium, High (adjust based on environment to minimize false triggers).
- Retraso de detección: Time interval between detections.
- Data e hora: Establece a data e a hora actual.
- Gravación en bucle: Enable/Disable (overwrites oldest files when SD card is full).
- After configuring settings, switch the mode selector to "ON" to begin operation. The screen will turn off, and the camera will enter monitoring mode.
Figure 6.1: Using the integrated LCD screen for camera setup. Ensure the mode switch is in "SETUP" position.
6.2 Remote Monitoring via TrailCam Go App
Once the SIM card is activated and the camera is connected to the 4G network, you can remotely access its features via the "TrailCam Go" app.
- Open the "TrailCam Go" app on your smartphone.
- Your registered camera should appear in the device list.
- Desde a aplicación, podes:
- Receive real-time motion detection alerts.
- View captured photos and video replays (stored in the cloud).
- Adjust camera settings remotely.
- Check battery status and signal strength.

Figure 6.2: Real-time motion detection alerts received on a smartphone via the TrailCam Go app.

Figure 6.3: Accessing high-quality 32MP photos and 1080P videos through the TrailCam Go application.
6.3 Funcionamento da visión nocturna
The camera automatically switches to night vision mode in low light conditions. The two 850nm infrared LEDs provide illumination without visible flash, ensuring discreet capture of wildlife. Night vision images and videos will be in black and white.
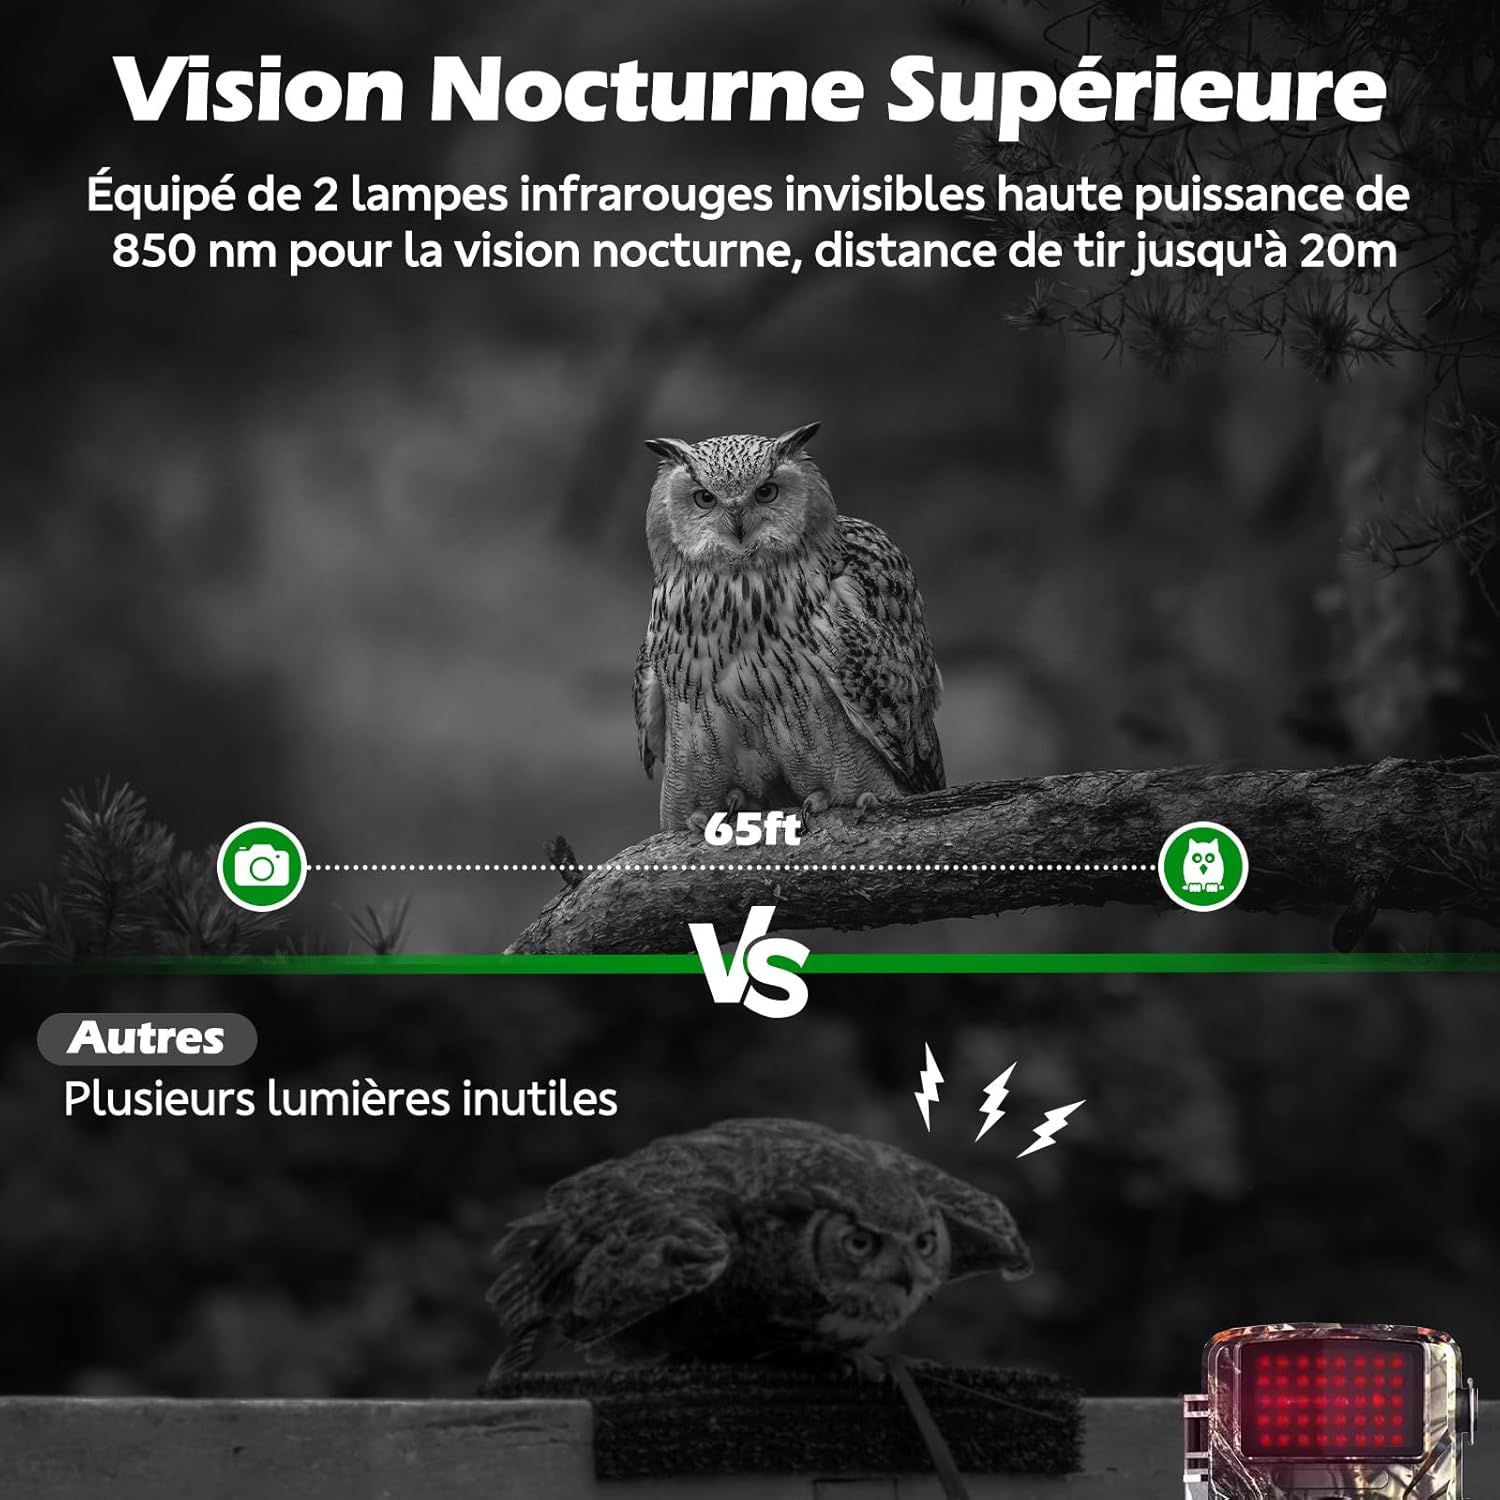
Figure 6.4: Superior night vision capability of the VOOPEAK TC31A, capturing clear images in darkness using invisible infrared light.
6.4 Gravación en bucle
When enabled in the camera settings, loop recording automatically overwrites the oldest files on the Micro SD card when it becomes full, ensuring continuous operation without manual intervention.

Figure 6.5: Loop recording ensures continuous capture by overwriting the oldest files cando a tarxeta SD estea chea.
7. Mantemento
- Limpeza: Use a soft, dry cloth to clean the camera lens and PIR sensor. Do not use abrasive cleaners or solvents.
- Substitución da batería: Replace all 8 AA batteries when the low battery indicator appears on the screen or in the app.
- Xestión da tarxeta SD: Regularly check the SD card capacity. Enable loop recording or manually delete old files para garantir a gravación continua.
- Actualizacións de firmware: Check the "TrailCam Go" app or VOOPEAK's official website for any available firmware updates to ensure optimal performance and new features.
8 Solución de problemas
| Problema | Causa posible | Solución |
|---|---|---|
| A cámara non se acende. | As baterías están baixas ou instaladas incorrectamente. | Substitúa as pilas por pilas AA novas, asegurándose de manter a polaridade correcta. |
| No photos/videos captured. | SD card full, incorrectly inserted, or corrupted. PIR sensitivity too low. Camera in OFF mode. | Check/replace SD card. Format SD card via camera menu. Increase PIR sensitivity. Ensure camera is in ON mode. |
| No 4G signal or remote access. | SIM card not activated. Poor cellular coverage. Data plan expired. | Verify SIM activation and data plan status in the app. Relocate camera to an area with better signal. |
| Blurry images/videos. | Lens is dirty. Camera is too close/far from subject. | Clean the lens. Adjust camera position relative to the subject. |
| Falsos desencadeantes. | PIR sensitivity too high. Heat sources or moving branches in detection zone. | Decrease PIR sensitivity. Clear detection zone of obstructions. |
9. Especificacións
| Nome do modelo | TC31A 4G Trail Camera |
| Marca | VOOPEAK |
| Tecnoloxía de conectividade | Wireless (4G Cellular) |
| Resolución fotográfica | 32 megapíxeles |
| Resolución de vídeo | 1080P HD @ 30fps |
| Viewángulo ing | 120 graos |
| Range de visión nocturna | 20 metros (65 pés) |
| LEDs IR | 2 x 850nm (Invisible) |
| Detección de movemento | Sensor PIR |
| Resistencia á auga | Impermeable IP66 |
| Fonte de enerxía | 8 pilas AA (non incluídas) |
| Almacenamento | Micro SD Card (up to 64GB, not included), Cloud Storage via App |
| Método de control | Integrated LCD Screen, Smartphone App ("TrailCam Go") |
| Dimensións | 19.5 x 8.5 x 12.5 cm |
| Temperatura de funcionamento | -25°C a 60°C |
10. Garantía e soporte
The VOOPEAK TC31A 4G Trail Camera comes with a 1 anos de garantía do fabricante desde a data de compra.
For technical support, warranty claims, or any questions regarding your product, please contact VOOPEAK customer service through the "TrailCam Go" application or visit the official VOOPEAK website. Please have your model number (TC31A) and purchase details ready when contacting support.
11. Recursos de vídeo
For visual guidance on setup and operation, please refer to official VOOPEAK video tutorials. If available, relevant videos will be embedded below.
Note: No specific video URLs with "creator_type":"Seller" were found in the provided product data. Please check the VOOPEAK official website or product page for available video resources.