1. Introdución e finalview
This manual provides essential instructions for the setup, operation, and maintenance of your Prechen HD-173 16.2-inch 2K Touchscreen Portable Monitor. Please read this manual thoroughly before using the device to ensure proper functionality and longevity.
Características principais:
- 16.2" 2K QHD IPS Panel: Features an 800 nits brightness, 178° viewing angle, and 1000:1 contrast ratio for vivid colors and sharp details.
- 10-Point Multi-Touch: Responsive touch functionality, optimized for interactive monitoring with Aida64 on Windows. (Note: iOS devices support single touch only).
- Dedicated Aida64 Monitoring: Designed as a secondary display for real-time CPU/GPU usage, temperatures, fan speeds, and custom sensor panels.
- Conectividade dual: Equipped with HDMI and USB-C ports for easy connection to laptops, PCs, and gaming consoles.
- Construción metálica premium: Durable full-metal casing suitable for PC case integration, portability, or DIY projects.
Important Note on Power and Touchscreen Configuration:
Due to its higher power consumption, always connect the monitor to a power source before plugging in the HDMI or USB-C signal cable. This ensures full touchscreen functionality and stable operation, especially with high brightness settings.

Image 1.1: The Prechen HD-173 16.2-inch 2K Touchscreen Portable Monitor, showcasinpolo seu deseño elegante e a súa pantalla vibrante.

Image 1.2: Multiple Prechen monitors arranged to display vibrant graphics, highlighting the visual quality.
2. Configuración
Follow these steps to connect your Prechen HD-173 monitor to your device.
2.1 Port Overview
Familiarize yourself with the available ports on your monitor:
- Conector de audio: Para conectar auriculares ou altofalantes externos.
- Type-C (Full-featured USB-C): Supports power, video, and touch signal transmission.
- HDMI: For video signal input.
- Potencia CC: Para fonte de alimentación externa.
- USB 2.0: For connecting peripherals or additional power.
- Luminance + / Volume - / Menu / ON / OFF buttons: For monitor control.

Imaxe 2.1: Detallada view dos portos e botóns de control do monitor.
2.2 Métodos de conexión
Always connect the power adapter to the monitor first to ensure stable power before connecting any signal cables.
Method 1: Full-featured USB-C Connection (USB-C 3.1 or higher)
This method requires a single USB-C to USB-C cable and a power adapter (required).
- Connect the power adapter to the monitor's DC Power or Type-C port.
- Connect one end of the USB-C to USB-C cable to the monitor's Type-C port.
- Connect the other end of the USB-C to USB-C cable to your device's full-featured USB-C port.
This connection provides video, touch, and power (if your device supports power delivery through USB-C).
Method 2: HDMI and USB Connection
This method requires an HDMI cable, a USB-A to USB-C cable (for touch functionality), and a power adapter (required).
- Connect the power adapter to the monitor's DC Power or Type-C port.
- Conecta un extremo do cable HDMI ao porto HDMI do monitor.
- Connect the other end of the HDMI cable to your device's HDMI port.
- Connect one end of the USB-A to USB-C cable to the monitor's Type-C port.
- Connect the USB-A end of the cable to your device's USB-A port for touch signal.
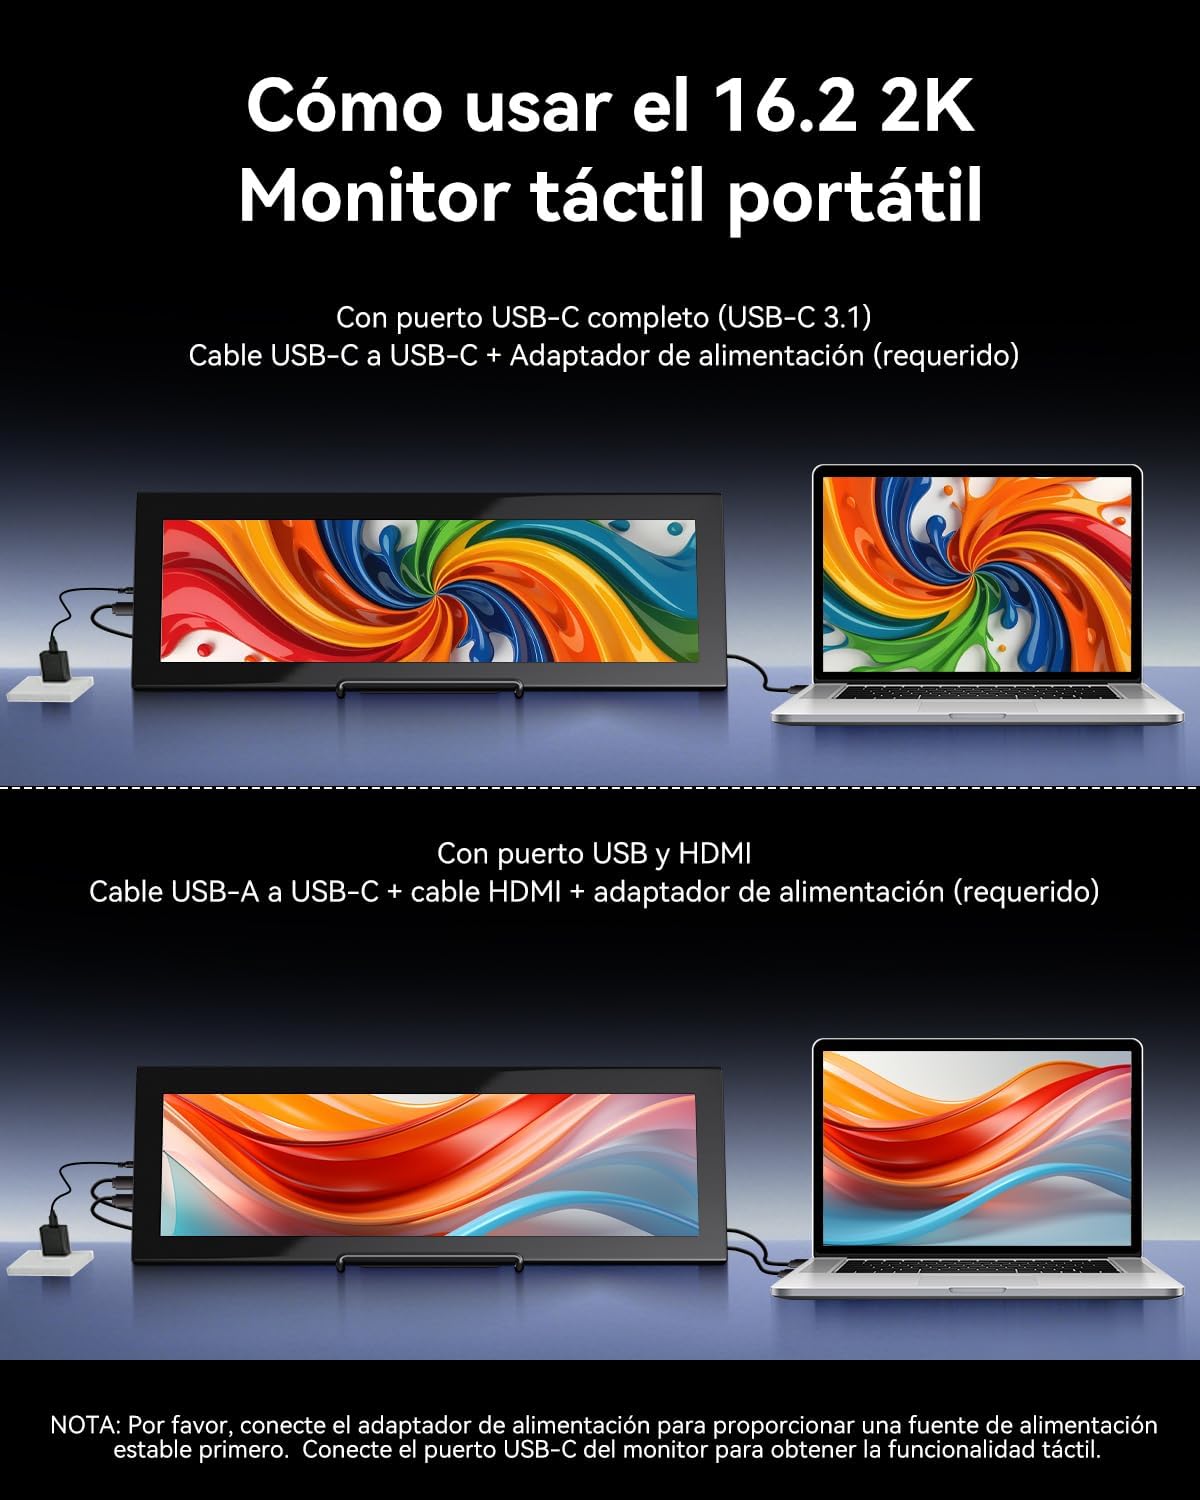
Image 2.2: Visual guide for connecting the monitor using either a single USB-C cable or HDMI with a USB-A cable for touch.

Image 2.3: Illustration of the monitor's broad compatibility with devices like cameras, PCs, Xbox, PS4/5 via HDMI, and Switch, MacBooks, phones, tablets via USB-C.
3. Instrucións de funcionamento
3.1 Acendido/apagado e controis básicos
Use the buttons on the side of the monitor to control its functions:
- ON/OFF: Press and hold to power the monitor on or off.
- Menú: Press to access the On-Screen Display (OSD) menu.
- Luminance +: Increases brightness. Also used for navigation in the OSD menu.
- Volume -: Decreases volume. Also used for navigation in the OSD menu.
3.2 Funcionalidade da pantalla táctil
The monitor supports 10-point multi-touch for interactive use.
- Dispositivos Windows: Fully plug-and-play; no drivers required for touch functionality.
- Apple Devices (iOS/macOS): Only supports single-touch input. Multi-touch gestures are not supported.
- Linux Devices: Not compatible with touch functionality.

Image 3.1: Illustration of various 10-point multi-touch gestures supported by the monitor.

Image 3.2: A compatibility chart indicating which devices support multi-touch, single-touch, or no touch functionality.
3.3 Aida64 Monitoring
This monitor is specifically designed as a secondary display for Aida64 on Windows. It allows you to view real-time hardware statistics without cluttering your primary screen.
- Connect the monitor to your Windows PC as described in the Setup section.
- Install and configure Aida64 software on your PC.
- Utilize Aida64's sensor panel feature to display CPU/GPU usage, temperatures, fan speeds, and other custom data on the Prechen monitor.

Image 3.3: The monitor displaying Aida64 hardware monitoring data, showing CPU and GPU statistics.

Image 3.4: The monitor seamlessly integrated into a PC case, demonstrating its use for Aida64 hardware monitoring.
4. Mantemento
Un coidado e mantemento axeitados prolongarán a vida útil do teu monitor.
4.1 Limpeza da pantalla
- Apague e desconecte sempre o monitor antes de limpalo.
- Use a soft, lint-free cloth (microfiber is recommended).
- Para marcas difíciles, espolvoree lixeiramenteampEnxágüe o pano con auga ou cunha solución de limpeza segura para pantallas. Non pulverice líquido directamente sobre a pantalla.
- Avoid using harsh chemicals, alcohol, or abrasive cleaners, as these can damage the screen coating.
4.2 Coidados xerais
- Manteña o monitor lonxe da luz solar directa, da calor excesiva e da humidade.
- Evite colocar obxectos pesados no monitor.
- Non bloquee as aberturas de ventilación.
- If transporting the monitor, use appropriate protective packaging.
5 Solución de problemas
Se tes problemas co monitor, consulta os seguintes problemas e solucións comúns:
| Problema | Causa posible | Solución |
|---|---|---|
| Screen flickering or unstable display | Fonte de enerxía insuficiente. | Ensure the monitor is connected to a dedicated power adapter (PD20W or higher recommended). Always connect power before signal cables. Use a high-quality Type-C to Type-C cable if using USB-C for power. |
| A pantalla táctil non responde | Incorrect connection order or insufficient power. Incompatible device. | 1. Ensure the power adapter is connected to the monitor first, then the signal cable (HDMI or USB-C). 2. Verify your device's USB-C port supports video and touch (full-featured USB 3.1). 3. If using HDMI, ensure the USB-A to USB-C cable is connected for touch. 4. Note: iOS devices only support single touch. Linux devices are not supported for touch. |
| Non se detectou ningún sinal | Incorrect cable connection or input source. | 1. Check all cable connections (HDMI, USB-C) are secure. 2. Ensure the correct input source is selected on the monitor (if applicable via OSD menu). 3. Test with another device or cable if possible. |
| O monitor non se acende | No power or faulty power adapter. | 1. Ensure the power adapter is securely connected to a working power outlet and the monitor. 2. Try a different power adapter if available. |
| Apple device touch is single-point only | This is a known compatibility limitation. | Apple devices (iOS/macOS) are designed to support only single-touch input with this monitor. Multi-touch gestures are not available. |
| No support for Linux devices | Incompatibilidade do sistema operativo. | This monitor is not compatible with Linux-based devices or consoles. |
6. Especificacións
Detailed technical specifications for the Prechen HD-173 monitor:
| Característica | Especificación |
|---|---|
| Marca | Prechen |
| Número de modelo | HD-173 |
| Tamaño da pantalla | 16.2 polgadas |
| Resolución máxima | 2608 x 720 píxeles (2K QHD) |
| Tipo de panel | IPS |
| Tecnoloxía de visualización | LED |
| Taxa de actualización | 60 Hz |
| Tempo de resposta | 3 milisegundos |
| Relación de contraste | 1000:1 |
| Descrición da superficie da pantalla | Brillante |
| Tecnoloxía de conectividade | USB Type-C, HDMI, USB |
| Interface de hardware | HDMI |
| Cor | Negro |
| Dimensións do artigo (D x W x H) | 3 x 15 x 44.3 cm |
| Peso do elemento | 2.3 kg |
| Fabricante | Shenzhen Kenowa Electronics Co., LTD |
| País de Orixe | China |
| UPC | 753018887476 |

Image 6.1: Visual comparison highlighting the superior detail of 2K (2608x720) resolution compared to 1080P.

Imaxe 6.2: A pantalla mostraasing its 800 nits brightness for clear and brilliant images.
7. Garantía e soporte
7.1 Garantía do produto
This product comes with a 1-year limited warranty from the date of purchase. Please retain your proof of purchase for warranty claims. The warranty covers manufacturing defects but does not cover damage caused by misuse, accidents, unauthorized modifications, or normal wear and tear.
7.2 Atención ao cliente
For technical assistance, warranty claims, or any questions regarding your Prechen HD-173 monitor, please contact the seller or manufacturer through the platform where you purchased the product. Provide your model number (HD-173) and a detailed description of the issue for faster service.