
Introdución
This manual provides detailed instructions for the safe and proper installation, operation, and maintenance of your PERLESMITH PSAT3B Tilting TV Wall Mount. Please read this manual thoroughly before beginning installation and retain it for future reference. This wall mount is designed for televisions ranging from 42 to 100 inches and supports a maximum weight of 160 lbs.
Información de seguridade
AVISO: Improper installation may result in serious personal injury and property damage. If you do not understand these instructions or have doubts about the safety of the installation, please contact a qualified installer.
- This product is intended for installation on wood studs (16"-24" spacing), solid concrete, or brick walls only. Do not install on drywall alone.
- Ensure the mounting surface can safely support the combined weight of the mount and your television.
- Non exceda a capacidade de peso máxima de 160 lb (72.5 kg).
- Verify your TV's VESA pattern (mounting hole spacing) is compatible with the mount (200x200mm to 600x600mm).
- Usa sempre un localizador de vigas de madeira para localizalas con precisión.
- Use o equipo de seguridade axeitado, incluída a protección ocular, durante a instalación.
- Manteña os nenos e as mascotas lonxe da zona de traballo durante a instalación.

The PERLESMITH PSAT3B Tilting TV Wall Mount provides a secure and flexible viewing solution for large televisions.
Contido do paquete
Please check to ensure all components are present and undamaged before installation. Refer to the included hardware bags for specific screw sizes and quantities.
- Montaxe da placa de parede
- Soportes para TV (2)
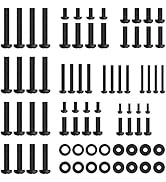
- Kit de ferraxes de montaxe (varios parafusos, arandelas, espazadores, ancoraxes)
- Nivel
- Manual de instrucións
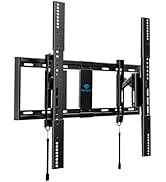
Acabadoview of the PERLESMITH PSAT3B wall mount components and included hardware.
Especificacións
| Característica | Especificación |
|---|---|
| Número de modelo | PSAT3B |
| Tipo de montaxe | Soporte de parede |
| Tipo de movemento | Giratorio, inclinación |
| Material | Aceiro de aliaxe |
| Cor | Negro |
| Dispositivos compatibles | Televisión |
| Maximum Supported Screen Size | 100 polgadas |
| Minimum Supported Screen Size | 42 polgadas |
| Capacidade de carga máxima | 160 libras (72.5 kg) |
| Compatibilidade VESA | 200x200mm a 600x600mm |
| Ángulo de inclinación | +5°/-15° |
| Ángulo de giro | ± 5° |
| Extensión desde a parede | 3" (retraído) a 6.5" (estendido) |

This diagram illustrates the available VESA patterns and compatible wall types for the mount. Do not install on drywall alone.
Configuración e instalación
Follow these steps carefully to ensure a secure installation. It is recommended to have two people for TV mounting.
Paso 1: comprobación previa á instalación
- Verificar o tipo de muro: Ensure your wall is suitable for mounting (16"-24" wood studs, concrete, or brick).
- Comprobar o tamaño do televisor: Confirm your TV is between 42-100 inches.
- Verificar o patrón VESA: Measure the horizontal and vertical distance between the mounting holes on the back of your TV. This must be between 200x200mm and 600x600mm.
Always perform these checks before beginning the installation process.
Paso 2: Fixar os soportes á parte traseira do televisor
- Coloca con coidado o televisor boca abaixo sobre unha superficie suave e limpa para evitar danar a pantalla.
- Aliña os soportes do televisor cos orificios de montaxe na parte traseira do televisor.
- Select the appropriate screws, washers, and spacers from the hardware kit that fit your TV's VESA holes.
- Securely fasten the brackets to the TV using a screwdriver, ensuring they are centered and tight. Do not overtighten.
Paso 3: Instala a placa de parede
- Determine the desired height for your TV. Use a pencil to mark the center of the desired location on the wall.
- Use a stud finder to locate the center of two adjacent wood studs (for wood stud installation) or mark drill points for concrete/brick.
- Hold the wall plate against the wall, aligning the center with your mark and ensuring it is level using the included bubble level. Mark the drill holes.
- Drill pilot holes at the marked locations. For wood studs, drill 7/32" (5.5mm) holes. For concrete/brick, drill 3/8" (10mm) holes and insert concrete anchors.
- Attach the wall plate to the wall using the lag bolts and washers. Tighten securely.
Paso 4: Colgar o televisor na placa de parede
- Con axuda, levante con coidado o televisor cos soportes instalados.
- Enganche os soportes do televisor na beira superior da placa de parede.
- Baixa o televisor con coidado ata que os soportes encaixen completamente na placa de parede.
- Engage the safety latches located at the bottom of the TV brackets to secure the TV to the wall plate. The magnetic pull tabs can be used to lock or release the TV.

Simplified three-step installation process for the PERLESMITH TV mount.

The mount extends 6.5 inches from the wall for easy cable access and retracts to 3 inches for a low-profile mira.
Video demonstrating the ease of installation and functionality of the PERLESMITH Tilting TV Wall Mount.
Instrucións de funcionamento
Axuste de inclinación
The PERLESMITH PSAT3B mount allows for a tilt range of +5° to -15°. To adjust the tilt, loosen the tilt knobs on the side of the TV brackets, adjust the TV to your desired angle, and then tighten the knobs securely. This helps reduce glare and optimize viewángulos de inflexión.
Axuste xiratorio
The mount offers a ±5° swivel adjustment. This feature allows for minor horizontal adjustments to achieve a perfectly level screen after installation. Simply grasp the sides of the TV and gently rotate it to the desired position.
Axuste de nivelación
After installation, you can fine-tune your TV's alignment with a ±2° leveling adjustment. This ensures your TV is perfectly horizontal, even if the wall plate was not installed perfectly level.

The mount offers a ±5° swivel for optimal viewa flexibilidade.

Achieve a perfectly level TV with the ±2° leveling adjustment feature.

The secure latch system with magnetic pull tabs allows for quick and tool-free locking and unlocking of the TV.
Presentación de vídeoasing the tilting functionality of the PERLESMITH TV Wall Mount.
Mantemento
Un mantemento regular garante a lonxevidade e o funcionamento seguro do soporte de parede para TV.
- Limpeza: Limpa o soporte cun pano suave e seco. Evita produtos de limpeza abrasivos ou solventes.
- Comprobacións periódicas: Comprobe periodicamente todos os parafusos e bulóns para asegurarse de que seguen axustados. Aperte de novo se é necesario.
- Inspeccionar por danos: Regularly inspect the mount for any signs of wear, damage, or corrosion. If any issues are found, discontinue use and contact customer support.
Resolución de problemas
If you encounter issues during or after installation, refer to the following common solutions.
- TV fóra de nivel: Use the ±2° leveling adjustment feature to fine-tune the TV's horizontal position. Ensure the wall plate was installed as level as possible.
- Difficulty Tilting: Ensure the tilt knobs on the TV brackets are sufficiently loosened before attempting to adjust the tilt. Tighten them firmly after adjustment.
- TV Feels Loose: Double-check that all mounting bolts to the wall and screws to the TV are securely tightened. Ensure the safety latches are engaged.
- Mounting Holes Don't Align: Verify your TV's VESA pattern against the mount's specifications. If incompatible, the mount cannot be used.
- Pezas que faltan: If any parts are missing from the package, contact PERLESMITH customer support immediately.
Vídeo review highlighting the features and installation process, which may assist with troubleshooting common issues.
Garantía e Soporte
This PERLESMITH product comes with a 5-year warranty. For warranty claims or technical assistance, please contact PERLESMITH customer support. You can typically find contact information on the product packaging or the official PERLESMITH websitio.
For additional support, you may visit the PERLESMITH store on Amazon: Tenda PERLESMITH