
Introdución
Thank you for choosing the Indesit PAI212COW Portable Air Conditioner. This manual provides essential information for the safe and efficient operation, installation, and maintenance of your appliance. Please read it thoroughly before use and keep it for future reference.
Información de seguridade
- Asegúrese de que a fonte de alimentación coincida co voltage especificado na etiqueta de clasificación.
- Non utilice a unidade cun cable de alimentación ou un enchufe danados.
- Manteña o aparello lonxe de fontes de calor e luz solar directa.
- Non bloquee as entradas ou saídas de aire.
- Desconecte sempre a unidade antes de limpala ou realizala.
- This appliance is not intended for use by persons (including children) with reduced physical, sensory or mental capabilities, or or lack of experience and knowledge, unless they have been given supervision or instruction concerning use of the appliance by a person responsible for their safety.
- Os nenos deben ser supervisados para asegurarse de que non xoguen co aparello.
Produto rematadoview
Contido do paquete
Before installation, check that all items are present and undamaged:
- Unidade de aire acondicionado portátil
- Mangueira de escape
- Installation Kit (for window sealing)
- Control remoto
- Manual de usuario (este documento)
Compoñentes da unidade

Figure 1: The Indesit PAI212COW portable air conditioner, shown in a modern living space, ready for use.

Figure 2: The front of the air conditioner, featuring the Indesit logo and air outlet grille.
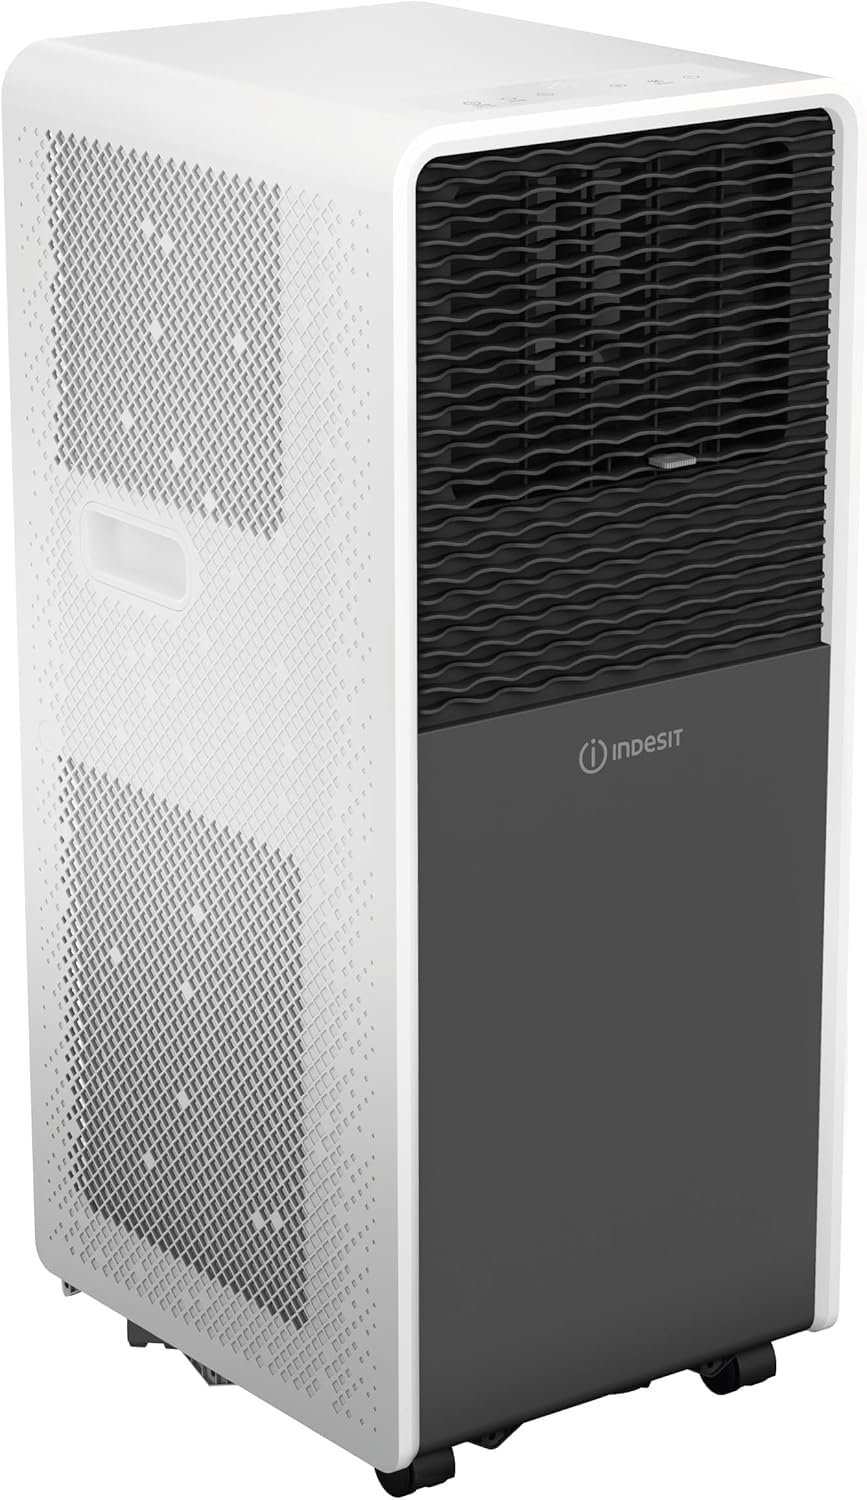
Figure 3: The side profile of the unit, showing its compact design and air intake vents.
- Saída de aire: Reixas axustables para dirixir o fluxo de aire.
- Panel de control: Touch buttons and digital display for settings.
- Air Intake Grilles: Located on the sides/rear, for drawing in room air.
- Saída de aire de escape: Punto de conexión para a mangueira de escape.
- Porto de drenaxe: For continuous drainage or manual emptying of condensed water.
- Rodízios: Para facilitar a mobilidade da unidade.
Configuración e instalación
Proper installation is crucial for the efficient operation of your portable air conditioner. Ensure the unit is placed on a flat, stable surface and there is at least 30 cm of clear space around it for proper airflow.
1. Instalación da mangueira de escape

Figure 4: The flexible exhaust hose, 150 cm long with a 12.5 cm diameter, designed for expelling hot air. It is easy to clean, flexible, heat-resistant, and made of polypropylene.
- Extend the exhaust hose (length 1.5 m, diameter 12.5 cm) by gently pulling both ends.
- Attach one end of the exhaust hose to the air outlet connector on the back of the air conditioner unit. Twist clockwise until securely fastened.
- Conecte o outro extremo da mangueira de escape ao adaptador do kit de xanela.
2. Instalación do kit de fiestras
- Open the window or sliding door where you intend to vent the hot air.
- Place the window sealing kit into the window opening. Adjust its length to fit snugly.
- Insert the exhaust hose adapter into the opening of the window sealing kit.
- Close the window as much as possible to seal around the kit and hose, minimizing air leakage.
- Asegúrate de que a mangueira de escape sexa o máis recta e curta posible para maximizar a eficiencia de refrixeración. Evita curvas pronunciadas.
3. Conexión de alimentación
- Enchufe o cable de alimentación a unha toma eléctrica conectada a terra.
- Ensure the outlet meets the electrical requirements of the unit (240V).
Instrucións de funcionamento
Your Indesit PAI212COW can be operated using the control panel on the unit or the included remote control.
Panel de control

Figure 5: The top panel features touch controls for power, mode selection, temperature adjustment, and fan speed.

Figura 6: Outra view of the control panel, highlighting the digital temperature display and function icons.
- Power Button ( ⏻ ): Acende ou apaga a unidade.
- Botón de modo (MODE): Cycles through operating modes: Cooling ( ❄ ), Dehumidify ( ☔ ), Fan ( 💨 ).
- Temperature Up ( + ) / Down ( - ) Buttons: Axusta a temperatura desexada no modo de arrefriamento.
- Fan Speed Button (SPEED): Selecciona a velocidade do ventilador (Baixa, Media, Alta).
- Timer Button (TIMER): Configura o temporizador de acendido ou apagado automático.
- Sleep Button (SLEEP): Activates Sleep mode.
- Pantalla dixital: Mostra a temperatura actual, a configuración do temporizador e os indicadores de modo.
Control remoto

Figure 7: The remote control for the Indesit PAI212COW, with buttons for power, speed, temperature, mode, sleep, and timer functions.
The remote control duplicates most functions of the control panel for convenient operation from a distance. Insert two AAA batteries (not included) into the remote control.
- POTENCIA: Acende ou apaga a unidade.
- MODO: Selects operating mode (Cooling, Dehumidify, Fan).
- TEMP+ / TEMP-: Axusta a temperatura.
- VELOCIDADE: Axusta a velocidade do ventilador.
- TEMPORIZADOR: Axusta o temporizador.
- DURMIR: Activates Sleep mode.
Modos de funcionamento
- Modo de arrefriamento: The unit cools the room. Set your desired temperature using the TEMP+ / TEMP- buttons.
- Modo de deshumidificación: Reduces humidity in the air without significant cooling. The fan speed is typically fixed in this mode.
- Modo de ventilador: Circulates air without cooling. You can select the fan speed.
Funcións especiais
- Temporizador de 24 horas: Allows you to program the unit to turn ON or OFF automatically within a 24-hour period. Press the TIMER button and use TEMP+ / TEMP- to set the desired time.
- Sleep Mode (Dolce Sonno): Reduces noise and gradually adjusts the temperature for comfortable sleep. Press the SLEEP button to activate.
- Reinicio automático: In case of a power interruption, the unit will automatically restart with the previous settings once power is restored.
- Tecnoloxía de ZoneFollow: Automatically adjusts temperature to maintain desired comfort in the area around the unit.
Mantemento
Un mantemento regular garante un rendemento óptimo e prolonga a vida útil do seu aire acondicionado. Desconecte sempre a unidade antes de realizar calquera mantemento.
Limpeza de filtros
O filtro de aire debe limparse cada dúas semanas ou con máis frecuencia dependendo do uso e da calidade do aire.
- Apague e desenchufe o aire acondicionado.
- Locate and remove the air filter from the back or side of the unit (refer to unit diagram for exact location).
- Lave o filtro con auga morna e un deterxente suave.
- Enxágüe ben e déixeo secar completamente ao aire antes de volvelo colocar.
- Non utilice a unidade sen o filtro.
Drenaxe de auga
The unit has an internal water collection tank. When full, the unit will stop operating and display an indicator. You will need to drain the water manually.
- Apague e desenchufe o aire acondicionado.
- Coloque unha tixola ou bandexa pouco profunda debaixo do orificio de drenaxe na parte inferior traseira da unidade.
- Retire a tapa/tapón de drenaxe.
- Deixar que escorra toda a auga.
- Volva colocar a tapa/tapón de drenaxe de forma segura.
- For continuous drainage, connect a drain hose (not included) to the drainage port and direct it to a floor drain or suitable container.
Limpeza do exterior da unidade
- Limpe o exterior cun suave, damp pano.
- Non empregue produtos químicos agresivos, produtos de limpeza abrasivos nin disolventes.
Almacenamento
Se garda a unidade durante un período prolongado:
- Drene toda a auga condensada da unidade.
- Limpar o filtro de aire.
- Deixe a unidade en funcionamento no modo só de ventilador durante unhas horas para secar os compoñentes internos.
- Desconecte o cable de alimentación e enróleo con coidado.
- Garde a unidade nun lugar seco e fresco, preferiblemente na súa embalaxe orixinal.
Resolución de problemas
Antes de contactar co servizo de atención ao cliente, consulte a seguinte táboa para ver os problemas e as solucións máis habituais.
| Problema | Causa posible | Solución |
|---|---|---|
| A unidade non se acende. | Sen electricidade, cable de alimentación desconectado, disyuntor saltado. | Comprobe a conexión de alimentación, reinicie o disxuntor. |
| A unidade non arrefría eficazmente. | Windows/doors open, room too large, air filter dirty, exhaust hose blocked/bent, temperature setting too high. | Close windows/doors, ensure proper room size, clean air filter, check exhaust hose, lower temperature setting. |
| A unidade é ruidosa. | A unidade non está sobre unha superficie plana, a velocidade do ventilador é demasiado alta, os compoñentes internos vibran. | Place on a flat surface, reduce fan speed, ensure no obstructions. (Note: Portable ACs generate some noise during operation). |
| Fuga de auga. | Drain plug loose, continuous drainage hose improperly connected. | Ensure drain plug is secure, check continuous drainage hose connection. |
| "Full Water" indicator light is on. | O depósito de auga interno está cheo. | Drain the water from the unit as per the "Water Drainage" section. |
Especificacións técnicas
| Característica | Especificación |
|---|---|
| Marca | Indesit |
| Nome do modelo | PAI212COW |
| Capacidade de refrixeración | 12000 BTU/h |
| Características especiais | Dehumidifier, Dust filter, Silent mode, Remote controlled |
| Dimensións do produto (PxWxH) | 33.5P x 28.5l x 69.8H cm (13.2D x 11.2W x 27.5H inches) |
| Cor | Branco |
| Voltage | 240 voltios |
| Nivel de ruído | 65 decibeis |
| Refrixerante | R-290 |
| Tipo de filtro | Filtro electrostático |
| Fonte de enerxía | Eléctrico con cable |
| Enerxía Eléctrica | 3500 vatios |
| Peso do elemento | 23.5 quilogramos (51.8 libras) |
| Área de cobertura | Up to 40 square meters (430 sq ft) |
| Tipo de habitación | Dormitorio |
| Tipo de instalación | Portátil |
| External Unit Required | Non |
| Método de control | Mando a distancia, táctil |
| Número de niveis de potencia | 2 |
| Modos de funcionamento | Refrixeración, deshumidificación, ventilador |
| Clase de eficiencia enerxética | A |
Garantía e Atención ao Cliente
Información da garantía
This Indesit PAI212COW Portable Air Conditioner comes with a 2 anos de garantía do fabricanteEsta garantía cobre defectos de materiais e fabricación en condicións normais de uso. Conserve o comprobante de compra para reclamacións de garantía.
The warranty does not cover damage caused by improper installation, misuse, neglect, unauthorized repairs, or normal wear and tear.
Atención ao cliente
For technical assistance, troubleshooting beyond this manual, or warranty service, please contact Indesit Customer Support. You can find contact details on the official Indesit websitio web ou a través do seu vendedor.
When contacting support, please have your model number (PAI212COW) and proof of purchase readily available.