
1. Introdución
Thank you for choosing the LiTHELi U20LM03-4A220 Cordless Lawn Mower. This manual provides essential information for the safe operation, assembly, maintenance, and troubleshooting of your new lawn mower. Please read this manual thoroughly before first use and keep it for future reference.

Image 1.1: The LiTHELi U20LM03-4A220 Cordless Lawn Mower. This image shows the overall design of the mower, highlighting its compact and modern appearance.
2. Información de seguridade
Observe sempre as precaucións de seguridade básicas para reducir o risco de incendio, descarga eléctrica e lesións persoais ao operar este produto.
Avisos xerais de seguridade:
- Lea o manual completo: Understand all instructions and warnings before operating the mower.
- Usar equipamento de seguridade axeitado: Always wear eye protection, sturdy footwear, and long pants. Avoid loose clothing that could get caught in moving parts.
- Manteña afastados aos transeúntes: Ensure children, pets, and other people are at a safe distance from the mowing area.
- Inspeccionar a zona: Before mowing, clear the lawn of any objects that could be thrown by the blade, such as rocks, sticks, or toys.
- Desconectar a batería: Retire sempre a batería antes de limpala, realizar o mantemento ou deixar a cortacésped desatendida.
- Avoid wet grass: Do not operate the mower in wet conditions, as this can increase the risk of slipping and electric shock.
- Manteña unha suxeición firme: Always hold the handle firmly with both hands during operation.
- Never lift or carry the mower while it is running.
- Use only LiTHELi approved batteries and chargers.
3. Contido do paquete
Carefully unpack your new lawn mower. Ensure all items listed below are present and undamaged. If any parts are missing or damaged, contact customer service.
- LiTHELi U20LM03-4A220 Cordless Lawn Mower Unit
- Handle Assembly (Upper and Lower)
- Bolsa de recollida de céspede
- Enchufe de mulch
- 2 x 5.0Ah 12V Batteries
- Cargador GaN de 45 W
- Manual de instrucións
4. Configuración
Montaxe de 4.1 asas
- Despregue a asa inferior e asegúrea na súa posición.
- Attach the upper handle to the lower handle using the provided knobs and bolts. Ensure the handle is securely fastened.
- Adjust the handle to one of the three available height levels for comfortable operation.

Image 4.1: The mower features a 3-level adjustable handle, allowing users from 5.3 FT to 6.7 FT to find a comfortable operating height.
4.2 Instalación da batería
- Abra a tapa do compartimento da batería.
- Insert the fully charged 5.0Ah batteries into the battery slots until they click into place.
- Pecha a tapa do compartimento da batería de forma segura.
4.3 Grass Collection Bag / Mulch Plug Installation
Your mower can operate in either mulching or bagging mode.
- For Mulching Mode: Insert the mulch plug into the rear discharge opening. Ensure it is seated firmly to prevent clippings from exiting.
- For Bagging Mode: Remove the mulch plug (if installed). Lift the rear discharge flap and hook the grass collection bag onto the mower's frame. Ensure it is securely attached.
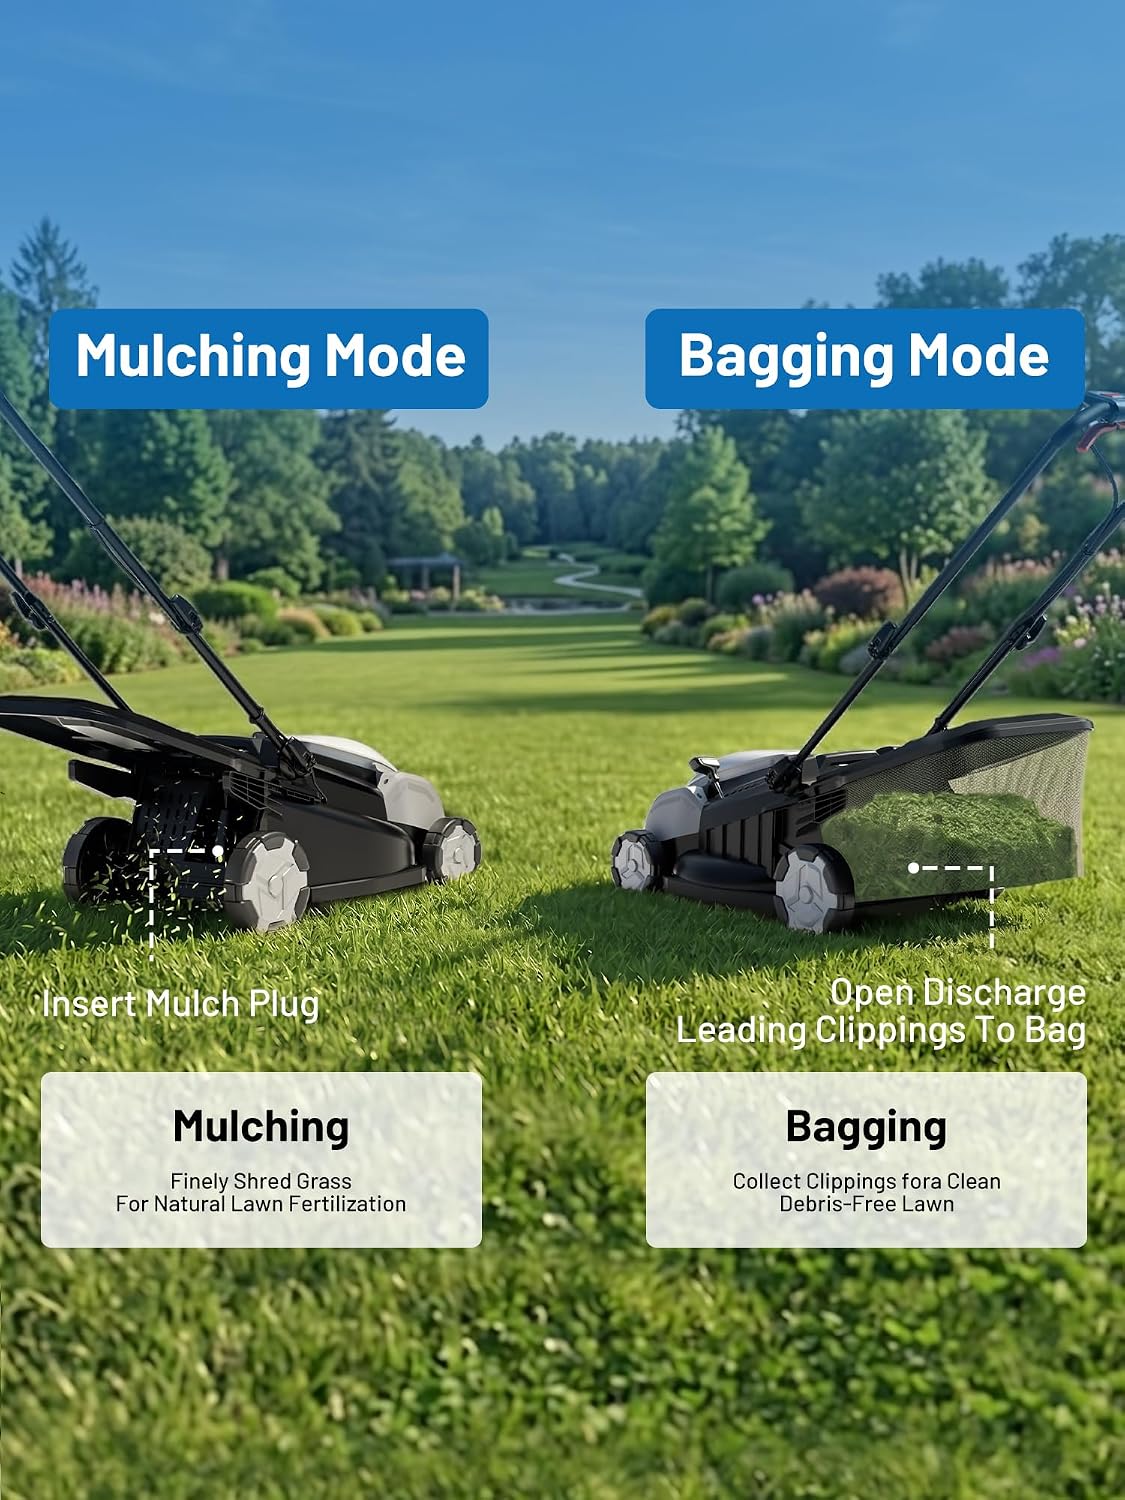
Image 4.2: Illustration of the mulching mode (left) with the mulch plug inserted for finely shredded grass, and bagging mode (right) with the grass collection bag attached for collecting clippings.
4.4 Axuste da altura de corte
The mower offers 6 adjustable cutting heights to suit various lawn conditions and preferences.
- Ensure the mower is turned off and the battery is removed before adjusting the cutting height.
- Localice a palanca de axuste de altura no lateral da cortacésped.
- Pull the lever outwards and move it to the desired height setting. The available heights range from 0.98" (25mm) to 2.95" (75mm).
- Solte a panca para bloqueala na súa posición. Asegúrese de que todas as rodas estean á mesma altura.
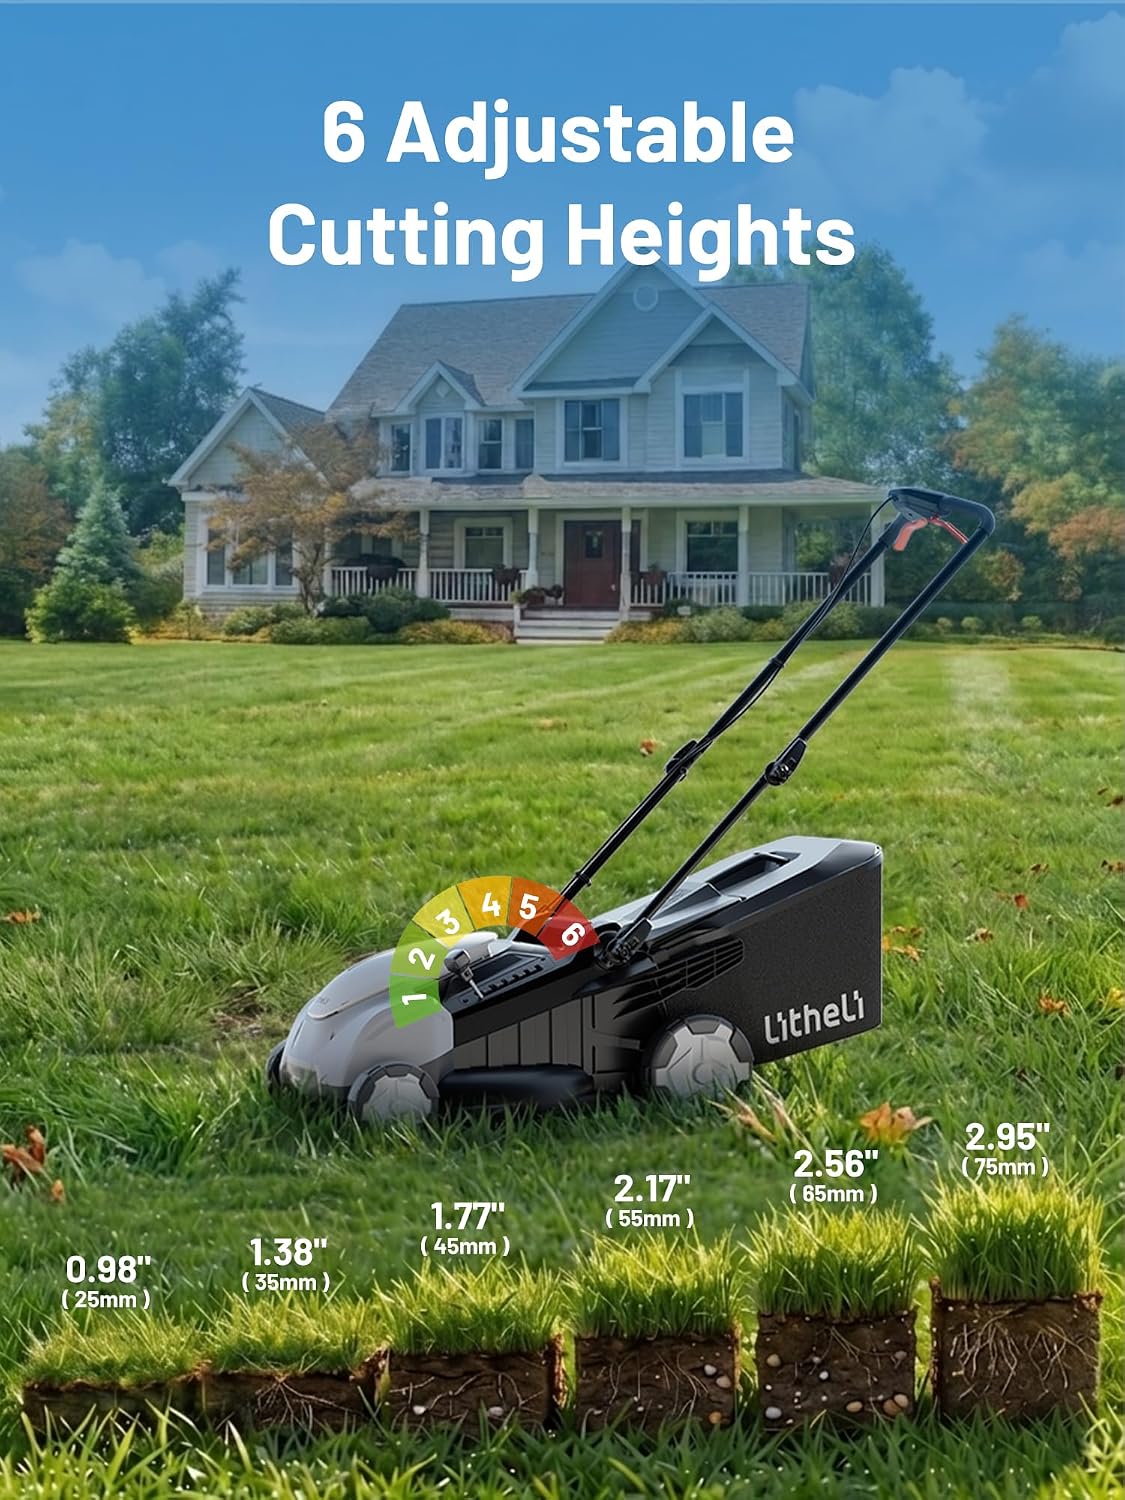
Image 4.3: Visual representation of the 6 adjustable cutting heights, ranging from 0.98 inches (25mm) to 2.95 inches (75mm).
5. Instrucións de funcionamento
5.1 Arranque do cortacésped
- Ensure the batteries are fully charged and correctly installed.
- Prema e manteña premido o botón de seguridade na asa.
- Mentres mantén premido o botón de seguridade, tira da panca de agarre cara ao mango. O cortacésped arrancará.
- Solte o botón de seguridade unha vez que o cortacésped estea en funcionamento.
5.2 Parar o cortacésped
Release the bail lever to stop the mower. The blade will cease rotation within a few seconds.
5.3 Técnicas de sega
- For best results, mow in straight, overlapping lines.
- Evite cortar máis dun terzo da lonxitude da folla de herba á vez.
- If the grass is very tall, make two passes, raising the cutting height for the first pass.
- The LiTHELi mower is designed for quiet operation, reducing noise pollution compared to traditional gas mowers.

Image 5.1: Comparison illustrating the quiet operation of the LiTHELi cordless mower versus the high noise of a traditional gas mower and the cord limitation of an electric corded mower.
5.4 Uso e carga da batería
The mower uses two 5.0Ah 12V batteries for extended runtime.
- Capacidade da batería: The 5.0Ah batteries offer 25% more capacity compared to 4.0Ah batteries, providing longer mowing sessions.
- Cargando: Use the included 45W GaN charger to recharge the batteries. Connect the charger to a standard 100-240V AC outlet.
- Indicador de carga: The charger will indicate the charging status. Refer to the charger's manual for specific indicator lights.

Image 5.2: This image highlights the 5.0Ah upgrade battery, showing it provides 25% more capacity than a 4.0Ah battery, suitable for small to medium lawns up to 1/8 acre.

Image 5.3: The 45W GaN charger, capable of charging the 5.0Ah batteries. It also features USB 3.0 CT-C2 input/output for versatile charging of other devices.
6. Mantemento
Un mantemento regular garante un rendemento óptimo e prolonga a vida útil do seu cortacésped.
6.1 Limpeza
- Retire sempre a batería antes da limpeza.
- Clean the underside of the mower deck after each use to prevent grass buildup. Use a stiff brush or scraper.
- Limpa o exterior da cortacésped con anunciosamp cloth. Do not use water jets or high-pressure washers directly on the mower.
6.2 Coidado da lámina
- Inspeccione a folla regularmente para comprobar se está afiada e se presenta danos. Unha folla desafilada pode arrincar a herba e deixar o céspede insalubre.
- If the blade is dull, it can be sharpened by a qualified service technician or replaced with a genuine LiTHELi replacement blade.
- Use sempre luvas resistentes ao manipular a lámina.
6.3 Almacenamento da batería
- Almacene as baterías nun lugar fresco e seco lonxe da luz solar directa e de temperaturas extremas.
- Para o almacenamento a longo prazo, cargue as baterías ata aproximadamente o 50 % da súa capacidade.
- Non garde as baterías descargadas.
7 Solución de problemas
Consulta esta sección para ver os problemas comúns e as súas solucións.
| Problema | Causa posible | Solución |
|---|---|---|
| A segadora non arranca | A batería non está instalada correctamente Baterías descargadas Safety button/bail lever not engaged | Asegúrate de que as baterías estean completamente colocadas Cargar baterías Press safety button then pull bail lever |
| Baixo rendemento de corte | Folla apagada ou danada Altura de corte demasiado baixa para a herba Grass buildup under deck | Afiar ou substituír a folla Aumentar a altura de corte Clean mower deck |
| A segadora para durante o funcionamento | Baterías descargadas Overload protection activated (e.g., very thick grass) | Recarga baterías Raise cutting height, mow slower, or clear obstruction |
8. Especificacións
| Característica | Especificación |
|---|---|
| Número de modelo | U20LM03-4A220 |
| Marca | LiTHELi |
| Nome do tipo de elemento | Cortacéspedes |
| Fonte de enerxía | Alimentado por batería |
| Baterías | 2 x 12V 5.0Ah (included) |
| Ancho de corte | 15 polgadas (aprox. 38 cm) |
| Alturas de corte | 6 positions (0.98" to 2.95" / 25mm to 75mm) |
| Modo de operación | Manual (Push Mower) |
| Dimensións do produto (P x A x A) | 71.5 x 44 x 36 cm (aprox.) |
| Peso do elemento | 22.55 kg |
| Cor | Branco |
| Cargador | 45W GaN Charger (AC Input: 100-240V 50Hz-60Hz) |
9. Garantía e soporte
LiTHELi products are manufactured to high-quality standards. For warranty information, technical support, or to order replacement parts, please refer to the warranty card included with your product or visit the official LiTHELi websitio. Garda o comprobante de compra para reclamacións de garantía.