1. Introdución
This manual provides detailed instructions for the proper use and care of your RCA CC6393 VHS-C AutoShot Camcorder. Please read this manual thoroughly before operating the device to ensure optimal performance and longevity. The RCA CC6393 is designed for recording video onto VHS-C tapes and capturing still images, offering a compact and user-friendly experience.
2. Produto rematadoview e Características
The RCA CC6393 VHS-C AutoShot Camcorder combines ease of use with versatile recording capabilities. Key features include:
- VHS-C Format: Records onto compact VHS-C tapes, which can be played back in any standard VHS VCR using the included cassette adapter.
- Deseño compacto e lixeiro: Weighing approximately 1.9 pounds, it is highly portable for travel and everyday use.
- 3-inch LCD ColorView Pantalla: A rotatable (270 degrees) color monitor allows for easy framing and playback.
- AutoShot Feature: Automatically adjusts focus and exposure to available light for simplified recording.
- Steady Pix Image Stabilization: Minimizes camera shake, particularly useful when zooming or recording while moving.
- Digital Still Camera Capability: Capture still images and transfer them to a PC using the included cable and software (compatible with Windows 95/98).
- Zoom: Features 16x optical zoom and 400x digital zoom for capturing distant subjects.
- Creative Recording Modes: Includes fade-in/out, wide-format 16:9 mode, animation mode, and time-lapse recording.

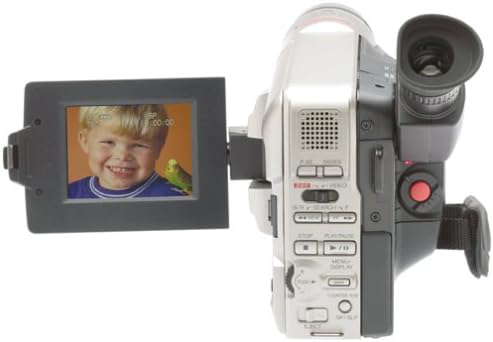
Imaxe 2.1: Fronte view of the RCA CC6393 camcorder with its LCD screen open, displaying an image.
3. Contido do paquete
Verifique que todos os seguintes elementos estean incluídos no seu paquete:
- RCA CC6393 VHS-C AutoShot Camcorder
- Batería recargable
- AC Adapter and Charger
- Correa de ombreiro
- VHS-C Cassette Adapter
- Cassette Adapter Battery
- Clock Cell
- Software CD-ROM (for still image transfer)
- PC Connection Cable (USB)
- Manual de usuario (este documento)

Image 3.1: Included accessories for the RCA CC6393 camcorder, featuring the VHS-C cassette adapter, AC adapter/charger, software CD, and shoulder strap.
4. Configuración
4.1 Carga da batería
- Connect the AC adapter to the camcorder's DC input jack.
- Conecte o adaptador de CA a unha toma eléctrica estándar.
- Allow the battery to charge fully before first use. The charging indicator light will typically show the charging status.
4.2 Inserción da batería
- Abra a tapa do compartimento da batería da videocámara.
- Insert the charged battery pack, ensuring it clicks into place securely.
- Pecha a tapa do compartimento da batería.
4.3 Inserting a VHS-C Tape
- Open the tape compartment cover.
- Insert a VHS-C tape with the window facing outwards, ensuring it is correctly oriented.
- Gently close the tape compartment cover until it latches.

Image 4.1: Right side view of the RCA CC6393 camcorder, highlighting the tape compartment and various control buttons.
5. Instrucións de funcionamento
5.1 Gravación básica
- Acende a videocámara.
- Open the LCD ColorView screen or use the viewbuscador para enmarcar a túa toma.
- O AutoShot feature will automatically adjust focus and exposure.
- Preme o Gravar button to start recording. Press it again to stop.
5.2 Uso do monitor LCD
The 3-inch LCD monitor can rotate 270 degrees, allowing for flexible viewing angles during recording and playback. Adjust it to your preferred position for comfortable operation.
5.3 Función de zoom
Use the zoom controls (typically a rocker switch) to zoom in (telephoto) or zoom out (wide-angle) on your subject. The Steady Pix feature helps stabilize images during zooming.
5.4 Modos de gravación especiais
- Fade-in/Fade-out: Adds professional transitions to your recordings. Consult the on-screen menu or dedicated buttons for activation.
- Wide-format 16:9 Mode: Records video in a widescreen aspect ratio.
- Modo de animación: Creates the illusion of movement by recording a series of slightly different poses.
- Gravación time-lapse: Programs the camcorder to record at preset time intervals, ideal for observing subtle changes over time (e.g., plant growth, cloud formations).
- Five-second Recording: An option for quick scene transitions.
5.5 Reprodución
To play back your recordings:
- Cambia a videocámara ao modo de reprodución.
- Use the playback controls (Play, Stop, Pause, Fast Forward, Rewind) to navigate your tape.
- Playback options include visual search, stop-action pause, time counter, tracking, and time base corrector.
5.6 Digital Still Camera Function
The camcorder can capture still images. To transfer these images to a PC:
- Connect the camcorder to your PC using the provided PC connection cable (USB).
- Install the included software CD-ROM on your Windows 95 or 98 operating system.
- Follow the software instructions to transfer and manage your still images.
Imaxe 5.1: Traseira view of the RCA CC6393 camcorder, displaying the control panel and battery compartment.
6. Mantemento
6.1 Cleaning the Camcorder
- Use a soft, dry cloth to clean the exterior of the camcorder.
- For the lens, use a specialized lens cleaning cloth and solution. Avoid touching the lens with your fingers.
- Non empregue produtos químicos duros nin limpadores abrasivos.
6.2 Coidado coa batería
- Almacene a batería nun lugar fresco e seco cando non estea en uso.
- Evite descargar completamente a batería con frecuencia para prolongar a súa vida útil.
- If the camcorder will not be used for an extended period, remove the battery.
7 Solución de problemas
Se tes problemas coa túa videocámara, consulta os seguintes problemas e solucións comúns:
- Sen enerxía: Ensure the battery is charged and correctly inserted, or connect the AC adapter.
- Cannot Record: Check if a tape is inserted correctly and if the tape's write-protect tab is not engaged. Ensure sufficient battery power.
- Mala calidade de imaxe: Clean the camcorder lens. Ensure adequate lighting for your recording environment. If playing back, ensure the tape heads are clean (professional cleaning may be required).
- Still Images Not Transferring: Verify the PC connection cable is securely connected to both the camcorder and the computer. Ensure the software is correctly installed and compatible with your operating system (Windows 95/98).
- Pantalla LCD que non se mostra: Check if the screen is properly opened and rotated. Ensure the camcorder is powered on.
For persistent issues, please contact RCA customer support.
8. Especificacións
| Característica | Especificación |
|---|---|
| Número de modelo | 1001B3 |
| Formato de gravación | VHS-C |
| Pantalla LCD Tamaño | 3 Inches (ColorView) |
| Zoom óptico | 16x |
| Zoom dixital | 400x |
| Estabilización da imaxe | Steady Pix |
| Still Camera Capability | Si |
| Conectividade | USB (for PC connection) |
| Peso | Approx. 1.9 pounds (camcorder only) |
| Fonte de enerxía | Rechargeable Battery, AC Adapter |
9. Garantía e soporte
For warranty information and customer support, please refer to the warranty card included with your product or visit the official RCA websitio. Garde o recibo da compra como proba de compra para calquera reclamación de garantía.
For technical assistance or service inquiries, please contact RCA customer service through their official channels.


