1. Produto rematadoview
The LUX Smart Temp 1500 (Model TX1500E) is a programmable thermostat designed for ease of use and energy efficiency. It features advanced technology with a focus on operating simplicity, making it suitable for various lifestyles. The thermostat includes an electro-luminescence (EL) display that illuminates with a touch, ensuring easy readability and temperature adjustments.

Figura 1: Lux TX1500E Smart Temp Programmable Thermostat in its retail packaging, highlighting its "Smart Temp 1500" branding and "Fully Programmable" features. The packaging also indicates it is "Easy to Install" and pre-programmed for energy saving.
2. Características clave
- Pantalla iluminada: The screen illuminates with a simple touch of a button for enhanced visibility in low light conditions.
- On-Screen Programming: All programming can be done directly on the thermostat's display.
- Horario flexible: Offers distinct programming options for weekdays, Saturday, and Sunday, allowing for customized temperature settings to fit your schedule.
- Visualización do tempo: Features a 12/24 hour clock display.
- Filter Usage Monitor: Tracks furnace filter usage to remind you when it's time for replacement.
- Interface fácil de usar: Incorporates a unique "Speed Dial" for intuitive programming and adjustments.
3. Configuración e instalación
The TX1500E thermostat is designed for straightforward installation. It is a wall-mount unit and requires batteries for operation (not included). Before beginning installation, ensure the power to your HVAC system is turned off at the circuit breaker to prevent electrical shock.
- Apagado: Turn off the power to your heating and cooling system at the main circuit breaker or fuse box.
- Eliminar o termostato antigo: Carefully remove your existing thermostat from the wall. Note the wiring connections. It is recommended to label each wire with the terminal it was connected to (e.g., R, G, Y, W).
- Mount New Thermostat: Mount the TX1500E base plate to the wall using the provided screws. Ensure it is level.
- Conectar cableado: Connect the labeled wires to the corresponding terminals on the TX1500E. Refer to the wiring diagram typically found on the back of the thermostat unit or its packaging for specific connections. This thermostat is compatible with 24 Volt systems, including gas, oil, electric, and heat/cool systems.
- Instalar baterías: Insert the required batteries into the thermostat compartment.
- Attach Thermostat to Base: Securely attach the thermostat body to the mounted base plate.
- Restaurar enerxía: Turn the power back on to your HVAC system at the circuit breaker.

Figura 2: Traseira view of the Lux TX1500E packaging, displaying key features, compatibility information, and a simplified wiring diagram for installation. It emphasizes "Installs in Less Than 30 Minutes."
4. Instrucións de funcionamento
The TX1500E is designed for intuitive operation, featuring a digital display and a touch dial control for programming.
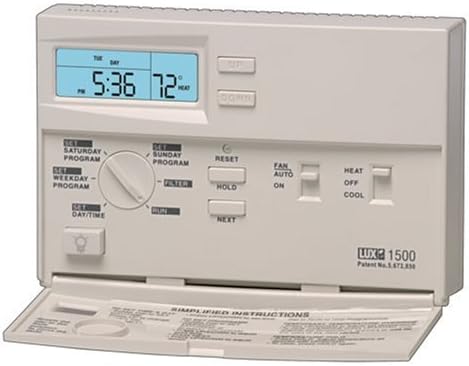
Figura 3: Fronte view of the Lux TX1500E thermostat unit, showing the digital display, "UP" and "DOWN" buttons, "SET" and "RUN" modes, and the "Speed Dial" for programming. The bottom flap reveals additional controls and simplified instructions.
4.1 Controis básicos
- Luz de visualización: Press the light bulb button (usually located on the lower left) to illuminate the display for a few seconds.
- Axuste de temperatura: Use the "UP" and "DOWN" buttons to manually adjust the desired temperature.
- System Mode Switch: Located on the right side of the unit, typically allows selection between "HEAT", "OFF", and "COOL".
- Interruptor de modo de ventilador: Located on the right side, typically allows selection between "AUTO" (fan runs only when heating/cooling) and "ON" (fan runs continuously).
4.2 Programming Your Thermostat
The TX1500E comes pre-programmed with an energy-saving schedule, but it can be easily customized. Programming is done using the "Speed Dial" and on-screen prompts.
- Set Day/Time: Rotate the "Speed Dial" to the "SET DAY/TIME" position. Use the "UP" and "DOWN" buttons to adjust the current time and day.
- Program Weekday: Rotate the dial to "SET WEEKDAY PROGRAM". The display will guide you through setting temperature points for different periods (e.g., Morning, Day, Evening, Night). Use "UP" and "DOWN" to adjust temperatures and "NEXT" to move between periods.
- Program Saturday/Sunday: Repeat the programming process for "SET SATURDAY PROGRAM" and "SET SUNDAY PROGRAM" as desired.
- Run Program: Once programming is complete, rotate the dial to "RUN" to activate your schedule.
4.3 Temporary Override and Hold Function
- Anulación temporal: While in "RUN" mode, pressing the "UP" or "DOWN" button will temporarily adjust the temperature. This override will remain active until the next programmed period begins.
- Función de retención: To maintain a specific temperature indefinitely, rotate the "Speed Dial" to "HOLD". Use the "UP" or "DOWN" buttons to set the desired temperature. The thermostat will maintain this temperature until the "HOLD" function is cancelled by rotating the dial back to "RUN".
5. Mantemento
- Substitución da batería: The thermostat requires batteries for operation. Replace them annually or when the low battery indicator appears on the display. Use fresh alkaline batteries.
- Monitor de filtro: The built-in filter usage monitor will alert you when it's time to check or replace your HVAC system's air filter. Reset the monitor after changing the filter (refer to the specific instructions in your full manual, often by pressing the "UP" button while the filter alert is active).
- Limpeza: Limpar o exterior do termostato cun pano suave eamp pano. Non use produtos de limpeza ou disolventes abrasivos.
6 Solución de problemas
| Problema | Causa posible | Solución |
|---|---|---|
| A pantalla está en branco ou escura. | Pilas baixas ou agotadas. | Substitúe as pilas por outras novas. |
| O sistema (calefacción/refrigeración) non se acende. | Power to HVAC system is off; incorrect wiring; system switch in "OFF" position. | Check circuit breaker; verify wiring connections; ensure system switch is set to "HEAT" or "COOL". |
| As lecturas de temperatura parecen inexactas. | Thermostat location affected by drafts or heat sources; internal calibration needed. | Ensure thermostat is not near windows, vents, or direct sunlight. Some models allow for temperature calibration (refer to full manual for advanced settings). |
| Buttons are unresponsive or hard to press. | Wear and tear on internal sensors. | Ensure you are pressing firmly and directly. If issue persists, consider contacting support or replacement. |
7. Especificacións do produto
| Marca | LUX |
| Número de modelo | TX1500E |
| Tipo de controlador | Touch Dial |
| Característica especial | Programable |
| Cor | Branco |
| Tipo de control de temperatura | Manual (with programmable settings) |
| Peso do elemento | 9.6 onzas (aprox. 0.6 libras) |
| Tipo de visualización | Digital with Electro-Luminescence (EL) Backlight |
| Tipo de montaxe | Soporte de parede |
| Fonte de enerxía | Necesítanse pilas (non incluídas) |
| UPC | 082901043546, 021079415007 |
8. Garantía e soporte
The Lux TX1500E Smart Temp Programmable Thermostat comes with a 1 ano de garantía limitada from the manufacturer, Lux Products. This warranty covers defects in materials and workmanship under normal use.
For technical assistance, troubleshooting beyond this manual, or warranty claims, please contact Lux Products customer support. Refer to the product packaging or the official Lux Products websitio para obter a información de contacto máis actualizada.
Nota: Always ensure to have your product model number (TX1500E) and date of purchase available when contacting support.


