Introdución
Grazas pola compraasing the Muse M-12 CR Radio Alarm Clock. This compact and versatile device combines an FM radio with a dual alarm clock, offering convenience and functionality for your daily routine. Featuring a clear red LED display and intuitive controls, the M-12 CR is designed for ease of use. Please read this manual carefully to ensure proper operation and to fully utilize all features of your new alarm clock.
Contido do paquete
Comprobe que todos os elementos estean presentes e en bo estado:
- Muse M-12 CR Radio Alarm Clock Unit
- Adaptador de alimentación
- Manual de usuario (este documento)
Produto rematadoview e Controis
Familiarize yourself with the various parts and controls of your Muse M-12 CR Radio Alarm Clock.

Figura 1: Fronte e parte superior view of the Muse M-12 CR Radio Alarm Clock, highlighting the red LED display and the arrangement of control buttons.
Botóns de control (panel superior):
- SNOOZE / DIMMER Button: Press to temporarily silence the alarm (snooze function). Press and hold to adjust display brightness.
- Botón ALARMA 1: Press to activate/deactivate Alarm 1. Press and hold to set Alarm 1 time.
- Botón ALARMA 2: Press to activate/deactivate Alarm 2. Press and hold to set Alarm 2 time.
- Botón de axuste de tempo: Press and hold to set the current time.
- Botón HR (hora): Used to adjust the hour during time or alarm setting.
- Botón MIN (Minuto): Used to adjust the minute during time or alarm setting.
- VOL- / PREV Button: Decreases volume. In radio mode, short press for previous preset station, long press for backward auto-scan.
- VOL+ / NEXT Button: Increases volume. In radio mode, short press for next preset station, long press for forward auto-scan.
- FM / MEM Button: Press to switch to FM radio mode. Press and hold to automatically scan and store FM stations.
- Botón SLEEP: Activa a función do temporizador de sono.
- Botón NAP: Activates the nap timer function.
Configuración
1. Conexión de alimentación
- Unpack the Muse M-12 CR unit and the power adapter.
- Insert the DC plug of the power adapter into the DC IN jack located at the back of the unit.
- Plug the power adapter into a standard AC wall outlet (100-240V, 50/60Hz). The display will light up, and the clock will be ready for time setting.
2. Batería de reserva (opcional)
To maintain time and alarm settings during a power outage, you can install backup batteries (not supplied). The unit typically uses AAA batteries. Refer to the battery compartment on the bottom of the unit for correct battery type and polarity.
Instrucións de funcionamento
Axuste da hora
- Manteña premido o HORARIO botón ata que os díxitos das horas comecen a parpadear.
- Preme o HR botón repetidamente para axustar a hora.
- Preme o MIN botón repetidamente para axustar os minutos.
- Preme o HORARIO de novo para confirmar e saír do modo de axuste da hora.
Configuración de alarmas (alarma 1 e alarma 2)
The M-12 CR features two independent alarms.
- Manteña premido o ALARMA 1 or ALARMA 2 botón ata que os díxitos da hora da alarma parpadeen.
- Preme o HR botón para axustar a hora de alarma desexada.
- Preme o MIN botón para axustar o minuto de alarma desexado.
- Preme o ALARMA 1 or ALARMA 2 button again to select the alarm source (Radio or Buzzer). The corresponding indicator will light up.
- Preme o ALARMA 1 or ALARMA 2 button one more time to confirm and activate the alarm. The alarm indicator (1 or 2) will appear on the display.
Para desactivar unha alarma, prema o botón correspondente ALARMA 1 or ALARMA 2 button until its indicator disappears from the display.
Operación de radio (FM)
- Preme o FM / MEM button to switch to FM radio mode. The frequency will be displayed.
- Automatic Scan and Store: Manteña premido o FM / MEM button to automatically scan for and store available FM stations (up to 20 presets).
- Sintonización manual: Usa o VOL- / PREV e VOL+ / NEXT buttons to manually tune to a specific frequency. Long press for auto-scan to the next strong station.
- Seleccionando predefinicións: Prema brevemente o VOL- / PREV or VOL+ / NEXT buttons to cycle through stored preset stations.
- Axuste do volume: Usa o VOL- / PREV e VOL+ / NEXT buttons (when not in tuning mode) to adjust the radio volume.
Función de repetición
Cando soe a alarma, prema o botón SNOOZE / DIMMER button to temporarily silence the alarm. The alarm will sound again after a few minutes (default snooze time is usually 9 minutes, refer to specific product behavior if different).
Función Sleep Timer
O temporizador de sono permíteche adormecerte coa radio, que se apagará automaticamente despois dun período de tempo determinado.
- Mentres soa a radio, prema o botón DURMIR button repeatedly to cycle through available sleep timer durations (e.g., 120, 90, 60, 30, 15, 10, 5 minutes, or OFF).
- A radio apagarase automaticamente despois do tempo seleccionado.
Función de temporizador de sesta
The nap timer sets an alarm to sound after a short, predefined period.
- Preme o NAP button repeatedly to select a nap duration (e.g., 120, 90, 60, 30, 15, 10, 5 minutes, or OFF).
- The alarm will sound after the selected nap time has elapsed.
Dimmer da pantalla
Para axustar o brillo da pantalla LED:
- Preme o SNOOZE / DIMMER button (when the alarm is not sounding) to cycle through different brightness levels (e.g., High, Medium, Low, Off).
Mantemento
- Limpeza: Usa un pano suave e seco para limpar o exterior da unidade. Non empregues produtos de limpeza abrasivos, ceras nin disolventes, xa que poden danar o acabado.
- Colocación: Coloque a unidade sobre unha superficie estable e plana, lonxe da luz solar directa, de fontes de calor e de exceso de po ou humidade.
- Ventilación: Asegúrese de que haxa unha ventilación axeitada arredor da unidade para evitar o sobrequecemento. Non bloquee as aberturas de ventilación.
- Desconexión de alimentación: If the unit is not going to be used for a long period, unplug the power adapter from the wall outlet.
Resolución de problemas
| Problema | Causa posible | Solución |
|---|---|---|
| Sen alimentación / Pantalla apagada | O adaptador de corrente non está conectado ou está avariado. A toma de corrente non está activa. | Asegúrate de que o adaptador de corrente estea conectado correctamente á unidade e a unha toma de corrente que funcione. Proba cunha toma de corrente diferente. |
| A alarma non soa | Alarm not activated. Alarm volume too low (for radio alarm). Incorrect alarm time set. | Ensure the alarm indicator (1 or 2) is visible on the display. Increase radio volume if using radio alarm. Verify alarm time is correctly set. |
| Mala recepción de radio | Antenna not extended or positioned correctly. Interference from other electronic devices. Weak signal in the area. | Fully extend and adjust the FM wire antenna for best reception. Move the unit away from other electronics. Try auto-scanning for stronger stations. |
| Os botóns non responden | Temporary system glitch. | Unplug the unit from power for a few minutes, then plug it back in to reset. |
Especificacións
| Modelo | M-12 CR |
| Tipo de visualización | LED (vermello) |
| Tamaño de visualización | 1.5 cm (0.6 polgadas) |
| Radiofrecuencia | FM (with 20 preset stations) |
| Funcións de alarma | Dual Alarm (Radio or Buzzer), Snooze, Sleep, Timer (Nap) |
| Fonte de enerxía | Wired (AC Power Adapter) |
| Dimensións (L x W x H) | 12.9 x 5.3 x 6.5 cm (aprox.) |
| Peso | 290 g (aprox.) |
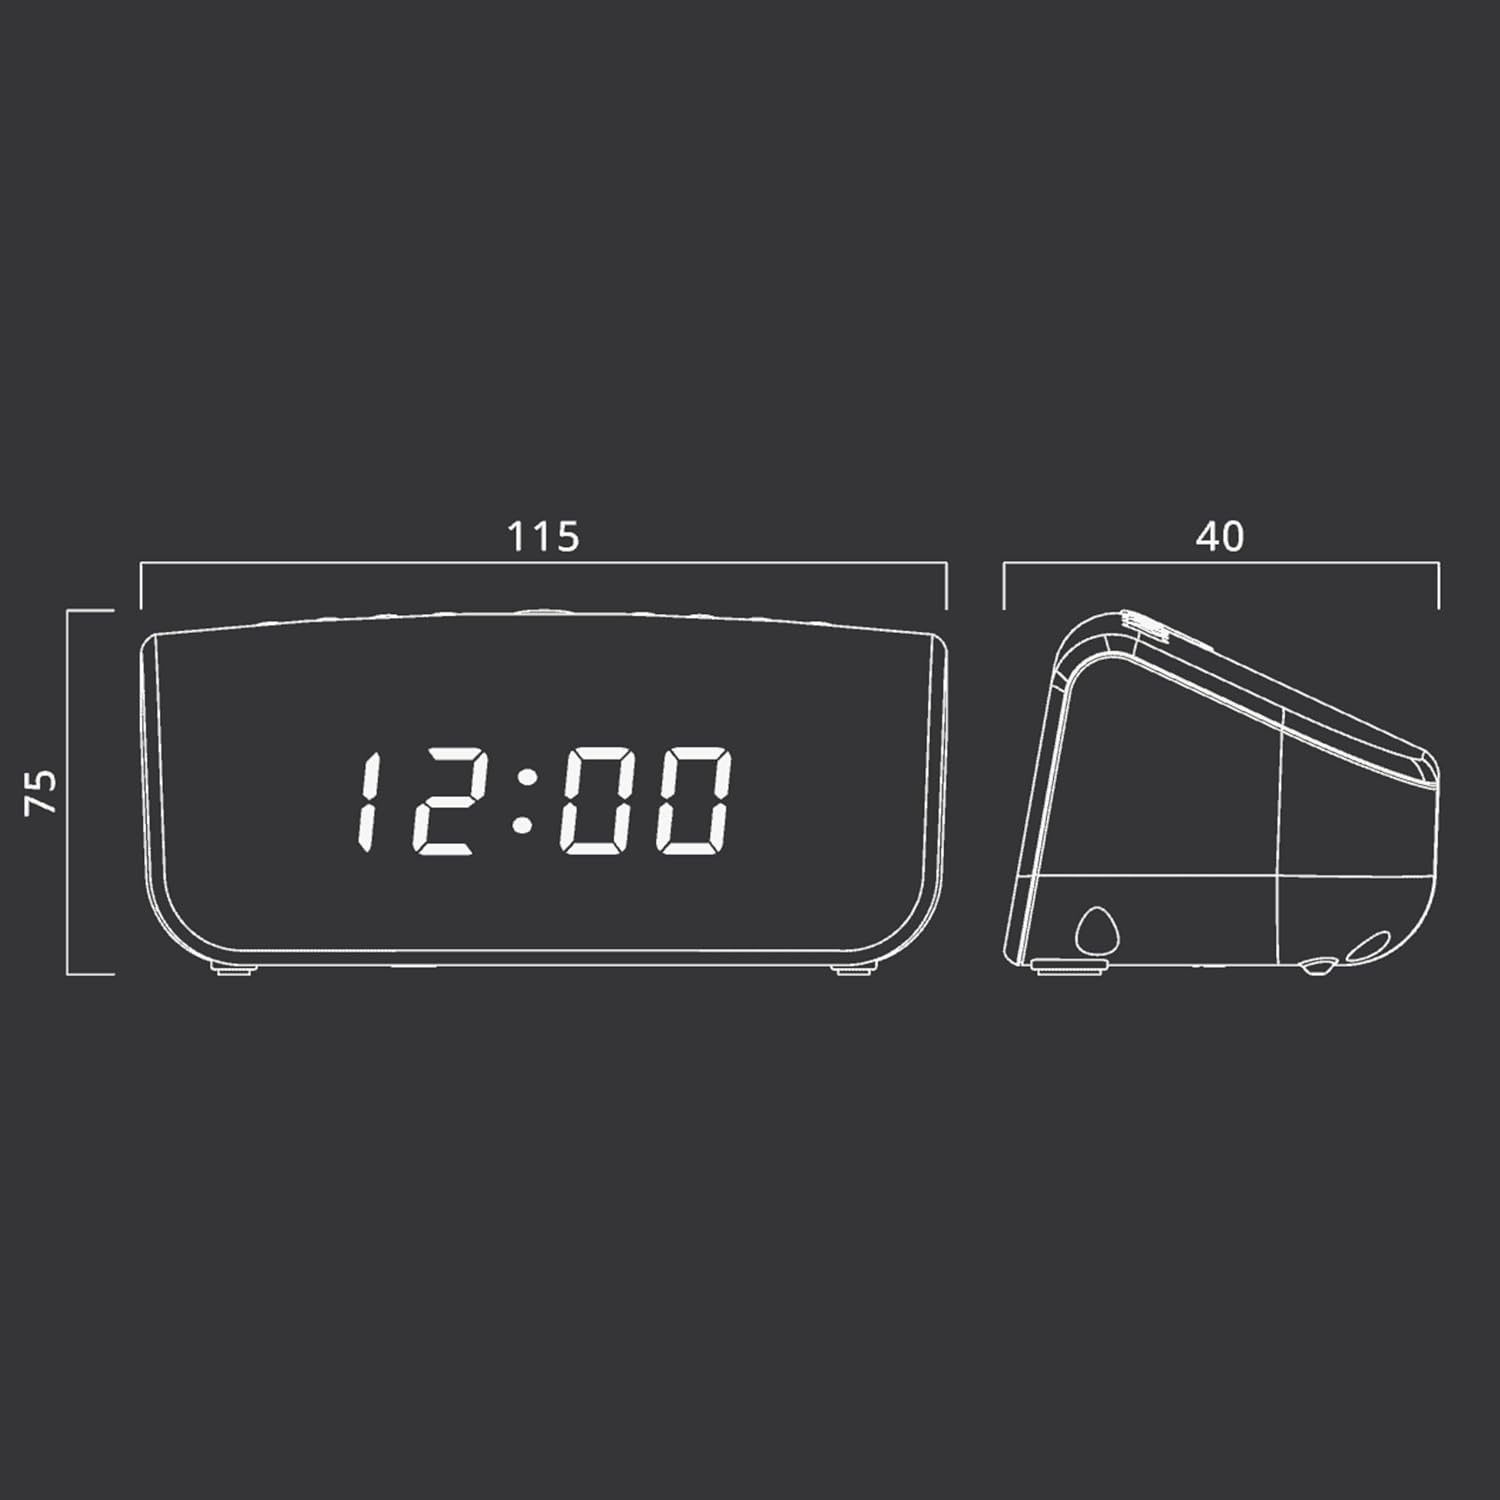
Figura 2: Approximate dimensions of the Muse M-12 CR unit.
Garantía e Soporte
For warranty information and technical support, please refer to the warranty card included with your product or visit the official Muse websitio. Garde o recibo da compra como proba de compra para calquera reclamación de garantía.
Para obter máis axuda, póñase en contacto co servizo de atención ao cliente de Muse.


