1. Introdución
This manual provides essential instructions for the installation, operation, and maintenance of your WATTS WUV6-110 6GPM UV Disinfection System. This system is designed to provide effective water disinfection by utilizing ultraviolet light to neutralize harmful microorganisms. Please read this manual thoroughly before installation and operation to ensure proper function and safety.
2. Información de seguridade
AVISO: O incumprimento destas instrucións de seguridade podería provocar lesións ou danos materiais.
- Desconecte sempre a alimentación antes de realizar calquera mantemento ou servizo.
- Do not look directly at the illuminated UV lamp. UV light can cause severe eye damage.
- Ensure all plumbing connections are secure and leak-free before operating the system.
- This system operates with electricity. Avoid contact with water and electrical components.
- Install the system in a location protected from direct sunlight, freezing temperatures, and excessive humidity.
3. Produto rematadoview
The WATTS WUV6-110 UV Disinfection System is engineered for reliable water purification. Key components include:
- 304 Stainless Steel Chamber: Houses the UV lamp and quartz sleeve, ensuring durability and corrosion resistance.
- UV Lamp: Emits germicidal ultraviolet light to inactivate bacteria, viruses, and other microorganisms. Rated for 9,000 hours of effective operation.
- Balastro electrónico: Powers the UV lamp and features audible and visual alarms to indicate lamp status or malfunction.
- Manga de cuarzo: Protects the UV lamp from water while allowing UV light to pass through.
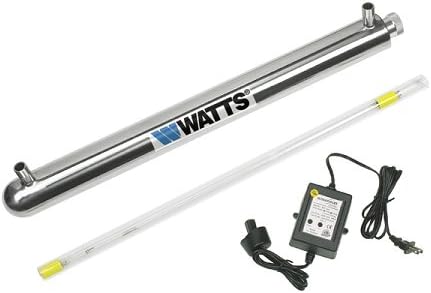
This image displays the main components of the WATTS WUV6-110 UV Disinfection System. It features the elongated stainless steel chamber, a long tubular UV lamp, and the electronic ballast with its power cord.
4. Configuración e instalación
Proper installation is crucial for the effective operation of your UV disinfection system. It is recommended that installation be performed by a qualified professional.
- Montaxe: Securely mount the stainless steel chamber horizontally or vertically to a sturdy surface using appropriate mounting hardware (not included). Ensure sufficient clearance for lamp substitución.
- Conexións de fontanería: Connect the water inlet and outlet to your existing plumbing using the 1/2 inch MPT (Male Pipe Thread) connections. Ensure all connections are watertight. A pre-filter is highly recommended to remove sediment that could shield microorganisms from UV light.
- Instalar UV Lamp and Quartz Sleeve: Carefully insert the quartz sleeve into the chamber. Then, gently slide the UV lamp into the quartz sleeve. Connect the lamp to the electronic ballast.
- Conexión eléctrica: Connect the electronic ballast to a grounded 110V electrical outlet. The system is designed for 110V operation.
- Comprobación de fugas: Slowly turn on the water supply and check for any leaks at the plumbing connections. Address any leaks before proceeding.
5. Instrucións de funcionamento
Once installed and leak-checked, the system is ready for operation.
- Encendido: Plug the electronic ballast into the 110V power outlet. The ballast will emit a visual indicator (e.g., a green light) and may produce an audible beep to confirm operation.
- Estado do sistema: The electronic ballast includes an audible and visual alarm system. A steady green light typically indicates normal operation. An alarm (audible beep and/or red light) signifies a lamp failure or other system malfunction. Refer to the Troubleshooting section for alarm interpretation.
- Funcionamento continuo: For continuous disinfection, the system should remain powered on at all times.
6. Mantemento
Regular maintenance ensures the continued effectiveness of your UV disinfection system.
- UV Lamp Substitución: A UV lamp has an effective life of approximately 9,000 hours (approximately 12 months of continuous operation). Replace the lamp annually to ensure optimal disinfection performance, even if the lamp appears to be working. Disconnect power before replacing.
- Quartz Sleeve Cleaning: Periodically (e.g., every 6-12 months, or as water quality dictates), the quartz sleeve may need cleaning to remove mineral deposits or fouling that can reduce UV light transmission. Disconnect power, drain the chamber, and carefully remove and clean the sleeve with a soft cloth and a mild acid solution (e.g., vinegar) if necessary. Rinse thoroughly before reinstallation.
- Pre-filter Maintenance: If a pre-filter is installed, follow its manufacturer's recommendations for replacement or cleaning to prevent sediment buildup in the UV chamber.
7 Solución de problemas
| Problema | Causa posible | Solución |
|---|---|---|
| No power to system / Lamp non iluminado | Power outlet issue, faulty ballast, or faulty lamp. | Check power outlet. Ensure ballast is securely plugged in. Test ballast with a new lamp if available. Replace ballast or lamp segundo sexa necesario. |
| Audible/Visual Alarm (Red Light) | UV lamp failure or nearing end of life. | Substitúe o UV lamp. If the alarm persists, check the ballast. |
| Water leakage from chamber connections | Loose connections, damaged O-rings, or improper thread sealant. | Disconnect power and water. Tighten connections. Inspect and replace O-rings if damaged. Reapply thread sealant if necessary. |
| Reduced disinfection effectiveness | Expired UV lamp, dirty quartz sleeve, or high water turbidity. | Substituír UV lamp. Clean quartz sleeve. Ensure adequate pre-filtration for water quality. |
8. Especificacións
| Característica | Detalle |
|---|---|
| Marca | vatios |
| Número de modelo | WUV6-110 |
| Caudal | 6 GPM (galóns por minuto) |
| Material da cámara | Aceiro inoxidable 304 |
| Tamaño de conexión | 1/2 inch MPT (Male Pipe Thread) |
| Voltage | 110 V |
| Lamp A vida | 9,000 horas |
| Ballast Features | Alarma sonora e visual |
| Peso do elemento | 5 libras |
| Método de control | App (Note: This feature may refer to monitoring capabilities if available with specific accessories.) |
9. Garantía e soporte
For warranty information, technical support, or replacement parts, please contact Watts customer service. Refer to the official Watts websitio web ou na documentación da súa compra para coñecer os termos específicos da garantía e os datos de contacto.
Watts Oficial Websitio: www.watts.com


