1. Introdución
Este manual proporciona instrucións esenciais para a instalación, o funcionamento, o mantemento e a resolución de problemas do seu conmutador de capa 3 Juniper EX2200-C-12T-2G. Lea este manual detidamente antes de usar o dispositivo para garantir o seu funcionamento e a súa seguridade axeitados. O Juniper EX2200-C-12T-2G é unha plataforma compacta, sen ventilador e de baixo consumo deseñada para implementacións de microsucursais de baixa densidade, acceso comercial ou entornos de grupos de traballo empresariais.
2. Produto rematadoview
2.1. Características clave
- Funcionamento silencioso e de baixo consumo.
- Factor de forma compacto e sen ventilador.
- Capacidades de conmutación de capa 3.
- 12 portos RJ-45 1000Base-T.
- 2 portos SFP.
- Funciona co sistema operativo Junos.
2.2. Contido do paquete
Verifica que todos os elementos estean presentes no paquete:
- Conmutador de capa 3 Juniper EX2200-C-12T-2G
- Cable de alimentación
- 12 cables RJ-45 1000Base-T (cables Ethernet)
- 2 cables SFP
2.3. Descrición física
O conmutador Juniper EX2200-C-12T-2G presenta un deseño robusto con varios portos e indicadores no seu panel frontal.
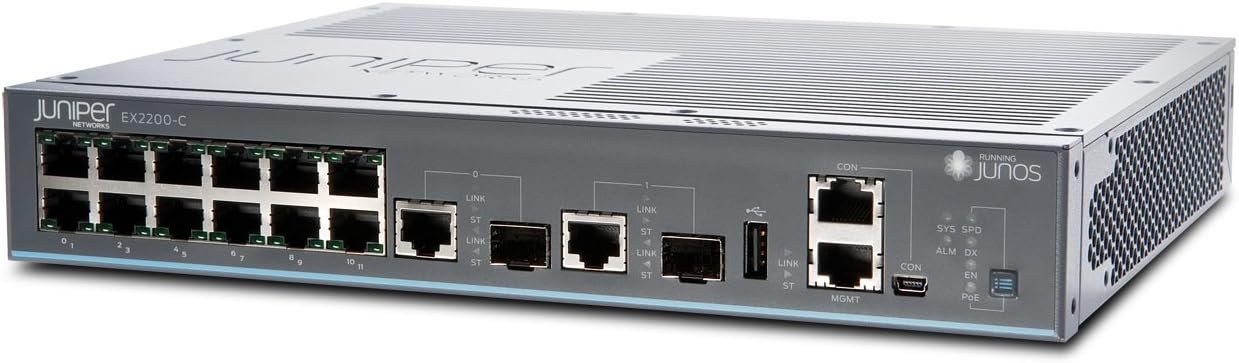
Figura 1: Fronte view do conmutador de capa 3 Juniper EX2200-C-12T-2G. Esta imaxe mostra o panel frontal do conmutador, destacando os 12 portos Ethernet RJ-45, dous portos de enlace ascendente SFP, portos de consola (RJ45 e mini-USB) e varios LED de estado, incluídos os indicadores SYS, SPD, ALM, DX, CON, EN e PoE.

Figura 2: Fronte alternativa view do conmutador de capa 3 Juniper EX2200-C-12T-2G. Esta perspectiva ofrece unha visión máis clara view da numeración de portos (0-11 para portos RJ-45) e o etiquetado dos portos SFP e as interfaces de xestión.
3. Configuración
3.1. Preparación do sitio
- Ambiente: Coloque o interruptor nunha zona limpa, seca e ben ventilada. Asegúrese de que a temperatura ambiente non supere os 40 graos Celsius.
- Montaxe: O deseño compacto permite a súa colocación sobre escritorio ou na parede (os accesorios de montaxe non están incluídos).
- Fonte de enerxía: Conecta o interruptor a unha toma de corrente fiable usando o cable de alimentación incluído. O interruptor funciona a 230 voltios.
3.2. Conectando o Switch
- Conexión de alimentación: Conecta o cable de alimentación á entrada de corrente do interruptor e despois a unha toma de corrente axeitada.
- Conexións de rede:
- Portos RJ-45: Empregue os cables RJ-45 1000Base-T fornecidos para conectar dispositivos de rede (ordenadores, servidores, outros conmutadores) aos 12 portos Ethernet (etiquetados como 0-11) do panel frontal.
- Portos SFP: Insira os transceptores SFP (se é necesario) nos dous portos SFP e conecte os cables de fibra óptica para conexións de enlace ascendente ou de alta velocidade.
- Conexión á consola (configuración inicial): Para a configuración e xestión iniciais, conecte un cable serie desde a estación de traballo de xestión ao porto CON (consola) do conmutador. Como alternativa, tamén hai dispoñible un porto de consola mini-USB.
4. Instrucións de funcionamento
4.1. Acendido
Unha vez conectado o cable de alimentación, o interruptor acenderase automaticamente. O proceso de arranque do sistema operativo Junos pode tardar varios minutos.
4.2. Indicadores LED
Supervisa os LED do panel frontal para ver o estado operativo:
- SYS (Sistema): Indica o estado xeral do sistema. Normalmente verde fixo para o funcionamento normal.
- SPD (velocidade): Indica a velocidade de enlace do porto conectado.
- ALM (Alarma): Indica unha condición de alarma. Consulta a documentación do sistema operativo Junos para obter códigos de alarma específicos e a resolución de problemas.
- DX (Dúplex): Indica o modo dúplex do porto conectado.
- CON (Consola): Indica actividade no porto da consola.
- EN (Activar): Indicador de estado.
- PoE (Power over Ethernet): Se corresponde, indica o estado de PoE para os portos. (Nota: Este modelo non inclúe explicitamente PoE como unha función, pero o LED está presente).
4.3. Configuración
O conmutador Juniper EX2200-C-12T-2G xestiónase mediante o sistema operativo Junos mediante unha interface de liña de comandos (CLI). Acceda á CLI a través do porto da consola ou mediante SSH despois da configuración inicial da rede. Consulte a documentación oficial do sistema operativo Junos de Juniper Networks para obter procedementos de configuración detallados, incluíndo a configuración de VLAN, os protocolos de enrutamento e a configuración de seguridade.
5. Mantemento
5.1. Atención xeral
- Manteña o interruptor limpo e libre de po. Use un pano suave e seco para limpalo.
- Asegúrate de que haxa un fluxo de aire axeitado arredor do dispositivo, mesmo que non teña ventilador, para evitar a acumulación de calor.
- Evite expoñer o interruptor a temperaturas extremas, humidade ou luz solar directa.
5.2. Actualizacións de firmware
Comprobe periodicamente o soporte de Juniper Networks websitio para obter actualizacións dispoñibles de Junos OS. A aplicación de actualizacións pode mellorar o rendemento, engadir novas funcións e solucionar vulnerabilidades de seguridade. Siga as instrucións proporcionadas por Juniper Networks para obter procedementos de actualización de firmware seguros.
6 Solución de problemas
6.1. Problemas de enerxía
- Sen enerxía: Verifica que o cable de alimentación estea conectado correctamente tanto ao interruptor como á toma de corrente. Comproba a toma de corrente con outro dispositivo.
6.2. Problemas de conectividade
- Sen ligazón: Comprobe se os cables Ethernet ou de fibra óptica están ben conectados e se presentan danos. Comprobe que o dispositivo conectado estea acendido e funcione correctamente. Observe o LED de enlace/actividade do porto.
- Conexión lenta: Asegúrate de que os cables sexan axeitados para a velocidade desexada (por exemplo, Cat5e/6 para Gigabit Ethernet). Comproba se hai discrepancias de dúplex ou conxestión na rede.
6.3. LED de alarma aceso
Se o LED ALM está aceso, indica unha alarma do sistema. Isto pode deberse a varias razóns, como un fallo de hardware, problemas ambientais ou erros de configuración. Acceda á CLI do conmutador a través do porto da consola para view mensaxes de alarma e rexistros detallados. Consulte a documentación do sistema operativo Junos ou o soporte de Juniper Networks para obter interpretacións específicas das alarmas e pasos de resolución.
7. Especificacións técnicas
| Característica | Especificación |
|---|---|
| Número de modelo | EX2200-C-12T-2G |
| Marca | Redes de enebro |
| Peso do elemento | 4.41 libras |
| Dimensións do produto (LxWxH) | 9 x 11 x 2 polgadas |
| Voltage | 230 voltios |
| Material do caso | Plástico |
| Clasificación de temperatura superior | 40 graos centígrados |
| Tipo de interface | RJ45, SFP |
| Taxa de transferencia de datos | 1000 megabits por segundo |
| Número de portos | 12 (RJ-45) + 2 (SFP) |
| RAM | 512 MB |
| Tamaño da memoria flash | 1024 MB |
| Sistema Operativo | Xunos |
8. Garantía e soporte
8.1. Información da garantía
Para obter información detallada sobre a garantía do seu conmutador Juniper EX2200-C-12T-2G, consulte a tarxeta de garantía incluída co produto ou visite o sitio web oficial de Juniper Networks. websitio. Os termos e condicións da garantía poden variar segundo a rexión e a data de compra.
8.2. Soporte técnico
Se atopas problemas que non se poden resolver cos pasos de resolución de problemas deste manual ou se necesitas asistencia avanzada, ponte en contacto co soporte técnico de Juniper Networks. Os recursos de soporte, como a documentación, as bases de coñecemento e a información de contacto, están dispoñibles no portal oficial de soporte de Juniper Networks.


