1. Introdución
The ECS Elitegroup A55F-M2 motherboard is designed to integrate AMD FM1 APU processors with the AMD A55 chipset, offering a balanced performance solution. This motherboard supports excellent graphics capabilities, including DirectX 11, and can utilize AMD Dual Graphics technology to combine APU and select Radeon discrete graphics cards for enhanced visual output. Key features include Dual-Channel DDR3 memory support up to 16GB, UVD3.0, SATA 3Gb/s, and USB 2.0 connectivity. This manual provides essential information for the proper installation, configuration, and maintenance of your A55F-M2 motherboard.
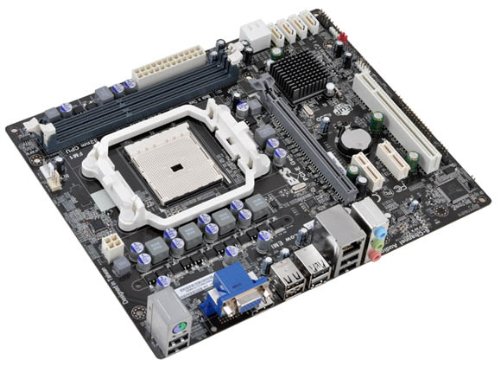
Figura 1: ECS Elitegroup A55F-M2 Motherboard. This image displays the overall layout of the motherboard, including the CPU socket, RAM slots, PCIe slots, and various connectors.
2. Características clave
- Supports AMD FM1 socket for AMD A series, E Series, Athlon Quad-core, Athlon Dual-core, and Sempron Dual-core processors.
- Features ESD protection design to prevent damage and extend product lifespan.
- Includes ECS Intelligent EZ Utility suite: eBLU, eDLU, eOC, eSF for system management.
- Supports AMD Dual Graphics technology for enhanced visual performance.
- Equipped with solid capacitors for improved VRM stability and longevity.
- Expansion slots include 1 x PCIe x16 and 1 x PCIe x1.
- Compatible with Microsoft Windows 8, Windows 7, Windows Vista, and Windows XP (32-bit and 64-bit versions).
3. Configuración e instalación
Follow these steps for proper installation of the motherboard and its components:
- Preparar o caso: Ensure your computer case is compatible with Micro ATX motherboards. Install the I/O shield into the case's rear opening.
- Instalar a CPU:
- Abra a panca do socket da CPU.
- Aliña coidadosamente a CPU co socket, asegurándote de que a marca triangular da CPU coincida coa marca do socket.
- Coloque a CPU no socket con coidado sen forzala.
- Peche a panca do zócalo para fixar a CPU.
- Aplica unha capa fina de pasta térmica na superficie da CPU.
- Instala o refrigerador da CPU segundo as instrucións do fabricante.
- Instalar módulos de RAM:
- Abra os clips en ambos extremos das ranuras DIMM.
- Align the RAM module with the slot, ensuring the notch on the module matches the key in the slot.
- Prema firmemente os dous extremos do módulo RAM ata que os clips encaixen no seu lugar.
- Montar a placa base:
- Place the motherboard into the case, aligning the screw holes with the standoffs.
- Fixa a placa base con parafusos. Non os apertes demasiado.
- Conectar fonte de alimentación:
- Connect the 24-pin ATX power connector from the power supply to the motherboard.
- Connect the 4-pin or 8-pin ATX 12V power connector (CPU power) to the motherboard.
- Conectar dispositivos de almacenamento: Conecta os cables de datos SATA das túas unidades de almacenamento (HDD/SSD) aos portos SATA da placa base. Conecta os cables de alimentación da fonte de alimentación ás unidades.
- Conectar os cables do panel frontal: Connect the power button, reset button, HDD LED, power LED, and USB/audio headers from the case to the corresponding pins on the motherboard. Refer to the motherboard's silkscreen labels for correct orientation.
- Instalar tarxetas de expansión (opcional): If using a discrete graphics card or other PCIe cards, insert them into the appropriate PCIe slots and secure them with the case's retention mechanism.
4. Soporte do sistema operativo
The ECS Elitegroup A55F-M2 motherboard supports a range of Microsoft Windows operating systems:
- Windows XP (32 bits e 64 bits)
- Windows Vista (32-bit and 64-bit)
- Windows 7 (32 e 64 bits)
- Windows 8 (32 e 64 bits)
Ensure you install the correct drivers for your operating system after installation for optimal performance and functionality.
5. Especificacións técnicas
| Característica | Detalle |
|---|---|
| Socket CPU | Socket FM1 |
| Procesadores compatibles | AMD A-Series, AMD Athlon, AMD Sempron (FM1) |
| Chipset | AMD A55 (Hudson D2) |
| Tipo de memoria | SDRAM DDR3 |
| Velocidade da memoria | Ata 1800 MHz |
| Capacidade máxima de RAM | 32 GB |
| Coprocesador gráfico | Integrated AMD Graphics (APU dependent) |
| Ranuras de expansión | 1 x PCIe x16, 1 x PCIe x1 |
| Portos USB 2.0 | 8 (via headers and rear panel) |
| Interface de almacenamento | SATA 3 Gb/s |
| Factor de forma | Micro ATX |
| Dimensións (LxWxH) | 10.5 x 9 x 2 polgadas |
| Peso do elemento | 1.7 libras |
6 Solución de problemas
Esta sección ofrece solucións a problemas comúns cos que podes atoparte.
- Sen enerxía:
- Ensure the power supply is connected correctly to the motherboard (24-pin ATX and 4/8-pin CPU power).
- Verifique que o interruptor da fonte de alimentación estea na posición "ON".
- Comprobe a conexión do botón de acendido do panel frontal á placa base.
- Proba cunha fonte de alimentación diferente se é posible.
- Sen visualización:
- Asegúrate de que o monitor estea conectado á saída de vídeo correcta (tarxeta gráfica integrada ou discreta).
- Reinstala os módulos de RAM. Tenta arrincar cun só módulo de RAM.
- Volva colocar a tarxeta gráfica (se é o caso).
- Clear CMOS by removing the CMOS battery for 5-10 minutes or using the clear CMOS jumper.
- Inestabilidade/fallos do sistema:
- Comproba as temperaturas da CPU e da GPU. O sobrequecemento pode causar inestabilidade.
- Asegúrate de que todos os controladores estean actualizados.
- Executa ferramentas de diagnóstico de memoria para comprobar se hai defectos na RAM.
- Verificar que a fonte de alimentación sexa suficiente para todos os compoñentes.
- Peripheral Devices Not Detected:
- Ensure devices are properly connected to the correct ports (USB, SATA).
- Check device manager in your operating system for driver issues.
- Try connecting the device to a different port.
7. Mantemento
Proper maintenance can extend the lifespan and ensure optimal performance of your motherboard.
- Eliminación de po: Regularly clean dust from inside your computer case, especially from CPU heatsinks, GPU fans, and case fans. Use compressed air for this purpose. Ensure the system is powered off and unplugged before cleaning.
- Xestión de cables Ensure cables are neatly routed to improve airflow and prevent obstruction of components.
- Actualizacións de controladores: Keep your motherboard drivers (chipset, audio, network) and graphics drivers updated to ensure compatibility and performance. Visit the ECS Elitegroup websitio para os controladores máis recentes.
- Actualizacións da BIOS/UEFI: Periodically check for BIOS/UEFI updates from the manufacturer's website. Updates can improve stability, add support for new hardware, or fix bugs. Follow the update instructions carefully.
- Control ambiental: Operate the computer in a well-ventilated area, away from direct sunlight, excessive heat, or humidity.
8. Garantía e soporte
For specific warranty terms and conditions, please refer to the warranty card included with your product or visit the official ECS Elitegroup websitio. A cobertura da garantía adoita incluír defectos de materiais e man de obra en condicións de uso normal.
For technical support, driver downloads, and further assistance, please visit the ECS Elitegroup support page. Have your product model number (A55F-M2) and serial number ready when contacting support.
Oficial Websitio: https://www.ecs.com.tw/


