1. Introdución
This manual provides detailed instructions for the installation, operation, and maintenance of the Balboa Water Group Air Control Complete 1/2 Gray, Model 10-2200GRY. This component is designed to regulate air flow into spa or hot tub jets, enhancing the hydrotherapy experience. Please read this manual thoroughly before installation and use to ensure proper function and safety.
2. Información de seguridade
AVISO: Always disconnect power to the spa or hot tub before performing any installation, maintenance, or service. Failure to do so can result in serious injury or death.
- Ensure all connections are secure and watertight to prevent leaks and electrical hazards.
- Do not modify the air control unit. Use only genuine Balboa Water Group replacement parts.
- If you are unsure about any part of the installation or operation, consult a qualified technician.
- Manteña aos nenos lonxe da zona de instalación.
3. Contido do paquete
Verifique que todos os compoñentes estean presentes e sen danos antes de comezar a instalación.
- 1x Balboa Water Group Air Control Assembly (Gray)
- 1x Mounting Nut
- 1x Gasket
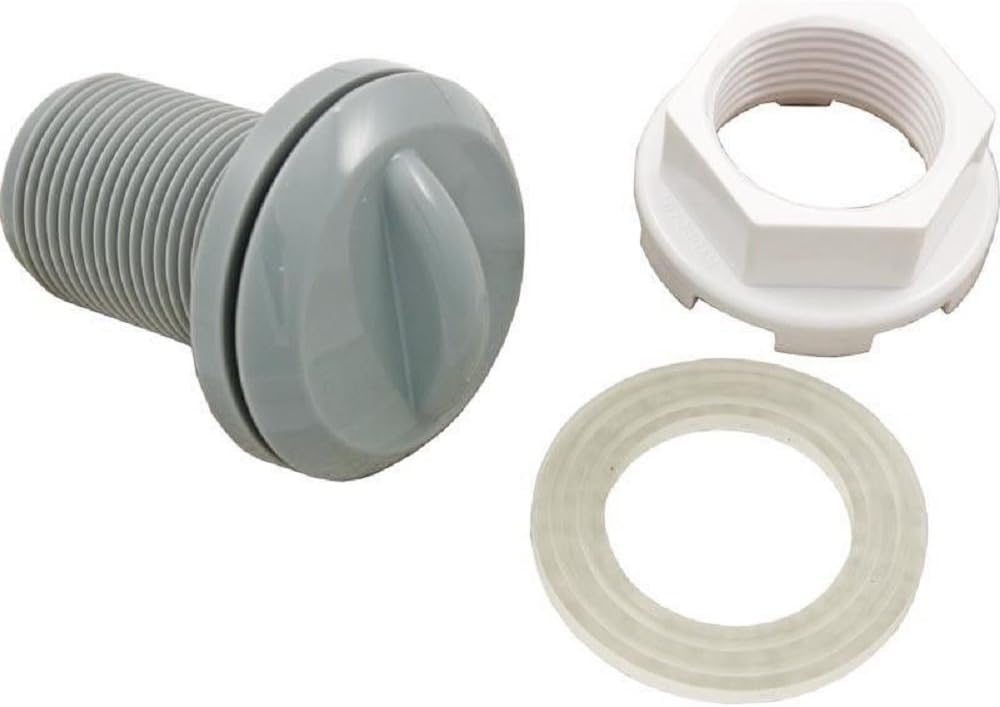
Figure 1: Components of the Balboa Water Group Air Control. Shown are the main air control body, a white mounting nut, and a clear gasket.
4. Configuración e instalación
This section outlines the steps for installing the air control unit. Professional installation is recommended if you are unfamiliar with spa plumbing.
4.1 Ferramentas necesarias (non incluídas)
- Chave inglesa axustable ou alicates de bloqueo de canle
- Sealant (if recommended by spa manufacturer)
4.2 Pasos da instalación
- Desconectar a enerxía: Ensure the spa or hot tub is completely powered off at the main breaker.
- Drain Spa (if necessary): If replacing an existing air control, drain the spa to below the level of the air control fitting.
- Remove Old Unit (if applicable): Unscrew the mounting nut from the old air control and carefully remove it from the spa shell. Clean the opening thoroughly.
- Prepare New Unit: Place the gasket onto the threaded portion of the new air control body. Ensure it is seated correctly.
- Insert Air Control: From the inside of the spa, insert the threaded portion of the air control through the prepared opening in the spa shell.
- Secure Mounting Nut: From the outside of the spa (or access panel), thread the mounting nut onto the air control body. Hand-tighten first, then use an adjustable wrench or pliers to tighten securely. Do not overtighten, as this can damage the spa shell or the air control.
- Connect Air Line: Attach the existing air line (typically 1/2 inch) from the spa's plumbing system to the barb fitting on the underside of the air control. Secure with a hose clamp if required by your spa's design.
- Refill Spa & Test: Refill the spa and inspect for leaks around the newly installed air control. Reconnect power to the spa.
5. Instrucións de funcionamento
The Balboa Water Group Air Control allows you to adjust the amount of air mixed with the water flow from your spa jets.
- Axuste do fluxo de aire: To increase air flow, rotate the top cap of the air control counter-clockwise. To decrease air flow or shut it off, rotate the top cap clockwise.
- Optimal Setting: Experiment with different settings to find the desired level of aeration for your hydrotherapy experience.
6. Mantemento
Regular maintenance ensures the longevity and proper function of your air control unit.
- Limpeza: Periodically wipe the visible parts of the air control with a soft cloth and a mild, non-abrasive cleaner. Avoid harsh chemicals that could damage the plastic.
- Inspección: Annually inspect the air control for any signs of wear, cracks, or leaks. Check the gasket for deterioration.
- Invernización: If winterizing your spa, ensure the air control is drained of any water to prevent freezing damage.
7 Solución de problemas
| Problema | Causa posible | Solución |
|---|---|---|
| No air flow from jets | Air control closed; air line kinked or blocked; pump not running. | Rotate air control cap counter-clockwise; inspect air line for obstructions; ensure spa pump is operating. |
| Fluxo de aire reducido | Partial blockage in air line; air control partially closed. | Check air line for partial obstructions; fully open air control. |
| Water leak around air control | Mounting nut loose; damaged gasket; cracked air control body. | Tighten mounting nut (do not overtighten); inspect and replace gasket if damaged; replace entire air control unit if cracked. |
8. Especificacións
| Característica | Detalle |
|---|---|
| Número de modelo | 10-2200 GRY |
| Marca | Grupo de Auga Balboa |
| Cor | Gris |
| Tamaño de conexión | 1/2 inch (air line) |
| Dimensións do produto | 6 x 4 x 6 polgadas |
| Peso do elemento | 1.41 onzas |
| Fabricante | Balboa |
| ASIN | B007VF0G06 |
9. Garantía e soporte
9.1 Información da garantía
Warranty coverage for the Balboa Water Group Air Control Complete 1/2 Gray (Model 10-2200GRY) is provided by the manufacturer, Balboa Water Group. Please refer to the warranty documentation included with your original purchase or visit the official Balboa Water Group websitio web para obter termos e condicións detallados. Garda o comprobante de compra para reclamacións de garantía.
9.2 Atención ao cliente
For technical assistance, troubleshooting beyond this manual, or to inquire about replacement parts, please contact Balboa Water Group customer support directly. Contact information can typically be found on their official websitio web ou na embalaxe do produto.
Note: This manual is for informational purposes only. Balboa Water Group is not responsible for any damage or injury caused by improper installation or use of this product.


