1. Introdución
The Focusrite Forte is a professional 2-input, 4-output portable USB audio interface designed for high-quality audio recording and playback on Mac and Windows computers. It features premium microphone preamplifiers derived from Focusrite's RedNet range and high-resolution 24-bit/192kHz analog-to-digital and digital-to-analog conversion. This manual provides essential information for setting up, operating, and maintaining your Forte interface.
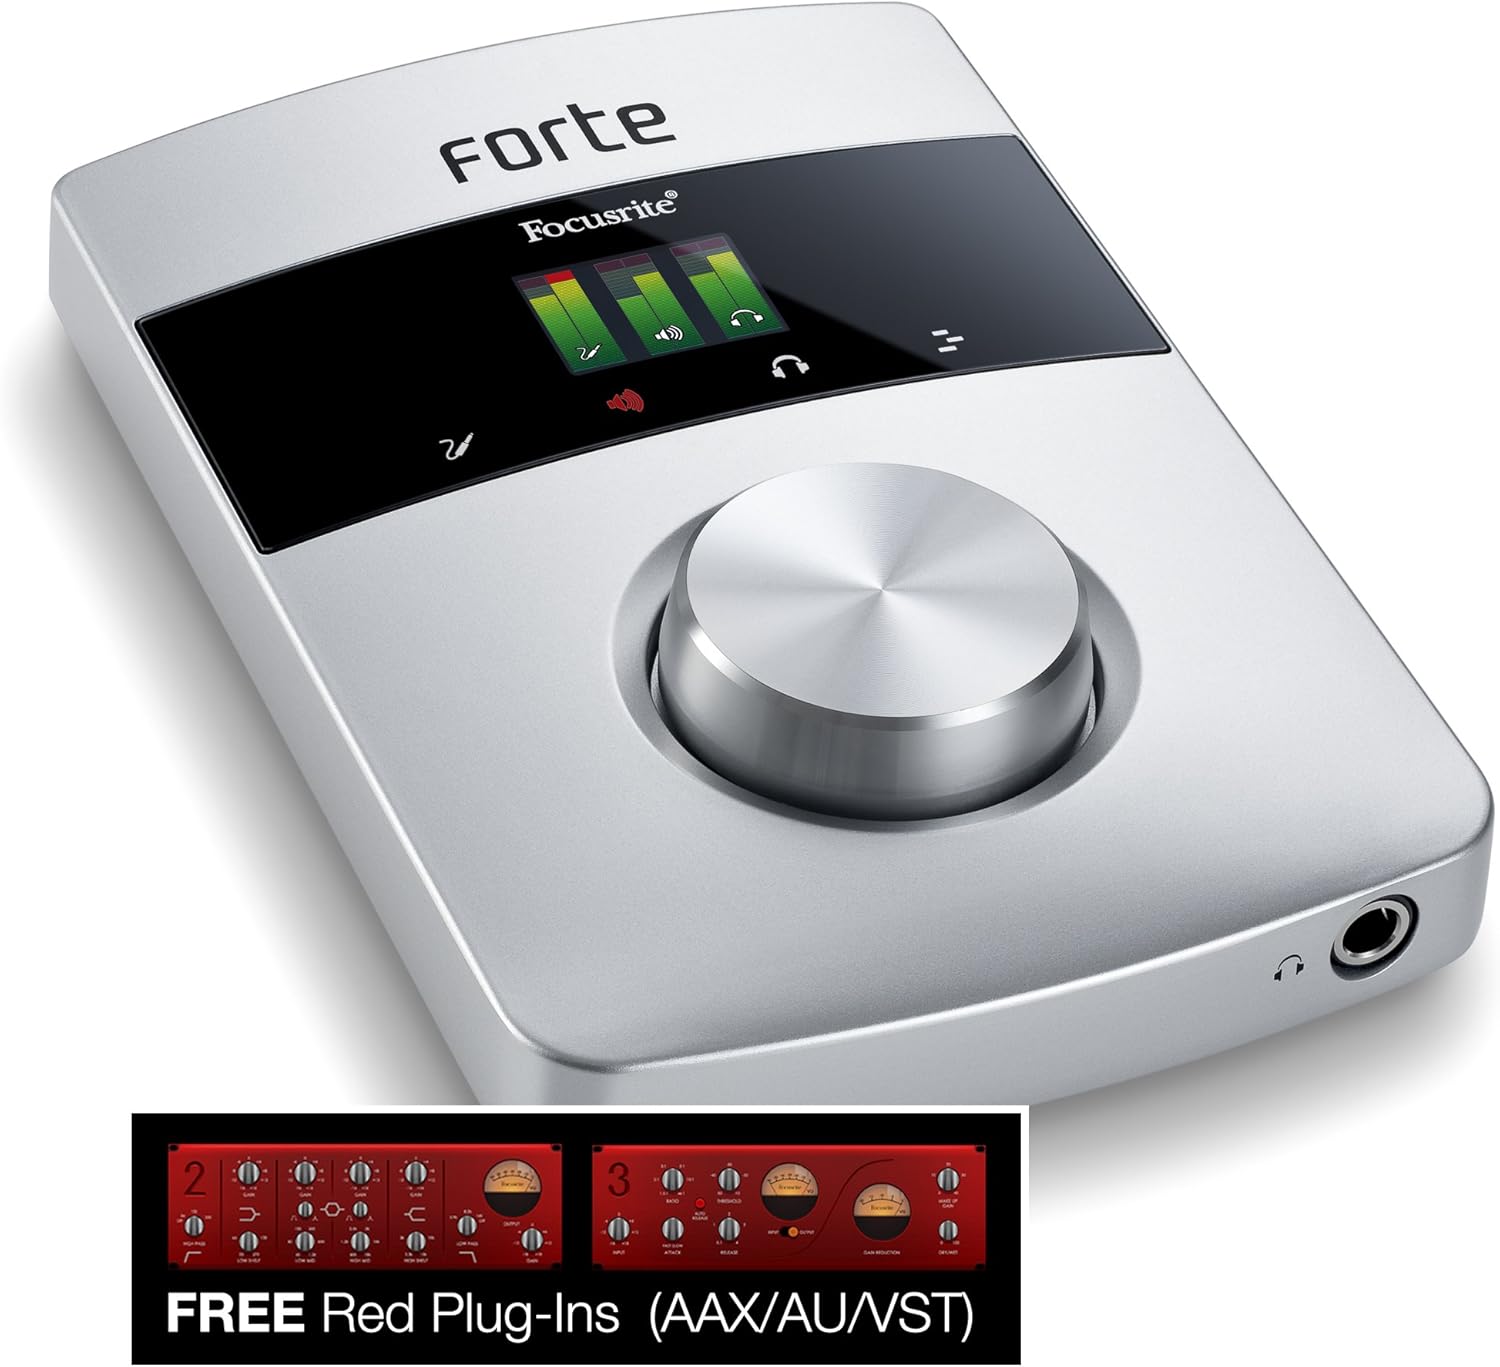
Imaxe 1.1: Fronte view of the Focusrite Forte Premium USB Audio Interface, showcasing its sleek design, OLED display, and large control knob.
2. Características clave
- Two Focusrite remote-controlled microphone preamplifiers, derived from the RedNet range.
- Ultra-high quality A-D / D-A conversion at up to 24-bit/192kHz resolution.
- +48V phantom power, High-Pass Filter (HPF), and polarity reverse functions.
- Compatible with both Mac and Windows operating systems.
- Durable premium aluminum enclosure.
- Color OLED display and touch controls for intuitive operation.
- Includes Forte Control software for low-latency monitoring and mic pre adjustment.
- Bundled with the classic Focusrite Midnight plugin suite.
3. Contido do paquete
Ensure all the following items are present in your Focusrite Forte package:
- Focusrite Forte USB Audio Interface
- External Power Supply Unit (PSU)
- Breakout Cable for microphone and line/instrument inputs
- Cable USB 2.0
- Documentación (Guía de inicio rápido, Información de garantía)
- Software download instructions for Forte Control and Midnight Plugin Suite
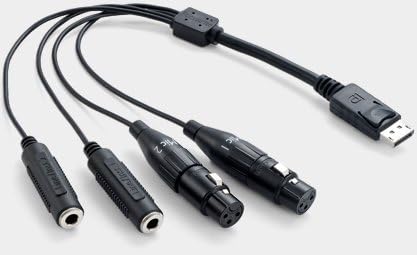
Image 3.1: The breakout cable for the Focusrite Forte, featuring XLR connectors for microphones and TRS connectors for line/instrument inputs.
4. Guía de configuración
4.1. Conexións de hardware
- Conecte o cable USB: Connect the Forte to your computer using the supplied USB 2.0 cable. Ensure it is connected directly to a USB 2.0 port on your computer. Avoid using unpowered USB hubs.
- Connect the Power Supply (Optional/Required for Phantom Power): The Forte can operate on USB bus power. However, if you intend to use +48V phantom power for condenser microphones, you must connect the external power supply unit to the Forte and a power outlet.
- Connect Inputs: Use the breakout cable to connect microphones (via XLR) or line/instrument sources (via TRS) to the Forte's input port. The breakout cable features a locking connector for secure attachment to the Forte.
- Connect Outputs: Connect your studio monitors to the balanced line outputs (L and R) on the rear of the Forte. Connect headphones to the dedicated headphone output on the front panel.
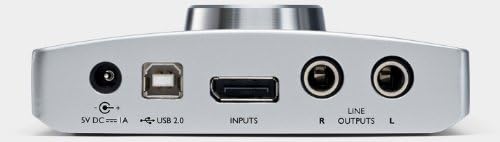
Image 4.1: Rear panel of the Focusrite Forte, showing the 5V DC power input, USB 2.0 port, Inputs port for the breakout cable, and balanced Line Outputs (R and L).

Image 4.2: Rear panel of the Focusrite Forte with the USB cable, power adapter, and breakout cable connected, illustrating a typical setup.
4.2. Instalación de software
Before connecting the Forte to your computer, it is recommended to download and install the latest drivers and the Forte Control software from the official Focusrite websitio. Siga as instrucións que aparecen na pantalla para a instalación.
- Condutores: Essential for your computer to recognize and communicate with the Forte.
- Forte Control: This application allows you to manage settings such as input gain, phantom power, monitoring mixes, and routing.
- Midnight Plugin Suite: Install these plugins into your Digital Audio Workstation (DAW) for additional audio processing capabilities.
4.3. System Optimization (Mac Specific Recommendations)
For optimal performance, especially on Mac systems, consider the following adjustments:
- Energy Saver Settings: Deactivate power-saving options. Go to System Preferences > Energy Saver. Set "Computer sleep" and "Display sleep" to "Never." Untick "Put hard disk(s) to sleep when possible."
- Selección de porto USB: Connect the Forte directly to a USB 2.0 port on your Mac. Some Mac models may have specific USB ports that perform better for audio devices. Use Apple's System Profiler (Applications > Utilities) to identify the internal USB configuration and avoid sharing the Forte's port with the iSight camera or other high-bandwidth devices.
- Lonxitude do cable USB: Use a USB cable no longer than five meters; three meters is generally recommended for stability.
5. Operating the Forte
5.1. Controis do panel frontal
- Pantalla OLED: Provides visual feedback on input levels, output levels, and current settings.
- Botón de control grande: Used for adjusting input gain, output volume, and navigating menus on the OLED display.
- Controis táctiles: Capacitive touch buttons surrounding the OLED display allow for quick access to functions like phantom power, input selection, and monitoring options.
5.2. Input and Output Configuration
Use the Forte Control software to configure your inputs and outputs. This includes:
- Adjusting input gain for microphones and line/instrument sources.
- Activating +48V phantom power for condenser microphones.
- Enabling High-Pass Filters (HPF) to reduce low-frequency rumble.
- Setting up direct monitoring mixes to hear your input with minimal latency.
- Controlling the main monitor output and headphone output levels.
Refer to the Forte Control software manual for detailed instructions on its features.
6. Mantemento
- Limpeza: Use a soft, dry cloth to clean the exterior of the Forte. Avoid abrasive cleaners or solvents.
- Almacenamento: Garde a unidade nun lugar fresco e seco, lonxe da luz solar directa e de temperaturas extremas.
- Coidado do cable: Handle the breakout cable and USB cable with care to prevent damage to connectors and wiring.
- Actualizacións de firmware: Revise periodicamente o Focusrite website for firmware updates for your Forte, as these can improve performance and add features.
7 Solución de problemas
7.1. Unit Not Recognized by Computer
- Ensure the USB cable is securely connected to both the Forte and a direct USB 2.0 port on your computer.
- Proba cun porto USB diferente no teu ordenador.
- Verify that the latest drivers for the Forte are installed.
- If the unit has been connected for a while and stops being recognized, try disconnecting both the USB and AC adapter cables from the Forte, wait for a minute, then reconnect the AC adapter first (if using), followed by the USB cable.
- Reinicia o teu ordenador.
7.2. No Sound or Distorted Audio
- Comprobe todas as conexións dos cables (entradas, saídas, auriculares).
- Verify input gain levels in Forte Control and your DAW.
- Ensure the correct audio device (Focusrite Forte) is selected in your computer's sound settings and your DAW.
- Check monitoring settings in Forte Control to ensure inputs are routed to outputs correctly.
- If using phantom power, ensure the external power supply is connected.
7.3. High Latency
- Adjust the buffer size in your DAW's audio settings. Smaller buffer sizes reduce latency but require more CPU power.
- Ensure your computer meets the minimum system requirements for your DAW and the Forte.
- Review system optimization steps (Section 4.3) for Mac users.
7.4. Unit Gets Warm
It is normal for the Forte to become slightly warm during operation. If it becomes excessively hot or exhibits unusual behavior, disconnect it immediately and contact support.
8. Especificacións
| Peso do elemento | 3 libras |
| Dimensións do produto | 7.48 x 9.92 x 4.37 polgadas |
| Número de modelo | FORTE |
| Interface de hardware | USB 2.0 |
| Dispositivos compatibles | Personal Computer (Mac and Windows) |
| Sistema Operativo | Windows (also Mac compatible) |
| A/D & D/A Conversion | Ata 24 bits/192 kHz |
| Poder Fantasma | +48V (requires external PSU) |
9. Garantía e soporte
For warranty information, technical support, and service inquiries, please refer to the documentation included with your product or visit the official Focusrite websitio. Garda o comprobante de compra para reclamacións de garantía.
Recursos en liña:
- Rexistro do produto
- Driver and software downloads
- Knowledge base and FAQs
- Contacte co servizo de asistencia


