Introdución
This instruction manual provides detailed guidance for the safe installation, operation, and maintenance of your new Progress Lighting Outdoor Wall Lantern. Please read all instructions carefully before beginning installation and retain this manual for future reference. Proper installation and care will ensure optimal performance and longevity of your lighting fixture.

Imaxe: Fronte view of the 1-Light Clear Flat Glass Traditional Outdoor Wall Lantern Light in Antique Bronze finish.
Información de seguridade
- AVISO: Risco de descarga eléctrica. Desconecte a alimentación no disxuntor ou na caixa de fusibles antes da instalación ou do mantemento.
- All electrical connections must be in accordance with local codes, ordinances, or the National Electric Code (NEC). Contact a qualified electrician if you are unfamiliar with proper electrical wiring installations.
- Use only UL/cUL listed wire connectors.
- Esta luminaria está deseñada para uso no exterior e é axeitada para lugares húmidos.
- Non exceda a potencia máximatage especificado para a lámpada.
- Use lentes e luvas de seguridade durante a instalación.
Contido do paquete
Verifique que todas as pezas que se indican a continuación estean incluídas no paquete:
- A. Fixture Body (1)
- B. Mounting Plate (1)
- C. Mounting Screws (2)
- D. Wire Connectors (3)
- E. Decorative Nuts (2)
- F. Glass Panels (4, pre-installed)
Especificacións
| Característica | Detalle |
|---|---|
| Número de modelo | P5607-20 |
| Dimensións (ancho x alto) | 4-1/2 inches x 8 inches |
| Remate | Bronce Antigo |
| Tipo de vidro | Clear Flat Glass |
| Tipo de bulbo | Base media (E26) |
| Max Wattage | 100 Watts (Incandescent equivalent) |
| Clasificación da localización | Localización húmida listada |
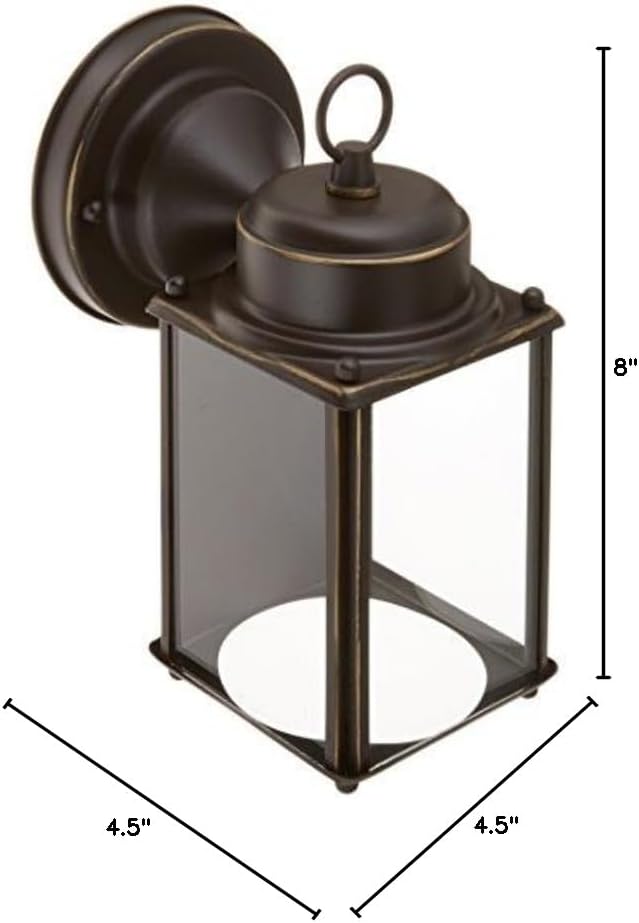
Image: Diagram showing the width (4.5 inches) and height (8 inches) of the wall lantern.
Guía de instalación
Follow these steps for proper installation of your outdoor wall lantern. It is recommended to watch the accompanying video for visual guidance on sizing and placement.
Ferramentas necesarias:
- Destornillador Phillips
- Destornillador de cabeza plana
- Pelacables
- Cinta illante (opcional)
- Gafas de seguridade
Preinstalación:
- Apague a enerxía: Locate the circuit breaker or fuse box that supplies power to the light fixture location. Turn off the main power switch.
- Unpack contents: Carefully remove all components from the packaging. Keep the packaging materials until installation is complete to ensure no small parts are lost.
- Review existing wiring: Ensure the existing electrical box is securely mounted and capable of supporting the fixture's weight.
Montaxe do aparello:
- Attach the mounting plate (B) to the electrical box using the mounting screws (C). Ensure the plate is level and secure.
- Pull the electrical wires from the electrical box through the center hole of the mounting plate.
Conexións de cableado:
- Connect the bare copper ground wire from the fixture to the bare copper ground wire from the electrical box using a wire connector (D). If your electrical box has a ground screw, wrap the fixture's ground wire around it before connecting to the supply ground wire.
- Connect the white (neutral) wire from the fixture to the white (neutral) wire from the electrical box using a wire connector (D).
- Connect the black (hot) wire from the fixture to the black (hot) wire from the electrical box using a wire connector (D).
- Ensure all wire connections are secure. Wrap electrical tape around the wire connectors for added insulation if desired.
Asegurar o dispositivo:
- Carefully push all excess wiring into the electrical box.
- Align the holes on the fixture body (A) with the threaded posts on the mounting plate (B).
- Secure the fixture body to the mounting plate using the decorative nuts (E). Tighten firmly but do not overtighten.
Instalación da bombilla:
- Insert one medium base (E26) bulb (not included) into the socket. Do not exceed the maximum recommended wattage de 100 vatios.

Imaxe: Lateral view of the wall lantern with a clear incandescent bulb installed, showing the internal socket.
Sizing and Selection Guidance Video:
For additional guidance on selecting the appropriate size and mounting height for outdoor lighting fixtures, please watch the official Progress Lighting video below:
Video: An official Progress Lighting guide on sizing and selecting outdoor lighting fixtures, covering optimal placement for entryways, garages, and other outdoor areas.
Instrucións de funcionamento
Once the fixture is securely installed and wired, restore power at the circuit breaker. The light fixture can then be operated using your wall switch or external control system (if applicable).
Mantemento
- Limpeza: To clean the fixture, turn off the power and allow it to cool. Wipe with a soft, damp pano. Non empregue produtos de limpeza abrasivos nin disolventes, xa que poden danar o acabado ou o vidro.
- Substitución da lámpada: Ensure power is off before replacing the bulb. Allow the bulb to cool completely before touching. Replace with a new medium base (E26) bulb, not exceeding 100 Watts.
- Inspección periódica: Periodically check all connections and mounting hardware for tightness.
Resolución de problemas
| Problema | Causa posible | Solución |
|---|---|---|
| A luz non acende. | Non hai potencia para o dispositivo. | Comprobe o disxuntor ou o fusible. Asegúrese de que o interruptor de parede estea aceso. |
| Conexións de fíos soltas. | Desconecte a alimentación e comprobe todas as conexións dos cables. | |
| Lámpada defectuosa. | Substitúe a lámpada. | |
| Luz parpadea. | Bombilla solta. | Aperte a lámpada no enchufe. |
| Tipo de bombilla ou wat incorrectotage. | Ensure bulb meets specifications. | |
| Cableado solto. | Desconecte a alimentación e comprobe todas as conexións dos cables. |
Garantía e Soporte
Progress Lighting products are manufactured to the highest standards and are backed by a limited warranty. For specific warranty details, technical support, or replacement parts, please visit the official Progress Lighting websitio web ou póñase en contacto co seu departamento de atención ao cliente. Garde o recibo da compra como proba de compra.
Para máis información, visite: Progress Lighting Store on Amazon


