1. Introdución
This instruction manual provides essential information for the proper installation, maintenance, and troubleshooting of the Vulcan HART Dishwasher Pump Seal, part number 906410, model 32-1094. This component is designed for use in specific Vulcan commercial dishwasher models to ensure efficient and leak-free operation. Please read this manual thoroughly before attempting any installation or service.
2. Produto rematadoview
The Vulcan HART Dishwasher Pump Seal 906410 is a critical component responsible for preventing water leakage from the dishwasher pump shaft. It consists of multiple parts that create a dynamic seal, allowing the pump shaft to rotate while maintaining a watertight barrier.
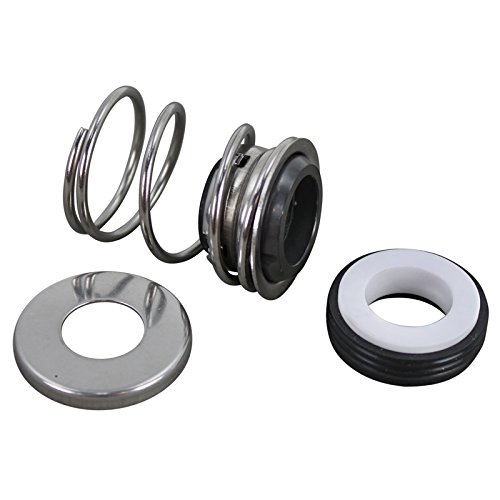
Image: Components of the Vulcan HART Dishwasher Pump Seal 906410. This image displays the individual components of the Vulcan HART Dishwasher Pump Seal 906410. It includes a coiled metal spring, a main seal assembly composed of metal, rubber, and ceramic parts, and a separate flat metal washer. These parts work together to create a watertight seal within a dishwasher pump.
Características principais:
- Genuine Vulcan HART replacement part.
- Designed for dishwasher pump applications.
- Part number: 906410.
- Model number: 32-1094.
- 5/8" OD (Outer Diameter) for precise fitment.
3. Instrucións de instalación
Safety Warning: Always disconnect power to the dishwasher before performing any service or installation. Failure to do so may result in serious injury or death. Wear appropriate personal protective equipment (PPE) such as gloves and eye protection.
Ferramentas necesarias:
- Desaparafusadores (Phillips e cabeza plana)
- Chaves inglesas ou conxunto de chaves de vaso
- Alicates
- Seal puller (optional, but recommended)
- Trapos limpos
- Lubricant (silicone-based, safe for rubber)
Pasos de instalación:
- Desconectar a enerxía: Ensure the dishwasher is completely disconnected from its electrical power source.
- Drenaxe de auga: Drain any remaining water from the dishwasher and pump housing.
- Bomba de acceso: Locate and access the dishwasher pump. This may require removing panels or other components. Refer to your specific dishwasher model's service manual for detailed access instructions.
- Retirar o selo antigo: Carefully remove the old pump seal. Note its orientation and how each component is assembled. A seal puller can assist in removing stubborn seals. Clean the pump shaft and housing thoroughly, removing any debris or corrosion.
- Inspeccionar compoñentes: Inspect the pump shaft and housing for any damage, wear, or irregularities that could affect the new seal's performance. Address any issues before proceeding.
- Lubricate New Seal: Lightly lubricate the rubber components of the new pump seal with a silicone-based lubricant. This aids in installation and prevents damage to the seal.
- Instalar selo novo: Carefully install the new pump seal components in the correct order and orientation. Ensure the ceramic and carbon faces are clean and free of fingerprints or scratches. Press the stationary part of the seal firmly into the pump housing, and slide the rotating part onto the pump shaft.
- Remontar: Reassemble the pump and dishwasher components in reverse order of disassembly. Ensure all connections are secure and panels are properly reinstalled.
- Proba de funcionamento: Reconnect power to the dishwasher. Run a short cycle and carefully check for any leaks around the pump area. If leaks are detected, disconnect power immediately and re-inspect the seal installation.
4. Mantemento
Regular inspection of the pump seal is recommended to prevent unexpected failures. Look for signs of leakage, unusual noise from the pump, or reduced dishwasher performance. While the pump seal itself is a wear item and not typically maintained, ensuring the pump and surrounding components are clean and free of debris can extend its lifespan. If a leak is observed, replace the seal promptly.
5 Solución de problemas
Problemas comúns:
- Water Leakage from Pump: This is the primary symptom of a failing pump seal. If water is observed dripping or spraying from the pump area, the seal likely needs replacement.
- Ruído inusual da bomba: A worn or improperly installed seal can sometimes cause the pump to operate with unusual grinding or squealing noises.
- Reduced Pump Performance: While less common, a severely damaged seal could potentially affect pump efficiency if it allows air ingress or significant water loss.
Solucións:
- If any of the above symptoms occur, the most common solution is to replace the pump seal following the installation instructions provided in Section 3.
- Ensure the pump shaft is clean and smooth, without any burrs or corrosion that could damage the new seal.
- Verify that the new seal is installed correctly and all components are seated properly.
6. Especificacións
| Propiedade | Valor |
|---|---|
| Fabricante | VULCAN HART |
| Número de peza | 906410 |
| Número de modelo | 32-1094 |
| Peso do elemento | 2.24 onzas |
| ASIN | B00DNGSWJ4 |
| Diámetro exterior (OD) | 5/8 polgadas |
| Primeira data dispoñible | 26 de xuño de 2013 |
7. Garantía e soporte
For information regarding warranty coverage for the Vulcan HART Dishwasher Pump Seal 906410, please refer to the original purchase documentation or contact your authorized Vulcan HART dealer or service provider. For technical support or assistance with installation, please reach out to Vulcan HART customer service or a qualified service technician.


