1. Introdución
This manual provides comprehensive instructions for the installation, operation, and maintenance of your Weiser Augusta/Troy Single Cylinder Handleset. This handleset is designed for residential and light commercial applications, offering security and durability with an ANSI Grade 2 rating. Please read all instructions carefully before beginning installation to ensure proper function and safety.
2. Información de seguridade
- Always wear appropriate safety gear, such as safety glasses, during installation.
- Manteña as pezas pequenas lonxe dos nenos para evitar riscos de asfixia.
- Use only the tools specified or recommended in this manual.
- Ensure all screws are tightened securely, but do not overtighten, as this may damage components.
- If you are unsure about any part of the installation process, consult a qualified locksmith or professional installer.
3. Contido do paquete
Comprobe que todos os compoñentes estean presentes antes de comezar a instalación:
- Exterior Handleset Assembly (Augusta/Troy Trim)
- Interior Knob Trim
- Pestillo de pestillo
- Pestillo de resorte
- Strike Plates (Full Lip)
- Parafusos de montaxe
- Chaves
- Modelo de instalación (se está incluído)
4. Instalación
Ferramentas necesarias: Phillips head screwdriver, tape measure, pencil, drill (optional for new installations).
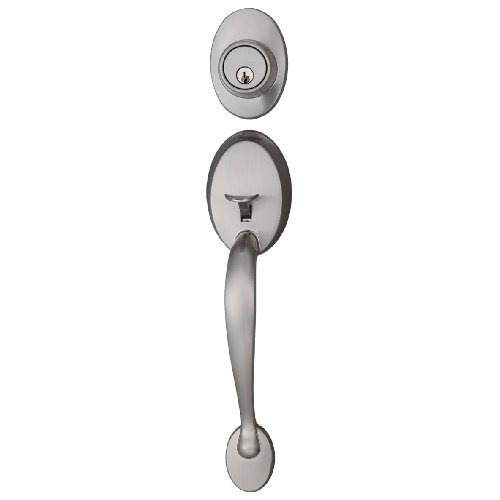
Figura 1: Máisview of the Weiser Augusta/Troy Single Cylinder Handleset components, including the exterior handle, interior knob, and associated hardware.
- Prepara a porta: Ensure your door has the correct bore holes and backset. This handleset is designed for doors with a 2-1/8 inch cross bore and an adjustable backset of 2-3/8 inches or 2-3/4 inches.
- Instalar o pestillo do ferrollo: Insert the deadbolt latch into the edge bore hole, ensuring the bolt faces the correct direction. Secure it with the provided screws.
- Install the Spring Latch: Insert the spring latch into the lower edge bore hole, ensuring the bevel faces the door frame. Secure it with the provided screws.
- Instalar o conxunto de manillar exterior: Place the exterior handleset assembly onto the door, aligning the posts with the bore holes.
- Install the Interior Knob Trim: Attach the interior knob trim to the exterior handleset, ensuring the spindle engages with the spring latch mechanism. Secure with the long mounting screws, tightening evenly.
- Proba de funcionamento: Before closing the door, test the deadbolt and spring latch mechanisms to ensure smooth operation. The deadbolt should extend and retract fully with the key from either side. The lower trim is non-locking.
- Instalar as placas de peche: Mark and chisel out recesses for the strike plates on the door frame, aligning them with the latches. Secure the strike plates with the provided screws.
5. Funcionamento
- Locking the Deadbolt: Insert the key into the exterior cylinder and turn to extend the deadbolt. From the interior, turn the thumbturn to extend the deadbolt.
- Unlocking the Deadbolt: Insert the key into the exterior cylinder and turn to retract the deadbolt. From the interior, turn the thumbturn to retract the deadbolt.
- Operating the Lower Latch: The lower handle operates a spring latch for entry and exit. This latch does not lock and is always accessible from both sides.
6. Mantemento
- Limpeza: Limpar o conxunto de asas cun pano suave eamp pano. Evite produtos de limpeza abrasivos, solventes ou produtos químicos agresivos, xa que poden danar o acabado.
- Lubricación: Aplique periodicamente unha pequena cantidade de lubricante de grafito ou un spray a base de silicona na chaveta e nos mecanismos internos para garantir un funcionamento suave. Non empregue lubricantes a base de aceite.
- Inspección: Regularly check all screws for tightness and ensure the handleset operates smoothly. Tighten any loose screws as needed.
7 Solución de problemas
- Handleset is stiff or difficult to operate:
- Check if mounting screws are overtightened. Loosen slightly if necessary.
- Apply lubricant to the latch and cylinder mechanisms.
- Ensure the door is properly aligned and not binding against the frame.
- Deadbolt does not extend or retract fully:
- Verify the strike plate alignment. Adjust if the deadbolt is hitting the frame or strike plate.
- Check for obstructions in the door frame.
- A chave é difícil de inserir ou xirar:
- Aplique lubricante de grafito na ranura da chaveta.
- Ensure the key is not bent or damaged.
8. Especificacións
| Número de modelo | A9470A/T17AB |
| Marca | Weiser |
| Material | Zinc (Handle), Nickel (Finish) |
| Remate | Níquel antigo |
| Tipo de bloqueo | Single Cylinder Key Lock |
| Retroceso | Axustable 2-3/8" ou 2-3/4" |
| ANSI Rating | Grao 2 |
| Compoñentes incluídos | Pomo, pestillo, fechadura |
9. Garantía e soporte
Weiser products are manufactured to the highest standards and are backed by a limited lifetime warranty on mechanical components and finish. For detailed warranty information, technical support, or to purchase replacement parts, please visit the official Weiser websitio web ou póñase en contacto co seu departamento de atención ao cliente. Garde o comprobante de compra para reclamacións de garantía.


