1. Introdución
This instruction manual provides essential information for the safe and efficient operation of your Nuwave Pro Plus Infrared Oven. Please read all instructions thoroughly before initial use to ensure proper function and to prevent injury or damage. Keep this manual for future reference.
2. Instrucións de seguridade importantes
Cando se utilicen aparellos eléctricos, débense seguir sempre as precaucións básicas de seguridade para reducir o risco de incendios, descargas eléctricas e lesións ás persoas, incluíndo as seguintes:
- Lea todas as instrucións antes de facer funcionar o aparello.
- Non toque superficies quentes. Use asas ou botóns.
- Para protexerse contra descargas eléctricas, non mergulle o cable, os enchufes nin o aparello en auga ou noutro líquido.
- É necesaria unha estreita supervisión cando calquera aparello é usado por nenos ou preto de eles.
- Desenchufe da toma cando non estea en uso e antes de limpalo. Deixar arrefriar antes de poñer ou quitar pezas.
- Non faga funcionar ningún aparello cun cable ou enchufe danados, ou despois de que o aparello funcione mal ou teña dano dalgún xeito.
- O uso de accesorios non recomendados polo fabricante do aparello pode causar lesións.
- Non use ao aire libre.
- Non deixes que o cable colgue do bordo da mesa ou do mostrador nin toque superficies quentes.
- Non o coloque sobre ou preto dun queimador eléctrico ou de gas quente, nin nun forno quente.
- Débese ter moito coidado ao mover un aparello que conteña aceite quente ou outros líquidos quentes.
- Conecte sempre primeiro o enchufe ao electrodoméstico e, a seguir, o cable á toma de corrente. Para desconectalo, poña calquera control na posición de apagado e, a seguir, retire o enchufe da toma de corrente.
- Non use o aparello para outros usos que os previstos.
3. Compoñentes do produto
The Nuwave Pro Plus Infrared Oven consists of several key components designed for efficient cooking.

Figure 3.1: The Nuwave Pro Plus Infrared Oven, shown with its instruction manual and a recipe CD.
- Cabeza de potencia: Contén o elemento calefactor, o ventilador e o panel de control.
- Cúpula: A transparent, heat-resistant dome that covers the cooking area.
- Estante de cociña: Used to elevate food for even cooking.
- Base Pan: Collects drippings and holds the cooking rack.
- Panel de control dixital: For setting time, temperature, and other functions.

Imaxe 3.2: Primeiro plano view of the heating element and internal fan located within the power head.
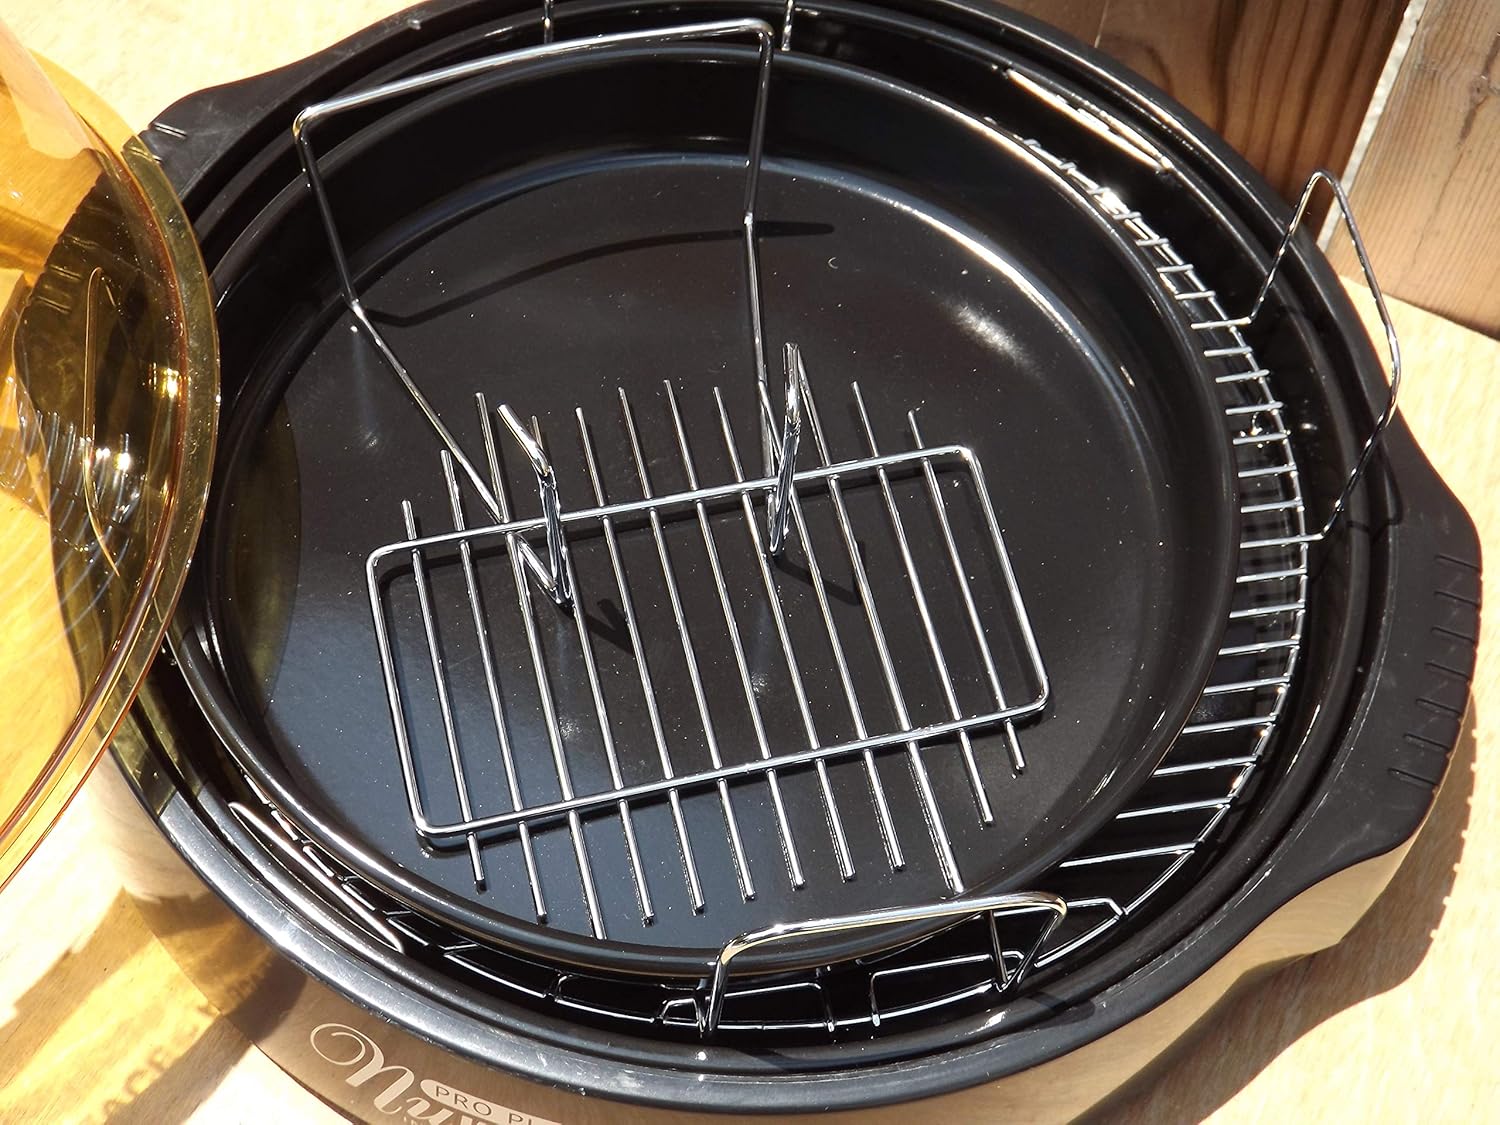
Figure 3.3: The cooking racks positioned within the oven's base pan, ready for food placement.
4. Configuración
Before first use, ensure all packaging materials are removed and the appliance is assembled correctly.
- Desempaquetar: Retire coidadosamente todos os compoñentes da embalaxe.
- Limpar: Wash the dome, cooking rack, and base pan with warm, soapy water. Rinse thoroughly and dry completely. The power head should only be wiped with a damp pano.
- Montar: Place the base pan on a stable, heat-resistant surface. Insert the desired cooking rack into the base pan. Place the food on the rack. Carefully position the dome over the base pan. Finally, place the power head securely on top of the dome.
- Conexión de alimentación: Conecte o cable de alimentación a unha toma eléctrica estándar de 120 V CA.
5. Instrucións de funcionamento
The Nuwave Pro Plus Infrared Oven features a digital control panel for precise cooking.

Figure 5.1: The digital control panel with buttons for Cook Time, Cook Temp, Reheat, Warm, Delay, Pause/Clear, Start, and numerical input.
- Encendido: Once plugged in, the display will illuminate.
- Tempo de cocción definido: Press the 'Cook Time' button. Use the numerical keypad to enter the desired cooking duration in minutes. Press 'Start' to confirm.
- Set Cooking Temperature: Press the 'Cook Temp' button. Use the numerical keypad to enter the desired temperature in degrees Fahrenheit. Press 'Start' to confirm.
- Comezar a cociñar: After setting time and temperature, press the 'Start' button to begin the cooking cycle.
- Pause/Clear: To temporarily stop cooking, press 'Pause/Clear'. Press 'Start' to resume. To cancel the current program, press 'Pause/Clear' twice.
- Función de recalentamento: Press the 'Reheat' button for a preset reheating cycle. Adjust time if necessary using 'Cook Time'.
- Función quente: Press the 'Warm' button to keep food warm after cooking.
- Función de retardo: Press the 'Delay' button to set a delayed start time for cooking. Follow on-screen prompts to set the delay duration.
Always monitor food during cooking. Cooking times may vary based on food type, quantity, and desired doneness.
6. Mantemento e Limpeza
Regular cleaning ensures optimal performance and extends the life of your Nuwave Pro Plus Infrared Oven.
- Desconecta e refresca: Always unplug the oven from the power outlet and allow all components to cool completely before cleaning.
- Dome, Rack, and Base Pan: These components are dishwasher safe or can be washed by hand with warm, soapy water. Use a non-abrasive sponge or cloth. Rinse thoroughly and dry completely.
- Cabeza de potencia: The power head contains electrical components and should NEVER be immersed in water. Wipe the exterior with a damp pano. Para manchas difíciles, use un deterxente suave no pano e logo limpe cun pano limpo.amp pano. Asegúrese de que estea completamente seco antes de gardalo ou de usalo de novo.
- Almacenamento: Garde o forno nun lugar limpo e seco cando non o use.
7 Solución de problemas
Consulta esta sección para ver os problemas comúns e as súas solucións.
| Problema | Causa posible | Solución |
|---|---|---|
| O forno non acende. | Non conectado; apagadotage; toma de corrente avariada. | Asegúrate de que o cable de alimentación estea ben conectado. Comproba o disyuntor. Proba cunha toma de corrente diferente. |
| A comida non se cociña de xeito uniforme. | Improper food placement; too much food; incorrect temperature/time. | Ensure food is placed on the rack and not directly on the base. Do not overcrowd the oven. Adjust cooking time or temperature as needed. |
| Fume ou cheiro inusual durante o funcionamento. | Food drippings on heating element; residue from previous cooking. | Unplug immediately. Allow to cool and clean all components thoroughly. Ensure no food particles are on the heating element. |
| O panel de control non responde. | Temporary electrical glitch; power head not seated correctly. | Unplug the oven for 1 minute, then plug back in. Ensure the power head is securely placed on the dome. |
8. Especificacións
Detailed technical specifications for the Nuwave Pro Plus Infrared Oven.
- Marca: Nuwave
- Nome do modelo: Nu-Wave Oven
- Tipo de control: Knob (Digital Keypad)
- Estilo de porta: Side Swing (Dome Lift)
- Compoñentes incluídos: Crumb Tray (Base Pan), Cooking Rack
- Tipo de acabado: Pintado
- Tipo de material da porta: Stainless Steel (referring to internal components/accents)
- Fonte de enerxía: adaptador de CA
- Número de estantes: 1 (Cooking Rack)
- Tamaño: Medio
- Peso do artigo: 14.26 libras
- Dimensións do paquete: 15.8 x 14.9 x 12.1 polgadas
- ASIN: B00IXC09QC
- UPC: 652185206021
9. Garantía e soporte
For warranty information and customer support, please refer to the documentation included with your purchase or visit the official Nuwave websitio. Garde o recibo da compra como proba de compra para calquera reclamación de garantía.
For further assistance, you may contact Nuwave customer service directly. Contact details are typically found on the product packaging or the manufacturer's official websitio.