Introdución
This manual provides instructions for the installation and use of the Flexson FLXPBTV1021 Screen Mount for the Sonos Playbar. This mount is designed to securely attach your Sonos Playbar to a full-motion (articulated) TV wall mount, allowing the soundbar to move in conjunction with your television screen. This ensures optimal audio alignment with your viewposición de ing.
The Flexson FLXPBTV1021 is engineered from high-quality alloy steel, ensuring durability and stable support for your Sonos Playbar. Its design facilitates neat cable routing and flexible placement, integrating seamlessly with your home entertainment setup.
Información importante de seguridade
- Lea atentamente todas as instrucións antes da instalación.
- Ensure the mounting surface (wall or TV mount) can safely support the combined weight of your television, TV mount, Sonos Playbar, and the Flexson screen mount.
- Use appropriate tools and hardware for installation. If unsure, consult a qualified installer.
- Do not overtighten screws, as this may cause damage to the mount or connected devices.
- Manteña as pezas pequenas lonxe dos nenos.
Contido do paquete
Verifique que estean presentes todos os compoñentes antes de comezar a instalación.

Figura 1: All components of the Flexson FLXPBTV1021 Screen Mount. This image displays the main bracket, vertical extension arms, and various screws and spacers required for assembly.
- Main Sonos Playbar mounting bracket
- Vertical TV attachment arms (2x)
- Assorted screws, washers, and spacers for TV and Playbar attachment
- Allen keys for assembly
Configuración e instalación
This section outlines the steps to install your Flexson FLXPBTV1021 Screen Mount. It is recommended to have assistance during the installation process, especially when handling the television.
Step 1: Prepare Your TV and TV Mount
- Carefully lay your television face down on a soft, clean surface to prevent screen damage.
- If your TV is already mounted, carefully remove it from the wall mount.
- Identify the VESA mounting holes on the back of your television.
Step 2: Attach Vertical Arms to TV

Figura 2: Explotou view illustrating the attachment of the vertical arms to the TV and the main bracket to the vertical arms, with the Sonos Playbar positioned below.
- Align the two vertical TV attachment arms with the lower VESA mounting holes on your television.
- Using the provided screws and appropriate spacers (refer to your TV's manual for correct screw length and VESA pattern), secure the vertical arms to the TV. Ensure the arms are oriented correctly, with the longer sections extending downwards.
- Nota: The use of spacers is crucial to ensure proper clearance and stability, especially with thin TVs or specific VESA patterns. You may need to stack multiple spacers to achieve the correct fit.
Step 3: Attach Main Bracket to Vertical Arms
- Position the main Sonos Playbar mounting bracket underneath the vertical arms.
- Align the slots on the main bracket with the holes on the vertical arms.
- Secure the main bracket to the vertical arms using the provided screws and nuts. Ensure all connections are firm but do not overtighten.
- Adjust the height of the main bracket along the vertical arms to achieve the desired position for your Sonos Playbar relative to the bottom edge of your TV.
Step 4: Mount TV with Flexson Bracket to Wall Mount

Figura 3: A television and Sonos Playbar mounted on a wall using the Flexson screen mount, demonstrating the integrated setup.
- Attach your television (now with the Flexson screen mount attached) to your existing full-motion TV wall mount. Follow the instructions provided with your TV wall mount for this step.
- Ensure all connections are secure and the TV is level.
Step 5: Install Sonos Playbar

Figura 4: Primeiro plano frontal view of the Flexson screen mount with a Sonos Playbar securely seated in its position.
- Carefully place your Sonos Playbar onto the main mounting bracket. The Playbar should sit securely within the bracket's cradle.
- Use the provided retaining screws (if applicable) to secure the Playbar to the bracket from underneath. This prevents accidental dislodgement.
- Connect all necessary cables to your Sonos Playbar and TV, ensuring they are routed neatly and do not interfere with the TV's movement.
Instrucións de funcionamento
The Flexson FLXPBTV1021 Screen Mount is designed to integrate with your full-motion TV wall mount. Once installed, the Sonos Playbar will move in sync with your television screen.
- Movemento: Gently adjust your television's position using its articulated wall mount. The Sonos Playbar will follow the TV's movement, maintaining its alignment.
- Orientación: The mount supports landscape orientation for the Sonos Playbar, in line with the screen.
Mantemento
- Limpeza: Limpa o soporte cun pano suave e seco. Evita produtos de limpeza abrasivos ou solventes.
- Comprobacións periódicas: Periodically inspect all screws and connections to ensure they remain tight and secure. Over time, vibrations or movement may cause fasteners to loosen.
- Xestión de cables Ensure cables remain free from pinching or excessive tension during TV movement.
Resolución de problemas
| Problema | Causa posible | Solución |
|---|---|---|
| A montura parece inestable ou tambaleante. | Loose screws or incorrect spacer usage. | Ensure all screws securing the mount to the TV and the Playbar are tightened. Verify that appropriate spacers are used to create a flush and stable connection between the TV, mount, and TV wall mount. |
| Playbar is not flush with the TV screen. | Incorrect spacer configuration or TV design. | Adjust the spacers between the TV and the vertical arms. Some TV designs may have a slight bulge, which can affect flushness. Experiment with different spacer combinations. |
| Mounting bolts are too short. | TV VESA holes are deeper than standard or require more spacers. | The kit includes various bolt lengths. If none are suitable, you may need to acquire longer M6 or M8 bolts (depending on your TV's VESA standard) from a hardware store. Ensure the new bolts are compatible with your TV and do not damage internal components. |
| Difficulty aligning components during assembly. | Complex assembly with multiple parts and spacers. | Refírese ao estoupado view diagram (Figure 2). Take your time and ensure each component is correctly aligned before tightening. Having a second person assist can greatly simplify the process. |
Especificacións
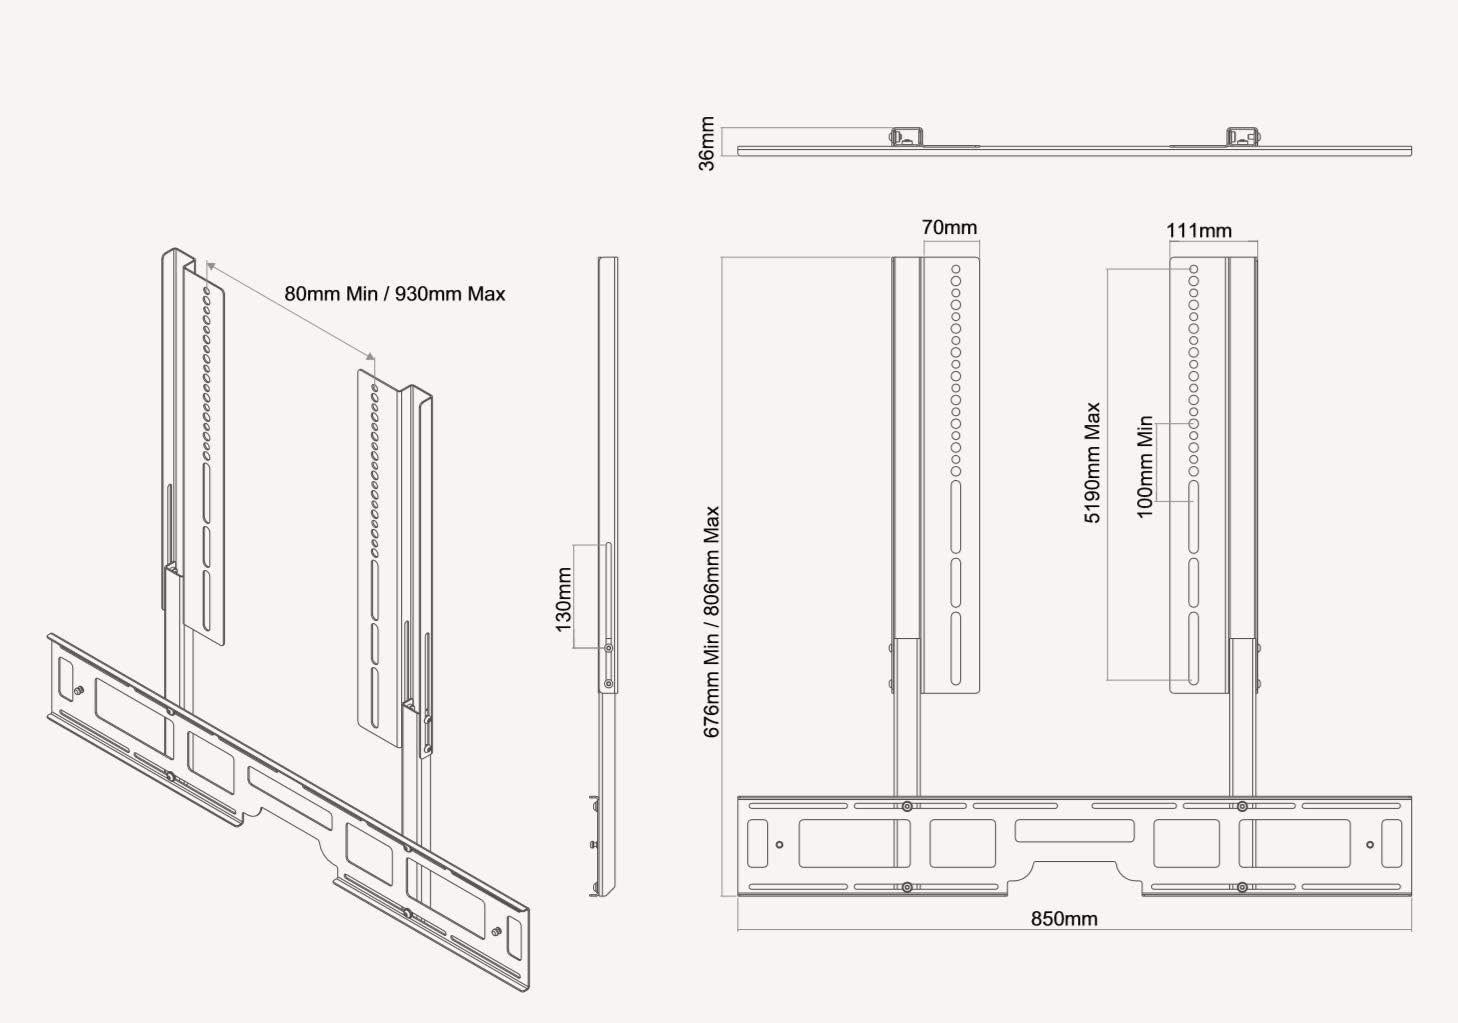
Figura 5: Detailed technical drawing showing the dimensions and adjustable ranges of the Flexson FLXPBTV1021 Screen Mount.
| Característica | Detalle |
|---|---|
| Modelo | FLXPBTV1021 |
| Tipo de montaxe | Speaker (for Sonos Playbar) |
| Tipo de movemento | Articulating (moves with TV) |
| Marca | Flexson |
| Material | Aceiro de aliaxe |
| Cor | Negro |
| Dispositivos compatibles | Television (with full-motion mount), Sonos Playbar |
| Peso do elemento | 9.04 libras (aprox. 4.1 kg) |
| Dimensions (D x H x W) | 35.5mm x 676mm (min) - 806mm (max) x 850mm |
| Orientación | Paisaxe |
Soporte e Garantía
For technical assistance, missing parts, or warranty inquiries, please contact Flexson customer support. Refer to the product packaging or the official Flexson websitio para obter a información de contacto máis actualizada.
Conserve o comprobante de compra para reclamacións de garantía.


