1. Introdución
This manual provides detailed instructions for the setup, operation, and maintenance of your Intermec EasyCoder PX4i Thermal Transfer Printer. The PX4i is a robust and flexible industrial printer designed for high-volume label printing, offering monochrome output at a resolution of 203 dpi and speeds up to 12 inches per second. Please read this manual thoroughly before using the printer to ensure safe and efficient operation.
2. Características do produto
- Impresión de alta velocidade: Capable of printing at speeds up to 12 inches per second.
- Alta resolución: Delivers clear monochrome prints at 203 dpi.
- Manexo flexible de medios: Supports various media types including black mark, continuous label, fanfold, gap, general identification label, notch, roll fed, tag, and ticket.
- Conectividade Ethernet: Integrated Ethernet for network integration.
- Programable: Designed for optimized printing operations and streamlined deployment.
- Deseño duradeiro: Industrial-grade construction for demanding environments.
3. Contido do paquete
Verify that all items listed below are included in your printer package. If any items are missing or damaged, contact your supplier immediately.
- Intermec EasyCoder PX4i Thermal Transfer Printer
- Cable de alimentación
- Labels (Included Components)
- User Documentation (This manual)
4. Información de seguridade
Observe sempre as seguintes precaucións de seguridade para evitar lesións e danos na impresora:
- Asegúrese de que a impresora estea colocada sobre unha superficie estable e nivelada.
- Connect the printer to a grounded power outlet.
- Do not operate the printer in wet or excessively humid conditions.
- Manteña as mans e a roupa solta lonxe das pezas móbiles durante o funcionamento.
- Desconecte a alimentación antes de realizar calquera mantemento ou limpeza.
- Use só pezas de recambio e accesorios aprobados.
5. Configuración
5.1 Desembalaxe
- Retire coidadosamente a impresora da súa embalaxe.
- Retire todos os materiais de embalaxe, cintas adhesivas e películas protectoras.
- Conserve a embalaxe orixinal para futuros transportes ou almacenamentos.
5.2 Conexión de enerxía
- Asegúrese de que o interruptor de alimentación da impresora estea na posición de APAGADO.
- Conecte o cable de alimentación á entrada de corrente da impresora.
- Conecte o outro extremo do cable de alimentación a unha toma eléctrica conectada a terra.
5.3 Carga de soportes (etiquetas)
The PX4i printer supports various label types. Follow these general steps to load your labels:

Imaxe: Fronte view of the Intermec EasyCoder PX4i printer, showing a label being fed out of the front slot. The control panel with an LCD screen and numeric keypad is visible on the top front.
- Abra a portada multimedia da impresora.
- Place the roll of labels onto the media supply spindle, ensuring it unwinds correctly.
- Feed the leading edge of the labels through the media guides and under the printhead assembly.
- Adjust the media guides to fit the width of your labels snugly but without binding.
- Close the media cover. The printer may automatically calibrate to the new media.
5.4 Connecting to a Computer/Network
The PX4i offers Ethernet connectivity for network integration.
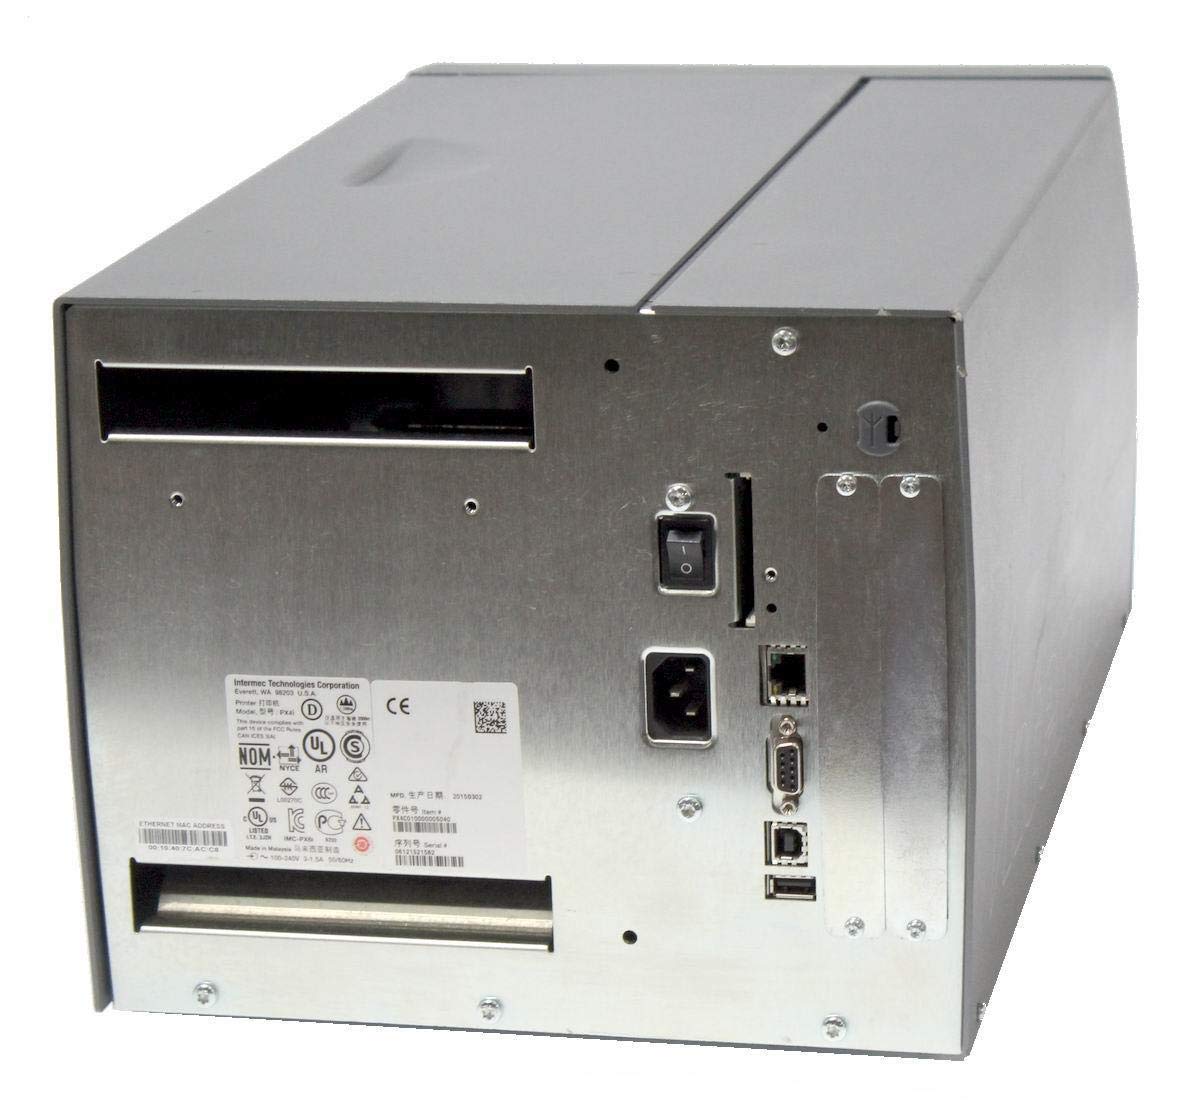
Imaxe: Traseira view of the Intermec EasyCoder PX4i printer, displaying the power inlet, power switch, Ethernet port, serial ports, and USB ports. The metallic casing is clearly visible.
- Locate the Ethernet port on the rear of the printer.
- Connect a standard Ethernet cable from the printer to your network router or switch.
- For direct connection to a computer, use an appropriate USB or serial cable if supported by your system and printer configuration.
- Refer to the printer's network configuration guide for setting up IP addresses and other network parameters.
6. Funcionamento
6.1 Panel de control rematadoview
The front control panel provides access to printer functions and status information.
Image: Close-up of the Intermec EasyCoder PX4i control panel, featuring an LCD display, navigation buttons (up, down, left, right, enter), and a numeric keypad with function keys like Pause, Feed, and Clear.
- Pantalla LCD: Mostra o estado da impresora, as opcións do menú e as mensaxes de erro.
- Botóns de navegación: Úsase para percorrer os menús e seleccionar opcións.
- Teclado numérico: For entering data or selecting numbered options.
- Botón de pausa: Temporarily stops printing.
- Botón de alimentación: Avanza unha etiqueta.
- Botón de configuración: Accesses printer configuration menus.
6.2 Impresión básica
- Asegúrate de que a impresora estea acendida e conectada ao teu ordenador ou á rede.
- Open the document or application from which you wish to print labels.
- Select the Intermec PX4i printer from your printer list.
- Configure print settings such as label size, orientation, and quantity as needed.
- Initiate the print job. The printer will begin feeding and printing labels.
6.3 Adjusting Print Settings
Advanced print settings can be adjusted through the printer's control panel or via the printer driver on your computer. These settings include print darkness, print speed, label gap sensing, and more. Consult your printer driver documentation for software-based adjustments.
7. Mantemento
Un mantemento regular garante un rendemento óptimo e prolonga a vida útil da súa impresora.
7.1 Limpeza do cabezal de impresión
The printhead should be cleaned regularly, especially if print quality degrades.
- Apague a impresora e desconecte o cable de alimentación.
- Abra o conxunto da cabeza de impresión.
- Cun pano que non solte fiapos ou un bolígrafo de limpeza do cabezal de impresión humedecido con alcol isopropílico, limpe suavemente a superficie do cabezal de impresión desde o centro ata a beira.
- Deixe que o cabezal de impresión seque completamente antes de pechar o conxunto e volver conectar a alimentación.
7.2 Substitución de soportes e cinta
When the label roll or thermal transfer ribbon (if used) runs out, replace it promptly.
- Apague a impresora e abra a tapa do soporte.
- Remove the empty label roll and/or used ribbon core.
- Install a new roll of labels and/or a new ribbon, following the loading instructions in Section 5.3.
- Ensure media and ribbon are properly tensioned and aligned.
- Pecha a portada dos medios.
8 Solución de problemas
This section addresses common issues you might encounter with your PX4i printer.
- A impresora non se acende: Check power cord connection, power outlet, and printer's power switch.
- Sen saída de impresión: Verify printer is online, connected to the computer/network, and has media loaded. Check for error messages on the LCD.
- Mala calidade de impresión: Clean the printhead (Section 7.1). Adjust print darkness settings. Ensure correct media and ribbon are used.
- Etiquetas que non se alimentan correctamente: Check media loading (Section 5.3) and ensure media guides are properly adjusted. Calibrate media sensors if necessary.
- Mensaxes de erro: Refer to the printer's LCD display for specific error codes and consult the full Intermec PX4i technical manual for detailed explanations and solutions.
9. Especificacións
| Característica | Descrición |
|---|---|
| Nome do modelo | PX4i |
| Número de modelo do artigo | PX4C010000000020 |
| Tecnoloxía de impresión | Transferencia térmica |
| Imprimir a cor | Monocromo |
| Velocidade de impresión máxima | 12 in/s (Monochrome) |
| Resolución de impresión máxima | 203 ppp |
| Tecnoloxía de conectividade | Ethernet |
| Tamaño máximo do soporte | 12 polgadas |
| Compoñentes incluídos | Etiquetas |
| Tipo de controlador | Pulsador |
| Fabricante | INTERMEC INDUSTRIAL PRINTERS |
| Dimensións do paquete | 23.25 x 15.5 x 15.25 polgadas; 36.2 libras |
10. Garantía e soporte
The Intermec EasyCoder PX4i Thermal Transfer Printer comes with a standard manufacturer's warranty. For specific warranty terms and conditions, please refer to the warranty card included with your product or visit the official Intermec (Honeywell) support website. For technical assistance, troubleshooting beyond this manual, or to inquire about service, please contact Intermec customer support or your authorized dealer.
Recursos en liña: For the latest drivers, firmware updates, and additional documentation, please visit the official Intermec support portal.


