1. Introdución
The devolo Home Control Radiator Thermostat is designed to provide energy-efficient temperature control within your smart home system. It integrates with your existing Home Control setup to manage room temperatures according to your preferences, offering both manual and app-based control. This device replaces conventional radiator thermostats and is compatible with commonly used radiator valves.
The thermostat communicates using standardized Z-Wave wireless technology, allowing integration with a central control unit, such as the devolo Home Control Central Unit, and other smart home components.

Image 1.1: The Devolo Home Control Radiator Thermostat, a white cylindrical device with a digital display and control buttons.
2. Configuración e instalación
Before installation, ensure you have the devolo Home Control Central Unit and that it is properly configured. The Radiator Thermostat requires 2 AA batteries (included).
2.1. Inserción de batería
- Carefully open the battery compartment of the thermostat.
- Introduza as dúas pilas AA, asegurándose de manter a polaridade correcta (+/-).
- Pecha o compartimento da batería de forma segura.
2.2. Mounting on Radiator
The devolo Home Control Radiator Thermostat is designed to replace your existing thermostatic radiator valve (TRV). It fits on all commonly used radiators.
- Remove your existing thermostatic head from the radiator valve. This usually involves unscrewing a collar or releasinclip ga.
- Attach the devolo Radiator Thermostat to the valve body. Ensure it is seated correctly and tighten the collar until it is secure. Do not overtighten.
- If necessary, use one of the included adapters to ensure a proper fit with your radiator valve.

Image 2.1: The Devolo Radiator Thermostat mounted on a white radiator next to a window.
2.3. Pairing with Home Control Central Unit
To integrate the thermostat into your smart home system, it must be paired with your devolo Home Control Central Unit.
- Put your devolo Home Control Central Unit into pairing mode (refer to your Central Unit's manual for specific instructions).
- On the Radiator Thermostat, press the pairing button (refer to the device diagram for location, typically a small button or sequence of button presses). The display will indicate pairing status.
- Once successfully paired, the thermostat will appear in your devolo Home Control app.
3. Operating the Radiator Thermostat
The thermostat offers both manual control directly on the device and remote control via the devolo Home Control app.
3.1. Control manual
The thermostat features an illuminated display and control buttons for direct temperature adjustment.
- Visualización da temperatura: The current set temperature is shown on the illuminated display.
- Axuste da temperatura: Use the 'Up' and 'Down' buttons on the device to manually increase or decrease the desired room temperature.
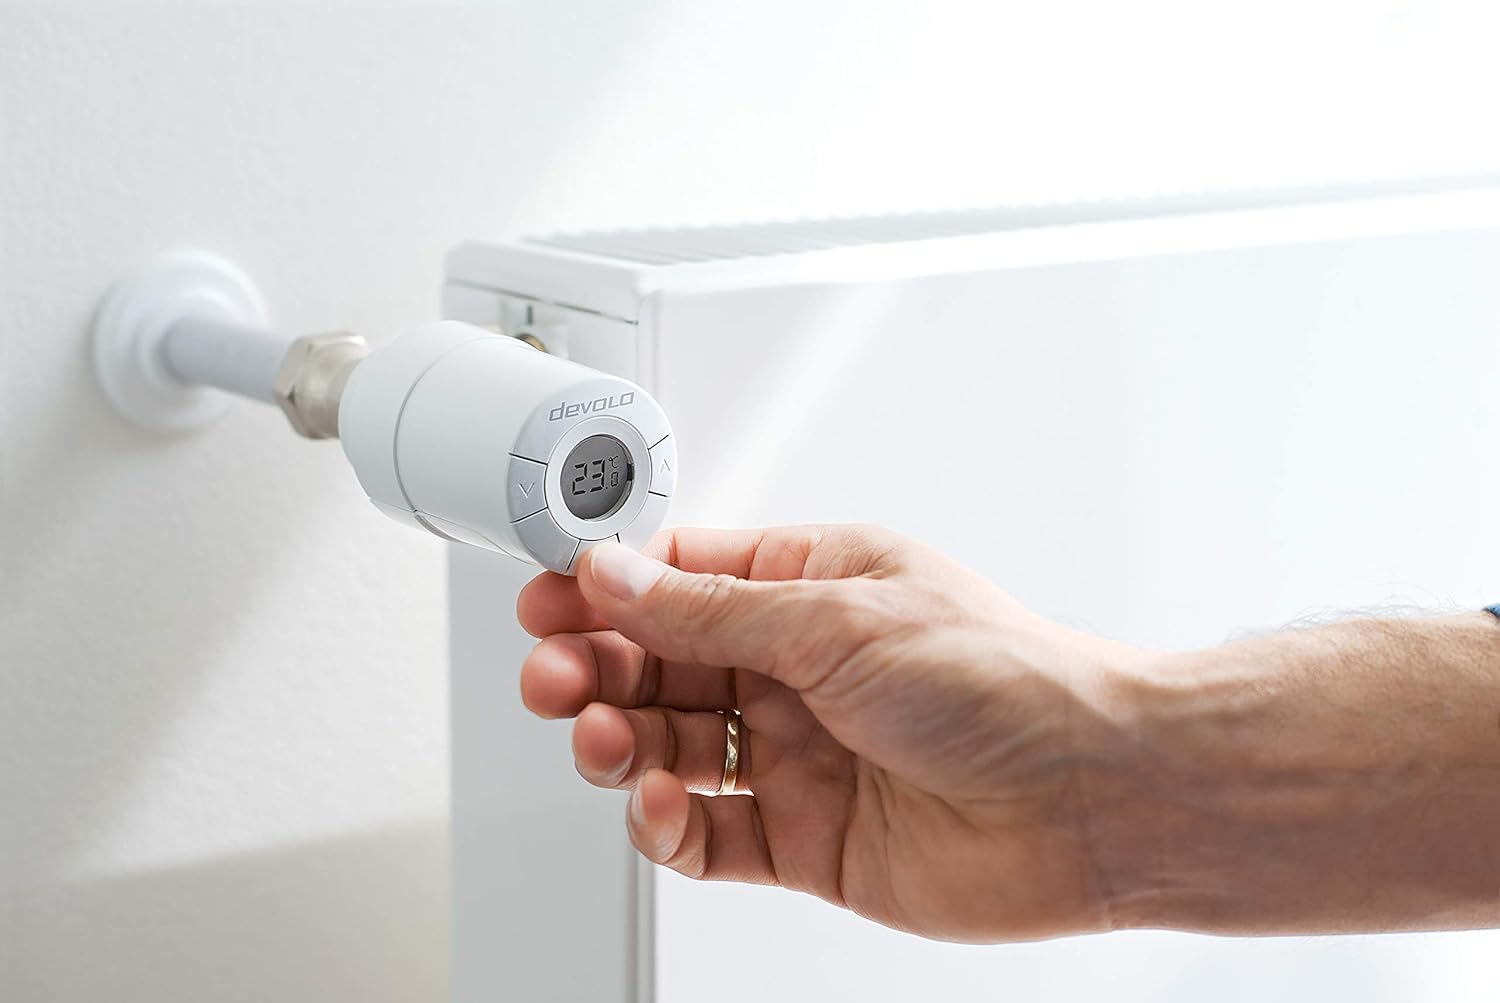
Image 3.1: A hand manually adjusting the temperature on the Devolo Radiator Thermostat's display.
3.2. Control e programación da aplicación
For comprehensive control and scheduling, use the intuitive devolo Home Control app on your smartphone or tablet.
- Remote Adjustment: Change the room temperature from anywhere using the app.
- Programación flexible: Program specific temperature schedules for each day of the week and time of day. This allows the thermostat to automatically adjust to your comfort preferences.
- Modo de aforro de enerxía: Configure the thermostat to automatically switch to an energy-saving mode when you are not at home.
- Integration with Scenes: Integrate the radiator thermostat into smart home scenes. For example, a 'Good Morning' scene could activate heating in the bathroom.

Image 3.2: An illustration depicting a smart home scenario where activating a 'Good Morning Scene' heats the bathroom and brews coffee, coordinated by a central unit.
3.3. Sensor de temperatura
The thermostat includes a temperature sensor for determining the exact room temperature, which is then displayed on the device and in the app.

Image 3.3: An illustration of a smart home system indicating a window sensor detecting an open window, which can be used to automatically adjust heating.
4. Mantemento
4.1. Substitución da batería
When the battery level is low, an indicator will appear on the thermostat's display and in the devolo Home Control app. Replace the batteries promptly to ensure continuous operation.
- Abra o compartimento da batería como se describe na Sección 2.1.
- Retire as pilas AA antigas.
- Insira dúas pilas AA novas, respectando a polaridade correcta.
- Pecha o compartimento da batería.
4.2. Limpeza
Clean the thermostat with a soft, dry cloth. Do not use abrasive cleaners or solvents, as these can damage the device's surface or internal components.
5 Solución de problemas
This section addresses common issues you might encounter with your devolo Home Control Radiator Thermostat.
- O termostato non responde: Check the battery level. Replace batteries if low. Ensure the thermostat is within range of the devolo Home Control Central Unit.
- Connectivity Issues (Offline Status): Verify that the Central Unit is powered on and functioning correctly. Ensure there are no significant obstructions (e.g., thick walls, large metal objects) between the thermostat and the Central Unit that could interfere with the Z-Wave signal. Re-pairing the device might be necessary if connectivity is consistently lost.
- Lecturas de temperatura incorrectas: Ensure the thermostat is not exposed to direct sunlight, drafts, or other localized heat sources that could affect its internal temperature sensor.
- Radiator Not Heating/Overheating: Check the set temperature on the device and in the app. Ensure the valve is not stuck. If the issue persists, it may indicate a problem with the radiator valve itself or the thermostat's internal mechanism.
- Lag in Temperature Change: Z-Wave devices, especially battery-powered ones, may have a wake-up interval to conserve battery life. This can result in a slight delay between a command being sent and the thermostat reacting. This is normal operation.
For more detailed troubleshooting or persistent issues, please refer to the official devolo support resources.
6. Especificacións
| Marca | devolo |
| Número de modelo | 9502 |
| Tipo de controlador | Push Button, Application |
| Característica especial | Programmable, Remote Access |
| Cor | Branco |
| Tipo de control de temperatura | Manual |
| Tecnoloxía de conectividade | Onda Z |
| Fonte de enerxía | Batería (2 pilas AA incluídas) |
| Voltage | 1.5 voltios |
| Tipo de visualización | Retroiluminado |
| Método de control | Aplicación |
| Tipo de montaxe | Montaxe en superficie |
| Dimensións do produto | 3.58 x 2.01 x 2.01 polgadas |
| Peso do elemento | 14.1 onzas |
7. Garantía e soporte
For detailed warranty information, please refer to the documentation included with your product or visit the official devolo websitio. Os termos da garantía adoitan cubrir os defectos de fabricación durante un período específico a partir da data de compra.
For technical support, product registration, or to access additional resources, please visit the devolo support portal or contact their customer service directly. Contact information can usually be found on the devolo websitio web ou na embalaxe do produto.


