1. Introdución
This manual provides detailed instructions for the installation, operation, maintenance, and troubleshooting of your Gateway SX2865 SFF Desktop Motherboard H61 (Model DB.U7411.001). This motherboard is designed for Small Form Factor (SFF) desktop systems, featuring the Intel H61 Express chipset and supporting LGA 1155/1156 CPUs and DDR3 RAM. Please read this manual thoroughly before proceeding with any installation or configuration to ensure proper functionality and safety.
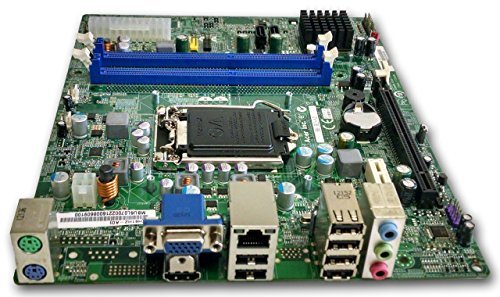
Figura 1: Acabadoview of the Gateway SX2865 SFF Desktop Motherboard H61. This image displays the main components and layout of the motherboard, including the CPU socket, RAM slots, and various connectors.
2. Información de seguridade
Always observe the following safety precautions when handling and installing computer components:
- Desconecte o cable de alimentación da toma de corrente antes de instalar ou retirar calquera compoñente.
- Use unha pulseira antiestática para evitar danos por descarga electrostática (ESD) en compoñentes sensibles.
- Sujete a placa base polos bordos para evitar tocar compoñentes ou circuítos sensibles.
- Asegúrate de que haxa unha ventilación axeitada dentro da carcasa do ordenador para evitar o sobrequecemento.
- Non expoñas a placa base á humidade nin a temperaturas extremas.
- If you are unsure about any installation step, consult a qualified technician.
3. Configuración e instalación
Follow these steps to properly install the Gateway SX2865 SFF Desktop Motherboard into your system:
3.1. Preparación do chasis
- Open your computer chassis and ensure it is clean and free of dust.
- Install the I/O shield provided with your chassis or motherboard into the rear panel opening.
- Verify that the standoffs in the chassis align with the mounting holes on the motherboard. Adjust if necessary.
3.2. Instalación da CPU
- Locate the CPU socket (LGA 1155/1156) on the motherboard.
- Levante con coidado a palanca de carga e abra a tapa do socket da CPU.
- Aliña coidadosamente a CPU co socket, facendo coincidir o triángulo dourado da CPU coa marca do triángulo do socket. Non forces a CPU para introducila no socket.
- Peche a tapa da toma de corrente e prema a palanca de carga cara abaixo ata que encaixe no seu lugar.
- Apply a thin layer of thermal paste to the CPU surface (if not pre-applied on the cooler).
- Install the CPU cooler according to its manufacturer's instructions, ensuring it is securely fastened.
3.3. Instalación da RAM
- Localice as ranuras DIMM DDR3 na placa base.
- Abra os clips nos dous extremos da ranura DIMM.
- Aliñe a muesca do módulo RAM coa chave da ranura DIMM.
- Prema firmemente os dous extremos do módulo RAM ata que os clips encaixen no seu lugar.
3.4. Montaxe da placa base
- Carefully place the motherboard into the chassis, aligning the mounting holes with the standoffs.
- Secure the motherboard with screws, ensuring not to overtighten.
3.5. Conexión de periféricos e alimentación
- Conecta o conector de alimentación ATX de 24 pines e o conector de alimentación da CPU de 4 pines da fonte de alimentación á placa base.
- Connect SATA data cables from your storage devices (HDD/SSD) to the SATA ports on the motherboard.
- Connect front panel connectors (power button, reset button, USB, audio) to their respective headers on the motherboard. Refer to the motherboard's silkscreen labels for correct orientation.
- Instale as tarxetas de expansión (por exemplo, a tarxeta gráfica) nas ranuras PCIe correspondentes e asegúreas.
- Connect all necessary cables to your power supply.
4. Funcionamento e configuración
4.1. Arranque inicial
- After all components are installed and connected, close the chassis.
- Conecta o monitor, o teclado e o rato.
- Connect the power cord to the power supply and a wall outlet.
- Preme o botón de acendido do teu ordenador.
4.2. Configuración da BIOS/UEFI
The BIOS (Basic Input/Output System) or UEFI (Unified Extensible Firmware Interface) is firmware that initializes hardware during the booting process. To enter the BIOS/UEFI setup utility:
- During the initial boot-up sequence, repeatedly press the designated key (commonly Del, F2, ou F10). The exact key may vary; check the on-screen prompts.
- Within the BIOS/UEFI, you can configure settings such as:
- Data e hora do sistema
- Boot Order (to install an operating system from a USB drive or DVD)
- SATA Mode (AHCI, IDE)
- CPU and Memory settings (advanced users)
- Garda os cambios e sae da BIOS/UEFI para continuar co arranque.
4.3. Instalación do sistema operativo e dos controladores
After configuring the BIOS/UEFI, proceed with installing your preferred operating system (e.g., Windows, Linux). Once the OS is installed, install the necessary drivers for the motherboard's components (chipset, audio, LAN, etc.). These drivers are typically available on the manufacturer's website (Acer/Gateway) or can be found through the operating system's update features.
5. Mantemento
Regular maintenance helps ensure the longevity and stable performance of your motherboard:
- Eliminación de po: Periodically clean the inside of your computer case, including the motherboard, CPU cooler, and fan vents, using compressed air. Ensure the system is powered off and unplugged before cleaning.
- Actualizacións da BIOS: Consulte o do fabricante website (Acer/Gateway) for BIOS/UEFI updates. Updates can improve stability, add support for new hardware, or fix bugs. Follow the update instructions carefully to avoid damaging the motherboard.
- Actualizacións de controladores: Manteña os controladores do sistema actualizados para garantir un rendemento e unha compatibilidade óptimos.
- Inspección física: De cando en vez, inspeccione a placa base para detectar calquera signo de danos, conexións soltas ou condensadores abombados.
6 Solución de problemas
Se tes problemas coa túa placa base, consulta os seguintes pasos comúns para a resolución de problemas:
- Sen enerxía:
- Ensure the power supply is connected correctly to the motherboard (24-pin ATX and 4-pin CPU).
- Check that the power supply switch is in the 'ON' position.
- Verify the power cord is securely plugged into both the power supply and the wall outlet.
- Confirm the front panel power button connector is correctly attached to the motherboard.
- Sen visualización:
- Ensure the monitor is powered on and connected to the correct video output (either integrated graphics or a dedicated graphics card).
- Reseat the RAM modules. Try booting with only one RAM module installed.
- Volva colocar a tarxeta gráfica (se é o caso).
- Check if the CPU cooler is properly installed and the CPU power connector is secure.
- System Fails to Boot / POST Errors:
- Listen for beep codes from the motherboard's speaker (if installed). Consult the motherboard's documentation for beep code meanings.
- Clear the CMOS (Complementary Metal-Oxide-Semiconductor) by removing the CMOS battery for a few minutes or using the clear CMOS jumper (refer to motherboard layout).
- Ensure all essential components (CPU, RAM, GPU) are correctly installed.
- Problemas co sistema operativo:
- Verify that all necessary drivers are installed and up to date.
- Check SATA cable connections for storage devices.
- Run diagnostic tools for hard drives/SSDs and RAM.
7. Especificacións
Key technical specifications for the Gateway SX2865 SFF Desktop Motherboard H61 (Model DB.U7411.001):
| Característica | Detalle |
|---|---|
| Marca | Pasarela |
| Nome do modelo | SX2865 |
| Número de modelo do artigo | DB.U7411.001 |
| Fabricante | Acer |
| Tipo de chipset | Intel H61 Express |
| Socket CPU | LGA 1155 or LGA 1156 |
| Procesadores compatibles | Intel Xeon (and other compatible LGA 1155/1156 CPUs) |
| Tecnoloxía de memoria RAM | DDR3 |
| Velocidade do reloxo da memoria | 2133 MHz (Max supported, actual speed depends on CPU and RAM) |
| Capacidade de almacenamento da memoria | 16 GB (Maximum supported) |
| Dispositivos compatibles | Ordenador persoal |
| Plataforma | Linux (and other compatible operating systems) |
| Factor de forma | uATX (Micro-ATX) |
8. Garantía e soporte
For warranty information and technical support regarding your Gateway SX2865 SFF Desktop Motherboard H61 (Model DB.U7411.001), please refer to the documentation provided with your original system or contact the manufacturer directly.
- Fabricante: Acer (as per product specifications)
- Marca: Pasarela
- Visita o oficial Soporte de pasarela websitio or Soporte Acer websitio for drivers, FAQs, and contact information.
- Conserve o seu comprobante de compra para reclamacións de garantía.