1. Introdución
This manual provides comprehensive instructions for the installation, operation, and maintenance of your GROHE 35065001 Grohsafe Universal Pressure Balance Rough-In Valve. This valve is designed for reliable performance and precise water temperature control in your shower system. Please read these instructions carefully before beginning installation to ensure proper function and safety.
2. Información de seguridade
- Peche sempre a subministración principal de auga antes de comezar calquera traballo de fontanería.
- Use equipos de protección persoal axeitados, como lentes e luvas de seguridade.
- Se tes algunha dúbida sobre calquera parte do proceso de instalación, consulta cun fontaneiro cualificado.
- Asegúrate de que todas as conexións estean seguras e estancas para evitar fugas.
- Do not overtighten connections, as this can damage the valve or pipes.
3. Contido do paquete
Comprobe que todos os compoñentes estean presentes antes de comezar a instalación:
- GROHE 35065001 Grohsafe Universal Pressure Balance Rough-In Valve body
- Protective blue cap (for rough-in stage)
- Ferraxes de instalación (parafusos, soporte de montaxe)
- Manual de instrucións (este documento)
4. Especificacións
| Material | Latón |
| Tamaño da conexión de entrada | 0.5 polgadas |
| Tipo de conexión de entrada | PEX crimp (1807) |
| Tipo de conexión de saída | PEX |
| Tamaño da conexión de saída | 0.5 polgadas |
| Número de portos | 2 |
| Dimensións do produto (L x W x H) | 2.95 x 17.09 x 7.2 polgadas |
| Peso do elemento | 3 libras |
| Certificacións | ASME, ANSI, CSA, ULC, NSF, IAPMO, WaterSense, ISO 9001, ASSE |
5. Configuración e instalación
The GROHE Grohsafe Universal Pressure Balance Rough-In Valve is designed for concealed installation within a wall. Proper installation is crucial for optimal performance and safety.
5.1 Pasos previos á instalación
- Desactivar o subministro de auga: Locate and turn off the main water supply to your home.
- Preparar a abertura na parede: Cree unha abertura axeitada na parede para o corpo da válvula, garantindo espazo suficiente para as conexións e o acceso futuro.
- Identify Inlets/Outlets: The valve has clearly marked hot and cold inlets, and an outlet for the showerhead/tub spout.
5.2 Valve Installation
- Montar a válvula: Secure the valve body to a sturdy framing member within the wall opening using the provided mounting bracket and screws. Ensure the valve is level and at the correct depth relative to the finished wall surface.
- Conectar as liñas de auga: Connect the hot and cold water supply lines to the respective 1/2" PEX crimp (1807) inlets on the valve. Use appropriate PEX crimping tools and fittings to ensure secure, leak-free connections.
- Connect Outlet Lines: Connect the showerhead and/or tub spout outlet lines to the valve's PEX outlets.
- Install Service Stops: The valve includes integrated service stops. Ensure these are accessible for future maintenance.
- Proba de presión: Before closing the wall, turn on the main water supply and carefully check all connections for leaks. Address any leaks immediately.
- Install Protective Cap: Keep the blue protective cap on the valve during the rough-in phase to protect internal components from debris and damage.
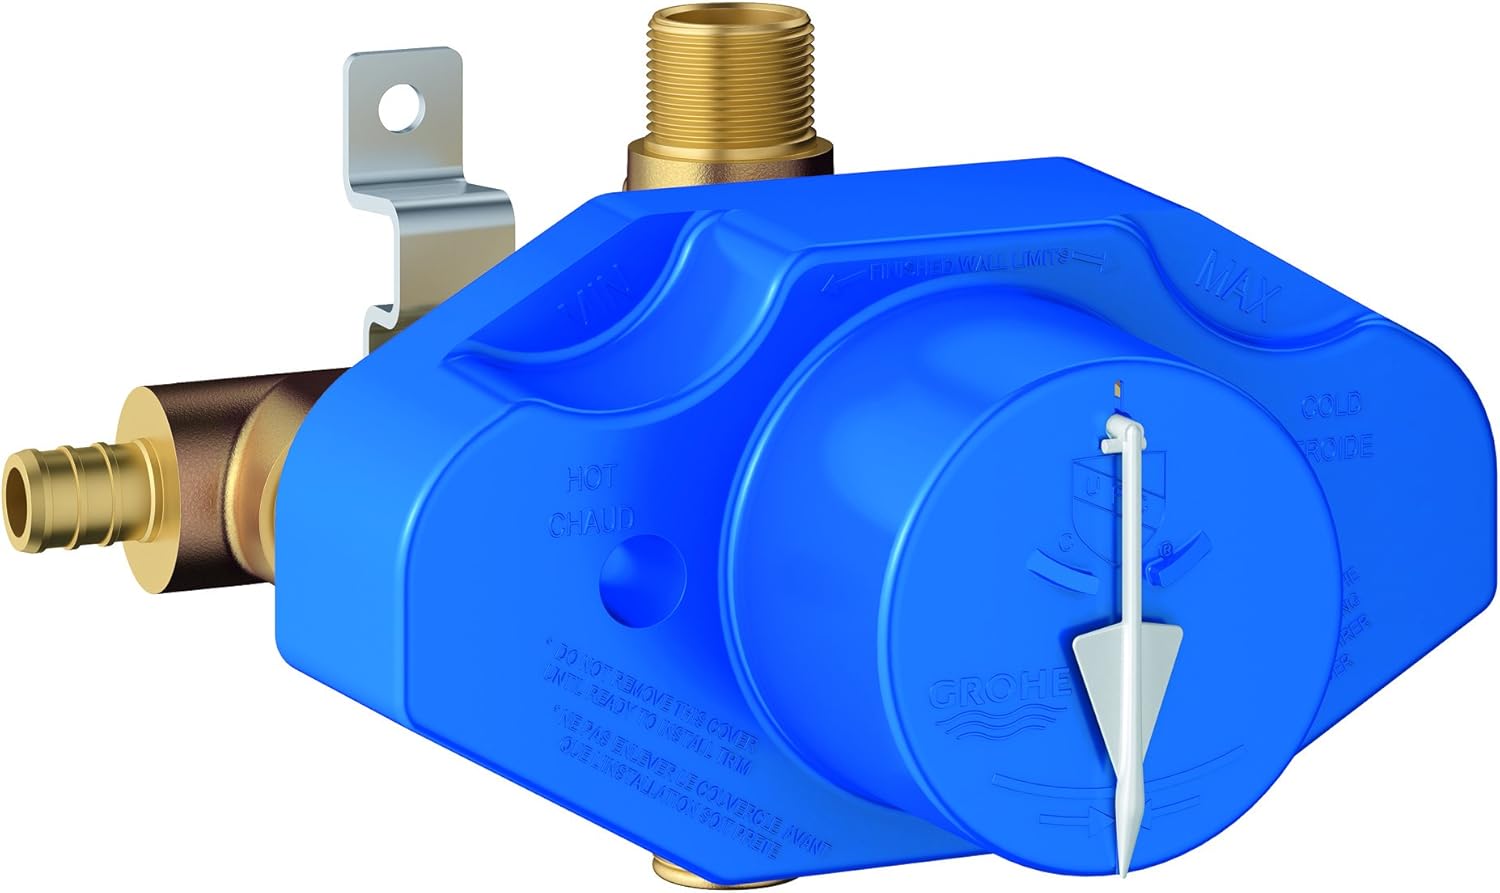
Image 1: GROHE 35065001 Grohsafe Universal Pressure Balance Rough-In Valve with its blue protective cover installed, showing the PEX crimp inlets and outlet. This cover protects the internal components during the rough-in phase of installation.

Image 2: GROHE 35065001 Grohsafe Universal Pressure Balance Rough-In Valve without its protective cover, revealing the brass body, PEX connections, and the internal diaphragm cartridge and handle spline.
6. Instrucións de funcionamento
The Grohsafe Universal Pressure Balance Rough-In Valve works in conjunction with a compatible GROHE trim kit (sold separately) to control water flow and temperature. Once the trim kit is installed, the valve's internal components, including the diaphragm cartridge and handle limit stop, ensure a consistent and safe showering experience.
- Control de temperatura: The handle on your trim kit will rotate to adjust the water temperature. The integrated handle limit stop within the rough-in valve can be set during installation to prevent excessively hot water, enhancing safety.
- Equilibrio de presión: The pressure balance feature automatically adjusts the mix of hot and cold water to maintain a constant temperature, even if there are sudden pressure drops in either the hot or cold supply lines (e.g., someone flushes a toilet).
- GROHE SilkMove: The ceramic cartridge technology provides smooth and precise control over water flow and temperature with minimal effort.
7. Mantemento
Regular maintenance helps ensure the longevity and optimal performance of your GROHE valve.
- Limpeza: The rough-in valve itself is concealed and generally does not require cleaning. For the visible trim kit, use a soft cloth and mild soap. Avoid abrasive cleaners or harsh chemicals.
- Substitución do cartucho: Over time, the diaphragm cartridge (part of the Grohe SilkMove technology) may require replacement if you experience issues with temperature control or leaks. Refer to your trim kit's manual or GROHE's official website for specific cartridge replacement instructions and part numbers. This typically involves turning off the water supply at the service stops or main, removing the trim, and replacing the cartridge.
- Válvulas de retención: The integrated check valves prevent cross-flow of hot and cold water. If you suspect issues with water mixing, these may need inspection by a professional.
8 Solución de problemas
If you encounter issues with your GROHE Grohsafe valve, refer to the following common problems and solutions:
| Problema | Causa posible | Solución |
|---|---|---|
| Sen caudal de auga ou caudal baixo | Main water supply off, service stops closed, debris in cartridge, clogged showerhead. | Check main water supply. Ensure service stops are fully open. Clean or replace cartridge. Clean showerhead. |
| Water temperature too hot or too cold | Handle limit stop incorrectly set, faulty cartridge, insufficient hot/cold water supply. | Adjust handle limit stop (refer to trim kit instructions). Inspect/replace cartridge. Check hot/cold water heater settings and supply pressure. |
| Water drips from showerhead/tub spout | Worn cartridge seals, debris in cartridge. | Substitúe o cartucho. |
| Sudden temperature changes during shower | Pressure balance mechanism issue, significant pressure fluctuations in home. | Inspect cartridge for damage. Consult a plumber to assess home's water pressure system. |
If these solutions do not resolve the issue, contact GROHE customer support or a qualified plumber.
9. Garantía e soporte
GROHE products are manufactured to the highest quality standards and come with a manufacturer's warranty. For specific warranty details, please refer to the warranty card included with your product or visit the official GROHE website. For technical assistance, replacement parts, or further support, please contact GROHE customer service directly.
Oficial GROHE Websitio: www.grohe.com


