1. Introdución
This manual provides detailed instructions for the installation, operation, and maintenance of your Reolink RLC-410WS 4MP Super HD Dual-Band Wi-Fi Wireless Security IP Camera. Please read this manual thoroughly before using the product to ensure correct usage and optimal performance.
2. Produto rematadoview
2.1 Compoñentes da cámara
Familiarize yourself with the main components of your RLC-410WS camera:

Imaxe 2.1: Reolink RLC-410WS Camera Component Diagram. This image illustrates the various parts of the camera including the antenna, lens, IR LEDs, daylight sensor, and connection ports for power, network, and the reset button.
- Antena: Para conectividade Wi-Fi.
- Metal Aluminum Case: Carcasa resistente para uso no exterior.
- High Definition F=4.0mm Lens: Captures 4MP Super HD video.
- 36 PCS IR LEDs: Provides infrared illumination for night vision up to 100ft.
- Sensor de luz diurna: Detects ambient light to switch between day and night modes.
- Botón de reinicio: Úsase para restaurar a configuración predeterminada de fábrica.
- Porto de alimentación: Para conectar o adaptador de corrente continua de 12 V.
- Network Cable Port: For initial setup and optional wired Ethernet connection.
2.2 Características principais
- Vídeo Super HD de 4 MP: Records clear video at 1440p resolution, supporting 1080p and 720p.
- 100ft Night Vision: Equipped with IR LEDs for clear surveillance in low-light conditions.
- Wi-Fi de banda dual: Supports 2.4GHz and 5GHz Wi-Fi for flexible and stable wireless connection.
- Alertas de detección de movemento: Sends real-time email alerts with photos or 30-second video clips, and push notifications to mobile phones.
- Almacenamento local: Built-in 16GB Micro SD card for recording and storing up to 400 motion-activated events.
- Acceso remoto: Monitor your home from anywhere using the Reolink Client software (PC/Mac) or Reolink App (iPhone/Android).
- 80-Grao ViewÁngulo de ing: Ofrece un amplo campo de view.
- Resistente ás inclemencias do tempo IP67: Deseñado para uso no exterior en diversas condicións meteorolóxicas.
3. Que hai na caixa
Verifica que todos os elementos estean presentes no teu paquete:

Imaxe 3.1: Package Contents. This image displays the camera, antenna, power adapter, extension cable, network cable, software CD, quick start guide, surveillance sign, mounting template, and screws.
- Reolink RLC-410WS Camera
- Adaptador de alimentación
- Cable de extensión de alimentación
- Network Cable (1 meter)
- Antena
- Guía de inicio rápido
- Plantilla de orificio de montaxe
- Parafusos e tacos
- Sinal de vixilancia
- CD (Manual/Software)
4. Configuración e instalación
4.1 Configuración inicial
- Connect Power and Ethernet: Connect the camera to the power adapter and then to your router using the provided Ethernet cable.
- Download Reolink App/Client: Download the Reolink App from the App Store or Google Play, or the Reolink Client software from the official Reolink website for PC/Mac.
- Engadir cámara: Open the app/client, click the "+" icon to add the camera. The app/client should automatically detect the camera on your local network.
- Definir contrasinal: Create a strong password for your camera.
- Configurar o Wi-Fi: Once connected via Ethernet, navigate to the camera settings in the app/client to configure Wi-Fi. Select your 2.4GHz or 5GHz network and enter the password. Ensure a strong Wi-Fi signal at the installation location. Note: Wi-Fi settings can typically only be changed while the camera is connected via Ethernet.
- Conexión de proba: After configuring Wi-Fi, test the connection. Once successful, you can disconnect the Ethernet cable.
4.2 Montaxe da cámara
Consider the following when mounting your camera:
- Localización: Escolla unha localización que proporcione o desexado viewángulo de inflexión e está dentro do alcance da túa rede Wi-Fi.
- Ruteo do cable de alimentación: The power cable requires a hole of approximately 3/4 inch (19mm) to pass through a wall due to the Ethernet socket and reset switch on the breakout cable. Plan your cable routing carefully.
- Axuste do soporte: The mounting bracket allows for three-dimensional adjustment. Loosen the small Allen screws to adjust the camera angle, then tighten them securely.
- Protección da auga: For outdoor installations, ensure the breakout cable connections (power, network, reset button) are protected from water. Consider using a waterproof junction box.

Imaxe 4.1: Camera Dimensions. This image provides the physical measurements of the RLC-410WS camera, useful for planning installation.
5. Funcionamento da cámara
5.1 Acceder á cámara
You can access your Reolink RLC-410WS camera using various platforms:

Imaxe 5.1: Reolink Software Platform. This image illustrates how the Reolink camera can be accessed and managed from various devices, including Mac, Windows, iPhone, and Android.
- Reolink App: Available for iOS (iPhone/iPad) and Android devices. Provides live view, playback, and settings management.
- Reolink Client: Desktop software for Windows and macOS. Offers comprehensive control, multi-camera viewing, and recording options.
- Web Navegador: Access the camera directly via its IP address using a web browser (features may be limited compared to the app/client).
5.2 Detección e gravación de movemento
The RLC-410WS camera features customizable motion detection:
- Axuste de sensibilidade: Axusta a sensibilidade da detección de movemento para minimizar as falsas alarmas.
- Zonas de detección: Define áreas específicas dentro da cámara view to monitor for motion, ignoring irrelevant areas.
- Máscara de privacidade: Mask out sensitive areas from being recorded or viewed.
- Alertas: Receive instant push notifications on your phone, email alerts with snapshots or video clips, and upload recordings to an FTP server.
- Almacenamento local: Motion-activated events are recorded to the built-in 16GB Micro SD card for later playback.
5.3 Calidade de vídeo e visión nocturna
The camera provides high-quality video day and night:
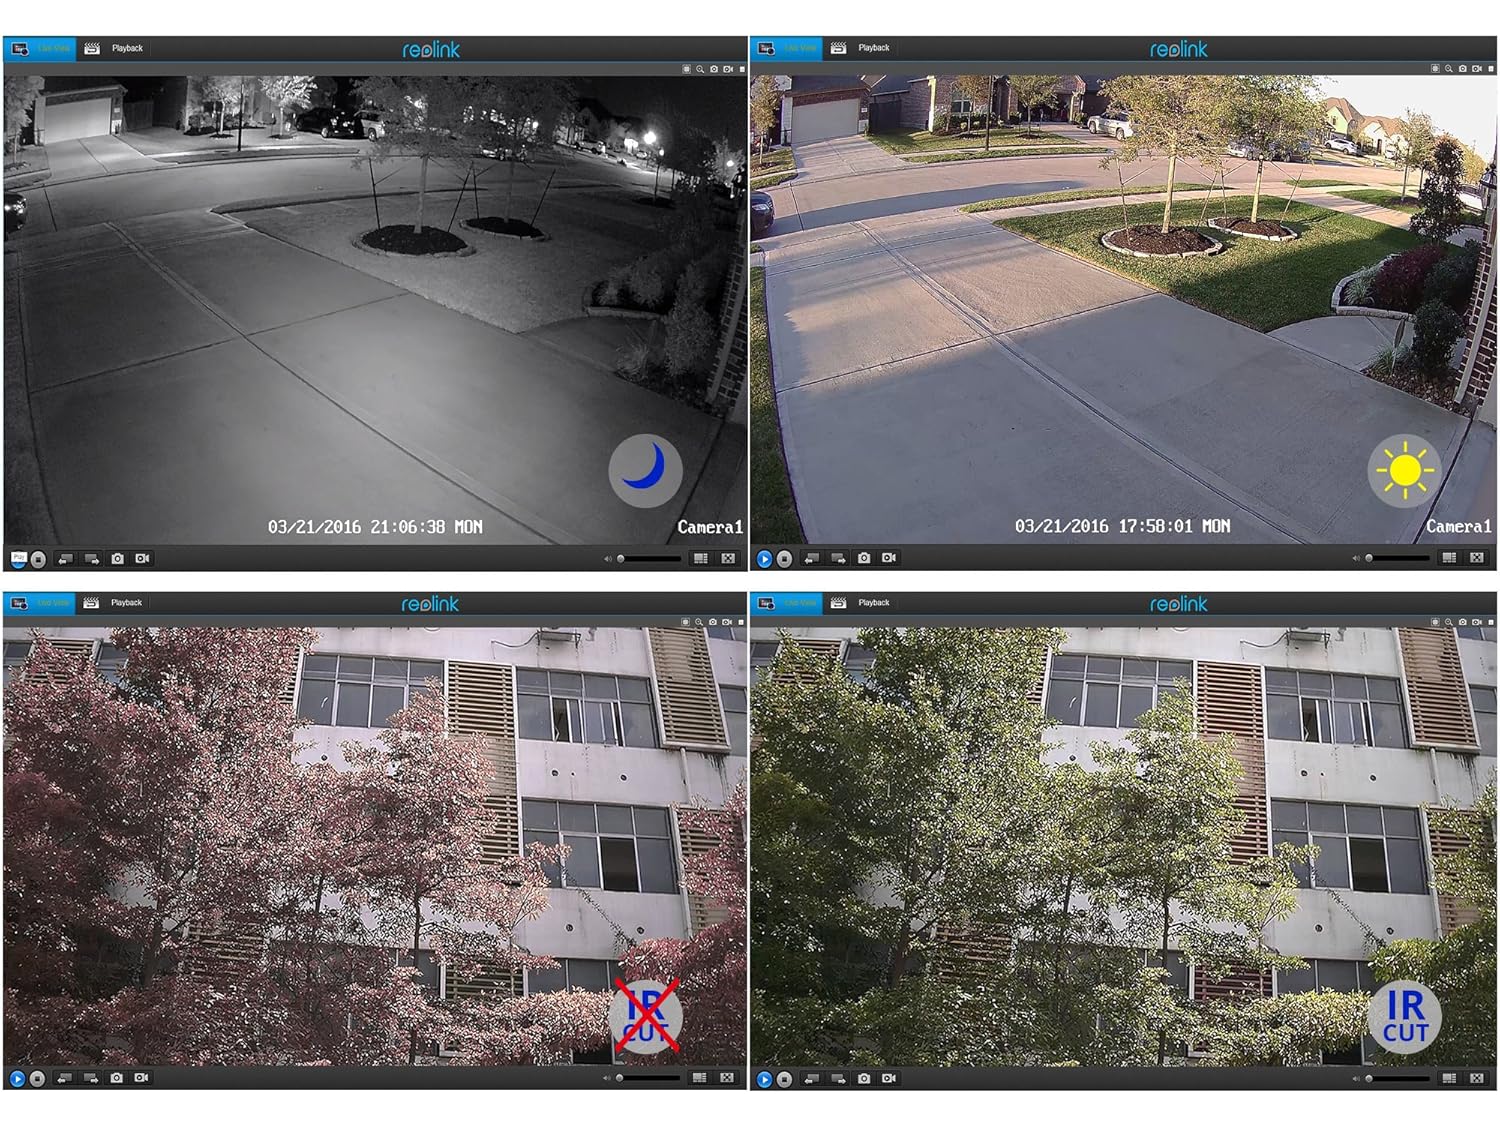
Imaxe 5.2: Day and Night Vision Comparison. This image demonstrates the camera's ability to capture clear video in both daylight and low-light conditions using its infrared capabilities.
- 4MP Super HD: Delivers crisp and clear video footage.
- Visión nocturna por infravermellos: Automatically switches to night mode in low light, providing clear black and white video up to 100 feet.
- Filtro de corte IR: Ensures accurate color reproduction during the day and enhanced infrared sensitivity at night.
6. Especificacións
Detailed technical specifications for the Reolink RLC-410WS camera:
| Característica | Especificación |
|---|---|
| Modelo | RLC-410WS |
| Resolución efectiva de vídeo | 4 MP (1440p) |
| Viewángulo ing | 80 graos |
| Range de visión nocturna | 100 pés |
| Velocidade de cadros | 25 fotogramas por segundo |
| Comunicación sen fíos | Wi-Fi (2.4/5Ghz Dual Band) |
| Almacenamento | Built-in 16GB Micro SD Card |
| Fonte de enerxía | 12 voltios DC |
| Clasificación de protección internacional | IP67 |
| Dimensións (L x W x H) | 18.8 x 6.6 x 6.6 centímetros |
| Peso do elemento | 454 g (1 Pound) |
| Método de control | Aplicación |
| Tipo de montaxe | Soporte de parede |

Imaxe 6.1: Reolink Model Feature Comparison. This table highlights the features available across various Reolink camera models, including PoE, Wi-Fi, Micro SD storage, optical zoom, and pan/tilt capabilities.
7 Solución de problemas
This section addresses common issues you might encounter with your RLC-410WS camera.
7.1 Problemas de conectividade Wi-Fi
- Sen conexión wifi:
- Ensure the camera is initially configured via Ethernet before setting up Wi-Fi.
- Verifica que o contrasinal da túa wifi sexa correcto.
- Perform a firmware update. Outdated firmware can cause connectivity problems.
- Ensure the camera is within range of your Wi-Fi router and has a strong signal. Signal strength can drop quickly with distance.
- If changing Wi-Fi settings, ensure the camera is connected via Ethernet, run a connection test, and save changes.
- Frequent Disconnects:
- Check Wi-Fi signal strength at the camera's location. Consider using a Wi-Fi extender if the signal is weak.
- Ensure your router's 2.4GHz and 5GHz channels are not overly congested.
- Update camera firmware to the latest version.
7.2 Camera Not Responding After Settings Change/Firmware Update
- If the camera becomes unresponsive after a settings change or firmware update, try power cycling the camera (unplug and re-plug the power adapter).
- If power cycling does not work, reconnect the camera via Ethernet. This often restores connectivity and allows further troubleshooting or re-configuration.
- If the issue persists, perform a factory reset using the reset button on the breakout cable. Note: This will erase all settings.
7.3 False Motion Detection Alerts
- Adjust the motion detection sensitivity in the camera settings.
- Define specific motion detection zones to exclude areas with frequent irrelevant movement (e.g., trees swaying, busy roads).
- In night vision mode, insects flying close to the IR illuminators can trigger alerts. Consider adjusting sensitivity or, if possible, using an external IR illuminator placed away from the camera.
8. Mantemento
- Limpeza: Limpe regularmente a lente e a carcasa da cámara cun pano suave eamp un pano para garantir unha calidade de imaxe nítida. Evite produtos de limpeza abrasivos.
- Actualizacións de firmware: Periodically check the official Reolink website for firmware updates. Keeping your camera's firmware up-to-date ensures optimal performance, security, and access to new features.
- Inspección de cables: Periodically inspect all cables and connections for wear or damage, especially in outdoor installations. Ensure waterproof seals are intact.
- Xestión da tarxeta SD: While the camera manages the 16GB SD card, it's good practice to occasionally check its status via the app/client.
9. Garantía e soporte
For warranty information, please refer to the warranty card included in your product package or visit the official Reolink website. Reolink provides dedicated customer support.
- Soporte técnico: For technical assistance, troubleshooting, or any product-related queries, please contact Reolink support via their official website. Email support is typically provided with responses within 24 hours.
- Firmware Downloads: Latest firmware versions and software clients can be downloaded from the Reolink support page.


