1. Instrucións de seguridade importantes
Cando se utilicen aparellos eléctricos, débense seguir as precaucións básicas de seguridade, incluíndo as seguintes:
- Le todas as instrucións antes de usar o aparello.
- Non intente usar este forno coa porta aberta, xa que isto pode resultar nunha exposición prexudicial á enerxía das microondas.
- Non coloque ningún obxecto entre a cara frontal do forno e a porta nin permita que se acumule terra ou residuos de limpeza nas superficies de selado.
- Non accione o forno se está danado. É particularmente importante que a porta do forno se peche correctamente e que non se danen as seguintes: (1) porta (dobrada), (2) bisagras e pestillos (rotos ou soltos), (3) selos e superficies de selado.
- O forno non debe ser axustado nin reparado por ninguén, excepto por persoal de servizo debidamente cualificado.
- Asegúrese de que o aparello estea correctamente conectado a terra.
- Non mergullo o cable nin o enchufe na auga.
- É necesaria unha estreita supervisión cando o aparello é usado por nenos ou preto de eles.
- Do not use the oven for purposes other than heating food.
2. Produto rematadoview
2.1. Microwave Oven Components

Figura 1: Fronte view of the Sharp R-369T Microwave Oven, showcasing its 33L capacity, 6 microwave power levels, and various cooking functions.
The Sharp R-369T is a 33-liter solo microwave oven designed for efficient food preparation. It features a sleek silver finish and a black glass door. Key components include the oven cavity, glass turntable, control panel, and door with a push-open mechanism.

Figura 2: Interior view of the microwave oven, showing the spacious 33L cavity and the removable glass turntable for even cooking.
The interior includes a 272mm glass turntable that rotates during operation to ensure food is heated evenly. The oven door opens with a simple push mechanism.
2.2. Panel de control
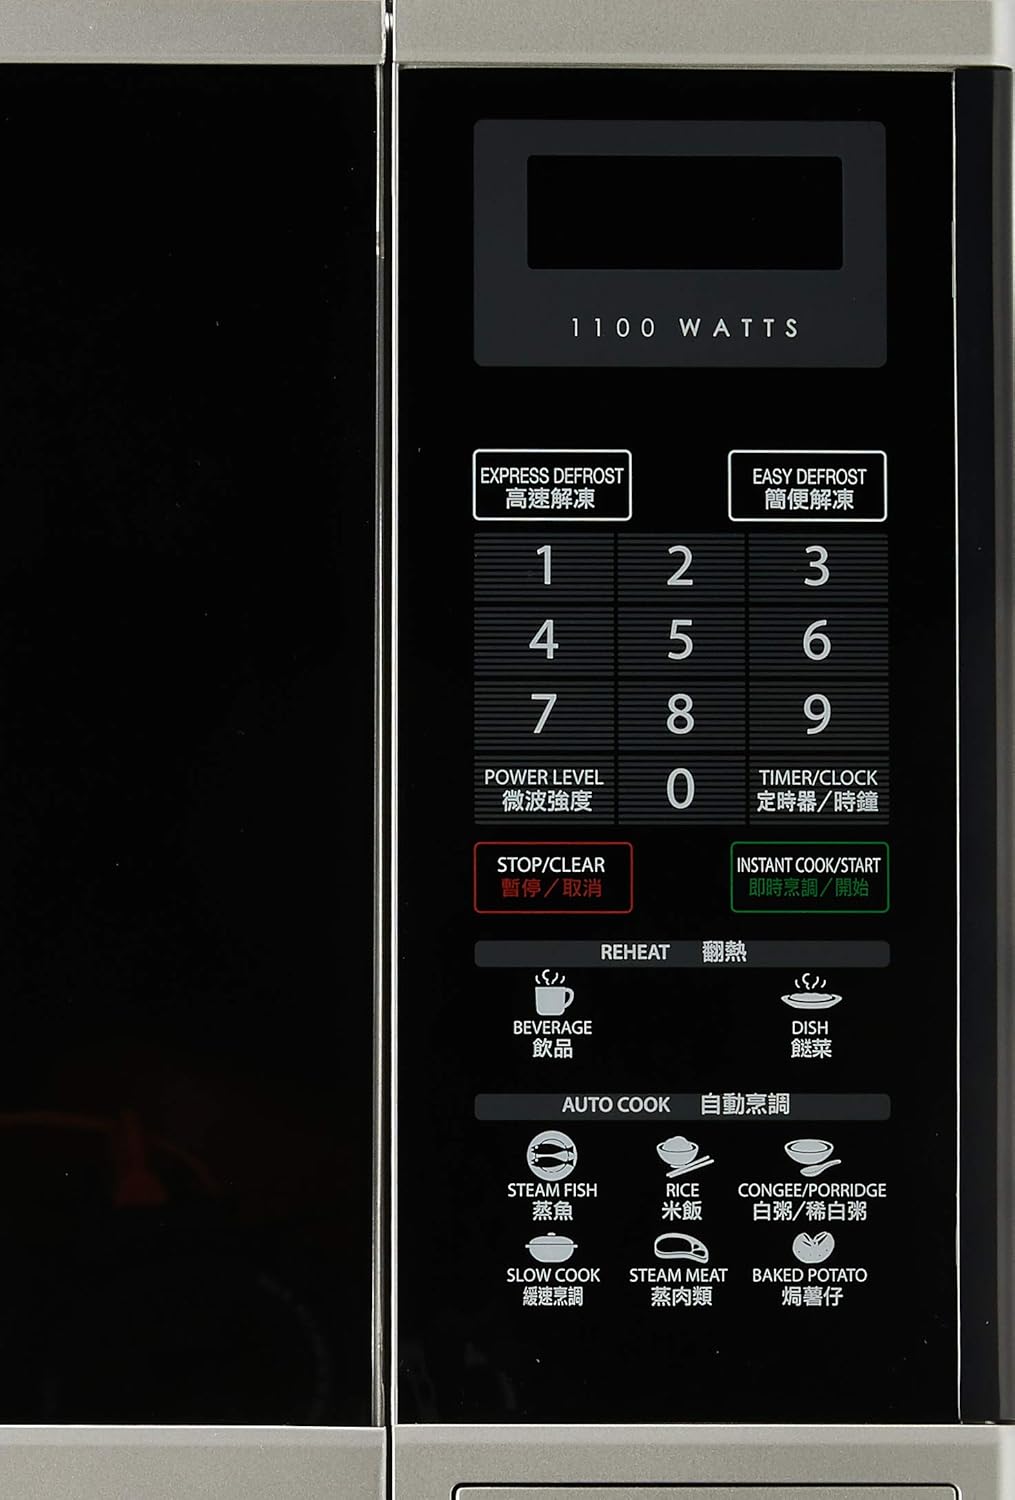
Figura 3: detallada view of the control panel, featuring numerical keys, function buttons, and the digital display.
The control panel is located on the right side of the oven and features a digital display, numerical keypad (0-9), and various function buttons:
- EXPRESS DEFROST / EASY DEFROST: For quick and convenient defrosting.
- NIVEL DE POTENCIA: Axusta a potencia de saída do microondas.
- TEMPORIZADOR/RELOXO: Sets the cooking timer or the current time.
- PARAR/BORRAR: Detén a operación actual ou borra a configuración.
- INSTANT COOK/START: Starts cooking immediately or confirms settings.
- REQUENTAR: Dedicated buttons for reheating beverages and dishes.
- AUTO COOK: Pre-programmed settings for various food types like Steam Fish, Rice, Congee/Porridge, Slow Cook, Steam Meat, and Baked Potato.
3. Configuración e instalación
3.1. Desembalaxe
Carefully remove the microwave oven and all packing materials from the carton. Check the oven for any damage, such as dents or a misaligned door. Do not operate the oven if it is damaged. Contact your dealer or authorized service center.
3.2 Colocación
- Place the oven on a flat, stable surface strong enough to hold its weight (approximately 17kg).
- Ensure adequate ventilation. Leave a minimum of 10 cm (4 inches) clearance at the rear, 20 cm (8 inches) at the top, and 5 cm (2 inches) on each side for proper airflow.
- Non bloquee as saídas de aire.
- Manteña o forno lonxe de fontes de calor, vapor ou salpicaduras de líquidos.
- Non coloque o forno preto dunha radio ou dun televisor, xa que pode causar interferencias.
3.3. Conexión eléctrica

Figura 4: Traseira view of the microwave oven, illustrating the power cord connection and important safety warnings regarding microwave energy.
- Plug the oven into a properly grounded 220V, 50Hz AC outlet with a dedicated circuit.
- Non use cables de extensión ou adaptadores.
- Asegúrate de que o cable de alimentación non estea danado nin axustado.
4. Instrucións de funcionamento
4.1. Axustar o reloxo
- Preme o TEMPORIZADOR/RELOXO botón unha vez.
- Use the numerical keypad to enter the current time (e.g., 12:30 for 12:30 PM).
- Preme o TEMPORIZADOR/RELOXO botón de novo para confirmar.
4.2. Cociña básica no microondas
- Coloque os alimentos nun recipiente apto para microondas no prato xiratorio de vidro.
- Pecha a porta do forno de forma segura.
- Preme o NIVEL DE POTENCIA button repeatedly to select the desired power level (e.g., P100 for 100% power, P80 for 80% power). The oven offers 6 microwave power levels.
- Use the numerical keypad to enter the cooking time.
- Preme INSTANT COOK/START para comezar a cociñar.
4.3. Desconxelación
The oven offers two defrost functions:
- EXPRESS DEFROST: For quick defrosting of smaller items. Follow on-screen prompts or manual for specific weight settings.
- EASY DEFROST: For more controlled defrosting. Refer to the manual for weight and food type guidelines.
- Coloque os alimentos conxelados no prato xiratorio.
- Preme calquera DESCONGELACIÓN EXPRESA or EASY DEFROST.
- Enter the weight of the food using the numerical keypad.
- Preme INSTANT COOK/START.
4.4. Reheat Functions
The oven includes 2 Reheat Menu keys for common items:
- BEBIDA: For reheating drinks.
- DISH: For reheating prepared meals.
- Place the item to be reheated on the turntable.
- Prema o apropiado REQUENTAR button (BEVERAGE or DISH).
- The oven will automatically set the time. Press INSTANT COOK/START para comezar.
4.5. Auto Cook Functions
O COCIÑEIRA AUTOMÁTICA menu provides pre-programmed settings for various foods:
- PEIXE A VAPOR
- ARROZ
- CONGEE/PORRIDGE
- COCIÑA LENTA
- CARNE AO VAPOR
- PATACA AO FORNO
- Place the food in a suitable container on the turntable.
- Prema o desexado COCIÑEIRA AUTOMÁTICA botón.
- Select the quantity or weight if prompted (refer to the full manual for specific auto cook settings).
- Preme INSTANT COOK/START.
5. Mantemento e Limpeza
Unha limpeza regular do teu forno microondas garantirá a súa lonxevidade e o seu funcionamento eficiente.
5.1. Limpeza exterior
- Limpe as superficies exteriores cun suave, damp pano.
- Non use produtos de limpeza abrasivos nin produtos químicos agresivos.
5.2. Limpeza interior
- Clean the oven cavity after each use with a mild detergent and a soft cloth.
- For stubborn food splatters, place a bowl of water with lemon slices inside and microwave on high for 2-3 minutes. The steam will loosen the residue, making it easier to wipe clean.
- Ensure the door seals and sealing surfaces are clean to maintain proper operation.
5.3. Prato xiratorio de vidro
- O prato xiratorio de vidro e o anel de rodillos pódense retirar para limpalos.
- Lávaas con auga morna e xabón ou no lavalouza.
- Asegúrate de que estean completamente secos antes de volvelos colocar no forno.
6 Solución de problemas
Antes de contactar co servizo técnico, comproba os seguintes problemas comúns:
| Problema | Causa posible | Solución |
|---|---|---|
| O forno non arranca | Cable de alimentación non conectado; Porta non pechada correctamente; Fusible fundido ou disyuntor saltado. | Conecte o cable de alimentación; peche a porta con seguridade; comprobe o fusible ou reinicie o disxuntor. |
| A comida non se quenta | Incorrect cooking time or power level set; Door not closed properly. | Adjust time/power; Ensure door is latched. |
| A placa xiratoria non xira | Prato xiratorio non asentado correctamente; Obstrución debaixo do prato xiratorio. | Reposition turntable and roller ring; Remove any obstructions. |
| Chispas dentro do forno | Metal or foil in oven; Food splatters. | Remove metal objects; Clean oven interior thoroughly. |
If the problem persists after checking these points, please contact an authorized service technician.
7. Especificacións
| Marca | Agudo |
| Modelo | R-369T |
| Capacidade | 33 litros |
| Potencia de saída | 800 W (microondas) |
| Wattage | 1100 vatios (entrada) |
| Diámetro de mesa giratoria | 272 mm |
| Dimensións exteriores (ancho x alto x prof.) | 520 x 310 x 448 mm |
| Peso | 16.96 kg |
| Voltage | 220 voltios |
| Frecuencia | 50 Hz |
| Material | Aceiro |
| Características especiais | Programmable, 6 Microwave Power Levels, 2 Reheat Menu Keys, Easy Defrost, Slow Cook Key, Black Glass Door |

Figure 5: Dimensional drawing of the Sharp R-369T Microwave Oven, illustrating its width (520 mm / 52 cm), height (310 mm / 31 cm), and depth (448 mm / 44.8 cm).
8. Garantía e soporte
Para obter información sobre a garantía e a atención ao cliente, consulte a tarxeta de garantía incluída co produto ou visite o sitio web oficial de Sharp. websitio web da súa rexión. Garde o recibo de compra como proba de compra para calquera reclamación de garantía.
For technical assistance or service inquiries, please contact Sharp customer service.


