1. Introdución
This manual provides detailed instructions for the installation, operation, and maintenance of your Avision FL-1501B document scanner. Please read this manual thoroughly before using the scanner to ensure proper and safe operation. Keep this manual for future reference.

Figure 1: Avision FL-1501B Document Scanner with its automatic document feeder (ADF) and output tray extended.
2. Información de seguridade
Observe the following safety precautions to prevent damage to the scanner and ensure user safety:
- Use só o adaptador de corrente subministrado co escáner.
- Non expoña o escáner á auga nin a humidade excesiva.
- Place the scanner on a stable, level surface.
- Evite bloquear as aberturas de ventilación.
- Non intente desmontar nin reparar o escáner vostede mesmo. Consulte persoal de servizo cualificado.
- Keep the scanner away from direct sunlight and heat sources.
3. Contido do paquete
Verifica que todos os elementos estean presentes no paquete:
- Avision FL-1501B Scanner Unit
- Adaptador de alimentación
- Cable USB
- Guía de inicio rápido
- CD do software (ou instrucións para descargar)
4. Configuración
4.1 Desembalaxe e colocación
- Retire con coidado o escáner da súa embalaxe.
- Remove all protective tapes and packing materials.
- Place the scanner on a flat, stable surface with adequate space for document feeding and output.

Figure 2: The Avision FL-1501B scanner in its closed position, suitable for storage or before extending trays.
4.2 Conexión do escáner
- Connect the power adapter to the scanner's power input port and then to an electrical outlet.
- Connect the USB cable to the scanner's USB port and then to an available USB port on your computer.
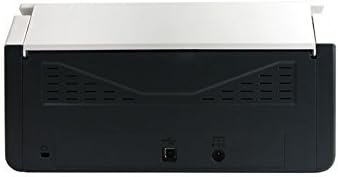
Figure 3: Rear panel of the scanner, illustrating the power input and USB connection ports.
4.3 Instalación de controladores e software
Before using the scanner, you must install the necessary drivers and scanning software on your computer.
- Insert the provided Software CD into your computer's optical drive, or download the latest drivers and software from the official Avision websitio.
- Follow the on-screen instructions to complete the installation process. It is recommended to install all bundled software for full functionality.
- Reinicie o ordenador se se lle solicita.
5. Funcionamento
5.1 Carga de documentos
- Extend the input tray and output tray of the scanner.
- Axuste as guías do papel para que coincidan coa anchura dos seus documentos.
- Place the documents face down, top edge first, into the automatic document feeder (ADF). Ensure the stack is neatly aligned. The scanner supports a maximum input sheet capacity of 100 sheets.

Figura 4: Pro lateralfile of the scanner, showing the fully extended input and output trays ready for document feeding.
5.2 Usando o panel de control
The scanner features a control panel for quick access to common scanning functions.

Figura 5: detallada view of the scanner's control panel, featuring a digital display, function selection buttons, Cancel, Scan, and Power buttons.
- Botón de encendido: Press to turn the scanner on or off.
- Function Buttons (Up/Down Arrows): Use these to select different scanning profiles or functions displayed on the digital screen.
- Botón de escaneo: Initiates the scanning process based on the currently selected function.
- Botón Cancelar: Stops the current scanning operation.
5.3 Realización dunha dixitalización
- Asegúrate de que o escáner estea acendido e conectado ao teu ordenador.
- Load your documents into the ADF as described in section 5.1.
- Open the Avision scanning software on your computer (e.g., Button Manager, Capture Tool).
- Select your desired scanning settings (e.g., color mode, resolution, destination folder, single-sided/duplex).
- Click the "Scan" button in the software or press the Escanear button on the scanner's control panel to begin scanning.
- The scanned images will be processed and saved according to your software settings.
6. Mantemento
6.1 Limpeza do escáner
Regular cleaning helps maintain optimal scanning performance.
- Turn off the scanner and disconnect the power cable before cleaning.
- Use un pano suave e sen pelusa dampenxugado con auga ou un limpador suave e non abrasivo para limpar o exterior do escáner.
- To clean the glass platen (if applicable) and rollers, open the scanner cover. Use a specialized scanner cleaning kit or a soft cloth with isopropyl alcohol.
- Allow all components to dry completely before reconnecting power.
6.2 Actualizacións de firmware
Periodically check the Avision website for firmware updates. Firmware updates can improve performance, add features, or resolve issues. Follow the instructions provided with the firmware update package carefully.
7 Solución de problemas
Se tes problemas co teu escáner, consulta os seguintes problemas e solucións comúns:
| Problema | Causa posible | Solución |
|---|---|---|
| O escáner non se acende. | Cable de alimentación non conectado; toma de corrente avariada. | Asegúrate de que o cable de alimentación estea conectado correctamente. Proba cunha toma de corrente diferente. |
| Computer does not detect scanner. | USB cable loose; drivers not installed or corrupted. | Check USB cable connection. Reinstall scanner drivers. Try a different USB port. |
| As imaxes dixitalizadas aparecen borrosas ou con raias. | Scanner glass or rollers are dirty; document misfeed. | Clean the scanner's internal components (refer to Section 6.1). Ensure documents are loaded correctly. |
| Documents jam in the ADF. | Documents are wrinkled or stapled; paper guides not adjusted. | Straighten documents. Remove staples/clips. Adjust paper guides to fit document width. |
8. Especificacións
| Característica | Detalle |
|---|---|
| Marca | Avisión |
| Modelo | FL-1501B |
| Tipo de escáner | Escáner de documentos |
| Resolución de escáner | 600 ppp |
| Capacidade máxima da folla de entrada | 100 follas |
| Tipo de medios | Papel |
| Wattage | 24 vatios |
| Dimensións do produto | 33 x 32.32 x 80.94 cm |
| Peso do elemento | 5.67 kg |
| Data de primeira dispoñibilidade | 6 de xuño de 2016 |
9. Garantía e soporte
9.1 Información da garantía
Avision products are manufactured to high-quality standards. This product is covered by a limited warranty against defects in materials and workmanship. The specific terms and duration of the warranty may vary by region. Please refer to the warranty card included with your product or visit the official Avision websitio para obter información detallada sobre a garantía.
9.2 Soporte técnico
For technical assistance, driver downloads, or further information, please visit the official Avision support website or contact your local Avision service center. Contact details can typically be found on the Avision websitio web ou na documentación do produto.


