1. Introdución
This manual provides comprehensive instructions for the setup, operation, maintenance, and troubleshooting of your Waveshare 7-inch HDMI LCD (C) Capacitive Touch Screen Display. This high-resolution display (1024x600) offers capacitive touch control and broad compatibility with various single-board computers and mini-PCs.
As características principais inclúen:
- 1024x600 high resolution display.
- Capacitive touch control with 5-point multi-touch support.
- Compatibility with Raspberry Pi (all versions), Banana Pi / Banana Pro, BB Black.
- Functions as a general HDMI computer monitor.
2. Configuración
2.1 Contido do paquete
Comprobe que estean presentes todos os compoñentes:
- Waveshare 7-inch HDMI LCD (C)
- Cable HDMI
- USB Cable (for touch and power)
- Mounting hardware (screws, standoffs, if included)
2.2 Conexión física
Connect the display to your device using the provided HDMI and USB cables. The USB connection is essential for both touch functionality and power. Ensure the USB cable is fully wired for data transfer, not just power.

Figure 2.1: Connection diagrams for Raspberry Pi 4, Raspberry Pi Zero W, Raspberry Pi 3B+, and Mini PC.
2.3 Fonte de alimentación
It is recommended to use a 5V/3A power adapter for the Raspberry Pi when connecting this display, especially for larger LCDs. Relying solely on a PC's USB port for power may not provide sufficient current, potentially causing the Pi to fail startup. For larger displays (10 inches or more), a separate stand-alone power adapter for the LCD may be required.
2.4 Software Configuration (Raspberry Pi)
For optimal performance with Raspberry Pi, driver installation or specific configuration file edits may be necessary, especially if using the official Raspbian image. If the LCD does not work immediately, consider using a Waveshare-provided image for initial testing.
To configure the display manually, edit the /boot/config.txt file on your Raspberry Pi's SD card. Add or modify the following lines:
hdmi_group=2
hdmi_drive=1
hdmi_ignore_edid=0xa5000080
hdmi_mode=87
hdmi_cvt=1024 600 60 6 0 0 0
Ensure any existing overscan or framebuffer entries that conflict are commented out.
2.5 Software Configuration (Windows IoT)
For Windows 10 IoT on Raspberry Pi, no specific drivers are needed. Configure the config.txt file do seguinte xeito:
max_usb_current=1
hdmi_mode=1
hdmi_mode=87
hdmi_group=2
hdmi_cvt 1024 600 60 6 0 0 0
Connect the HDMI lead, then connect the USB from the screen to the Pi. Ensure the USB cable supports data transfer.
3. Instrucións de funcionamento
3.1 Basic Display Operation
Once connected and configured, the display will show the output from your connected device. The 1024x600 resolution provides clear visuals for various applications.

Figura 3.1: Fronte view of the 7-inch HDMI LCD (C) demonstrating capacitive touch.
3.2 Capacitive Touch Control
The display features a capacitive touch screen, supporting up to 5-point multi-touch. This allows for intuitive interaction with compatible operating systems and applications.

Figure 3.2: Demonstration of 5-point multi-touch capability.
Control de retroiluminación 3.3
The display includes backlight adjustment solder pads for PWM signal input, allowing for control over the backlight brightness. This feature can be utilized for power saving or adjusting visibility in different lighting conditions.
4. Mantemento
4.1 Limpeza da pantalla
Para limpar a pantalla, limpe con coidado cun pano suave e sen pelusa. Para manchas difíciles, límpeaa lixeiramenteampen the cloth with water or a screen-safe cleaning solution. Avoid using harsh chemicals, abrasive materials, or excessive moisture, as these can damage the screen surface or internal components.
4.2 Coidados xerais
Handle the display with care to prevent physical damage. Avoid applying excessive pressure to the screen. Store the display in a cool, dry environment away from direct sunlight and extreme temperatures. Protect the display from dust and moisture when not in use.
5 Solución de problemas
5.1 LCD Not Working with Raspbian
If the LCD does not display with your Raspbian image, ensure the necessary drivers are installed. Refer to section 2.4 for manual configuration of the /boot/config.txt file. Alternatively, try using a Waveshare-provided image for initial setup.
5.2 LCD Not Working with Waveshare Provided Image
If the display fails to work even with a Waveshare-provided image:
- Verify all hardware connections are correct and secure.
- Ensure the image on the TF card was burnt correctly.
- Check the Raspberry Pi's PWR and ACT LEDs. If both remain constantly on, it may indicate an incorrectly burnt image or poor TF card contact.
5.3 Screen Flickering or Backlight Cycling
If the screen flickers or the backlight cycles on and off, this could be due to a micro-fracture in a resistor on the LCD board. While advanced users might attempt a repair, it is generally recommended to contact support for such issues.
5.4 Screen Burn-in / Image Retention
Some users have reported temporary or permanent image retention (screen burn-in) after static images are displayed for extended periods. To mitigate this, avoid displaying static images for long durations. Utilize screen savers or power-saving modes to turn off the display when not in active use.
6. Especificacións
Detailed technical specifications for the Waveshare 7-inch HDMI LCD (C):
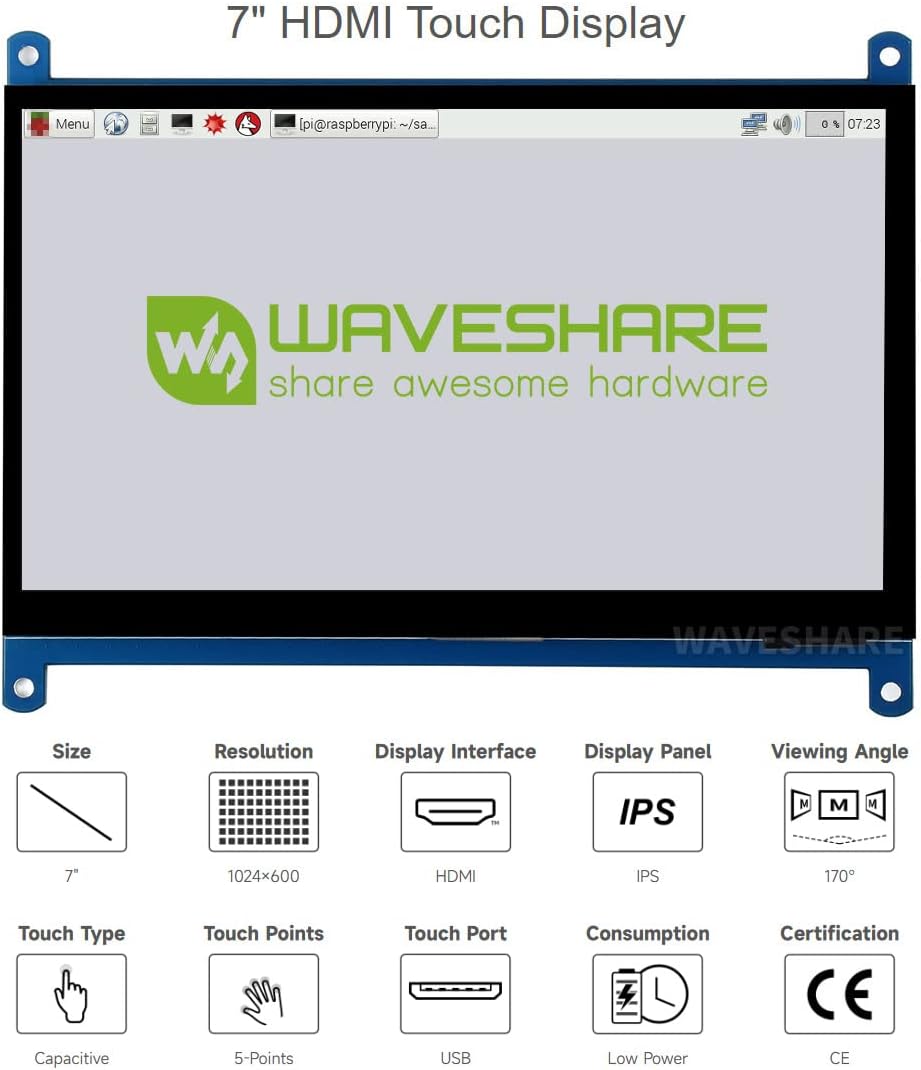
Figure 6.1: Key specifications of the 7-inch HDMI Touch Display.
| Característica | Especificación |
|---|---|
| Tamaño de visualización da pantalla de pé | 7 polgadas |
| Resolución de pantalla | 1024 x 600 píxeles |
| Resolución máxima de pantalla | 1024 x 600 píxeles |
| Toca Tipo | Capacitive, 5-Points |
| Panel de visualización | IPS |
| Viewángulo ing | 170° |
| Interface de visualización | HDMI |
| Toca Porto | USB |
| Número de portos USB 2.0 | 1 |
| Peso do elemento | 11.4 onzas |
| Dimensións do produto (LxWxH) | 0.2 x 5.91 x 4.17 polgadas |
| Voltage | 5 voltios (DC) |
| Descrición da superficie da pantalla | Brillante |

Figure 6.2: Dimensions of the 7-inch HDMI LCD (C) in millimeters.
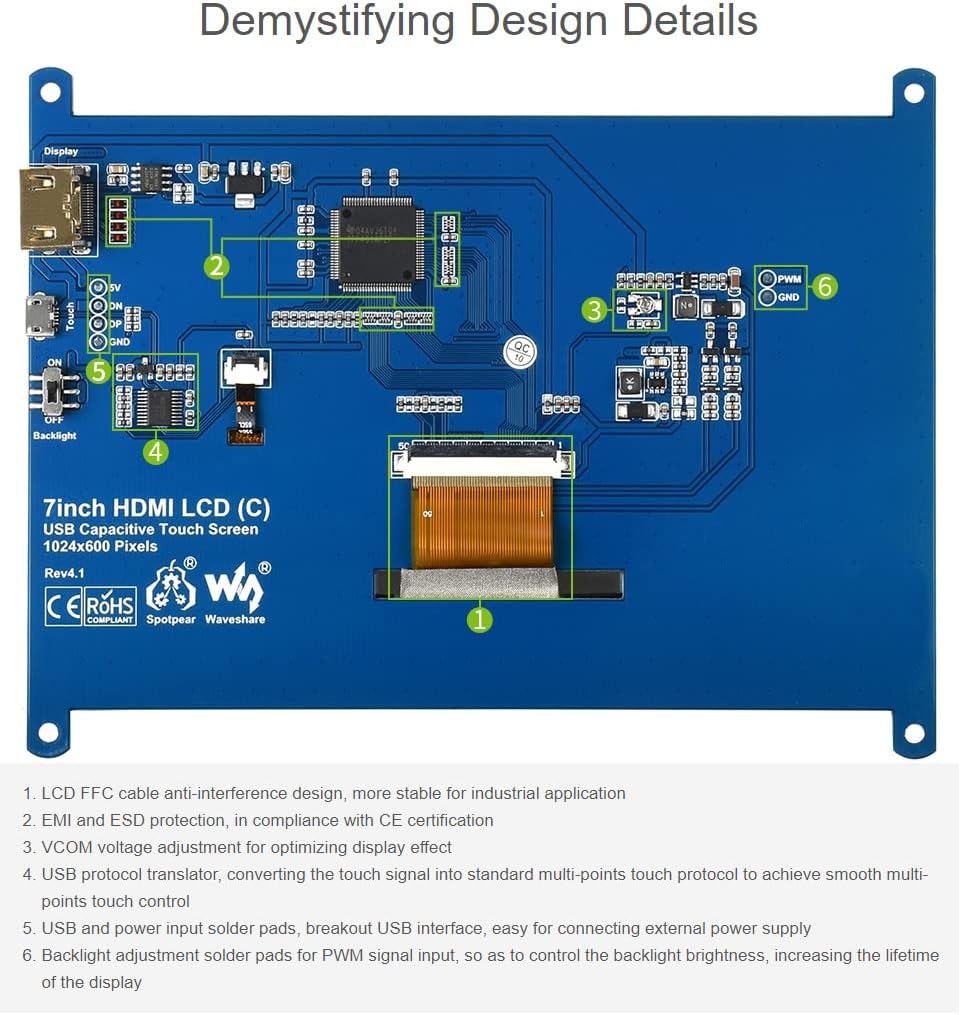
Figure 6.3: Demystifying Design Details of the LCD board, showing components like FFC cable, EMI/ESD protection, and USB protocol translator.
7. Garantía e soporte
7.1 Información da garantía
For specific warranty terms and conditions, please refer to the documentation provided with your purchase or contact the seller directly. Warranty coverage typically addresses manufacturing defects.
7.2 Soporte técnico
For further information, detailed guides, and troubleshooting resources, please visit the official Waveshare wiki page. You can also contact Waveshare customer service for support:
- Soporte de vendas: sales@waveshare.com
- Soporte posvenda: service@waveshare.com
- Complaint Department: denuncia@waveshare.com
- Teléfono: +86-755-82807524
- Fax: +86-755-83042572
The manufacturer is Waveshare, located at Rm 813, Dynamic World Building, Zhenhua Rd, Futian District, Shenzhen, China.


