1. Produto rematadoview
The LUX Pro P711V-010 is a versatile thermostat designed for controlling heating and cooling systems. It offers both programmable (7-day, 5/2-day) and non-programmable settings, an easy-view backlight, and a keypad lock feature. This manual provides detailed instructions for installation, operation, and programming to ensure optimal performance and energy efficiency.

Imaxe 1.1: Fronte view of the LUX Pro P711V-010 Thermostat, showing the digital display and control buttons.

Image 1.2: Key features of the P711V-010, highlighting vertical installation compatibility, dual power options (battery or 24VAC), and keyboard lockout functionality.
2. Características
- Configuración programable: Offers 7-day, 5/2-day, or non-programmable options for flexible temperature control.
- doado-View Retroiluminación: Provides a clear display for easy reading in various lighting conditions.
- User-Selectable Periods: Customize your heating and cooling schedule with 2 or 4 periods per day.
- Bloqueo do teclado: Prevents unauthorized adjustments to settings.
- Opcións de alimentación dual: Can be powered by 2 AA batteries (included) or a 24-volt system.
- Visualización da temperatura: Switch between Fahrenheit (F) and Celsius (C) display.
- Adjustable Temperature Differential: Allows customization of the temperature swing before the system activates.
- User Temperature Calibration: Fine-tune temperature readings for accuracy.
- Adjustable Heat/Cool Set Temperature Limit Stops: Set minimum and maximum temperature limits.
- 5/2-Minute Time Delay: Protects HVAC equipment by preventing short cycling.
3. Contido do paquete
Ao abrir o paquete, comproba que inclúa todos os seguintes elementos:
- LUX Pro P711V-010 Thermostat Unit
- 2 AA LR6 Batteries
- 2 parafusos ST
- 2 ancoraxes de parede
- Etiquetas de arame
- Manual de instrucións (este documento)

Image 3.1: Illustration of the contents included in the thermostat package.
4. Especificacións
| Especificación | Detalle |
|---|---|
| Nome do modelo | P711V-010 |
| Dimensións | 1.25 x 3.38 x 5.38 polgadas |
| Peso do elemento | 0.01 onzas |
| Fonte de enerxía | Battery Powered (2 AA included) or 24 Volts (system) |
| Tipo de visualización | LCD con retroiluminación |
| Tipo de control | Pulsador |
| Tipo de montaxe | Montaxe Vertical |
| Voltage | 24 voltios |
| Cor | Branco |
| Certificación | Listado UL |
5. Compatibilidade do sistema
The P711V-010 thermostat is compatible with a variety of HVAC systems. Please review the compatibility information below to ensure it is suitable for your system.
Compatible Systems (24V)
- ✔ Gas/Oil/Electric Furnace (Heating only)
- ✔ Gas/Oil/Electric Furnace (Single Stage)
- ✔ Heat Pump without Auxiliary Heat
- ✔ 2-wire Hydronic (Hot Water)
- ✔ 750 Millivolt Systems
- ✔ Gas Fireplaces (24V)
- ✔ Cooling only systems
- ✔ Single stagsistemas de refrixeración electrónicos
Non compatible con:
- ✘ Heat Pump Multistage
- ✘ Radiant Ceiling Heat
- ✘ Electric Baseboards
- ✘ Heat Pump with Auxiliary Heat
- ✘ Portable Space Heaters
- ✘ 3-wire Hydronic (Hot Water)
- ✘ Gas/Oil/Electric Furnace - Multistage
- ✘ Cool Multistage
- ✘ Plug-in Air Conditioners

Image 5.1: Visual chart detailing compatible and incompatible HVAC system types.
6. Instalación
Importante: Before beginning installation, turn off power to your heating and cooling system at the main circuit breaker or fuse box. Improper wiring can damage the thermostat and/or your HVAC system.
6.1 Esquemas de cableado
Refer to the following diagrams to correctly wire your thermostat based on your existing system configuration. Use the provided wire labels to mark your existing wires before disconnecting your old thermostat.
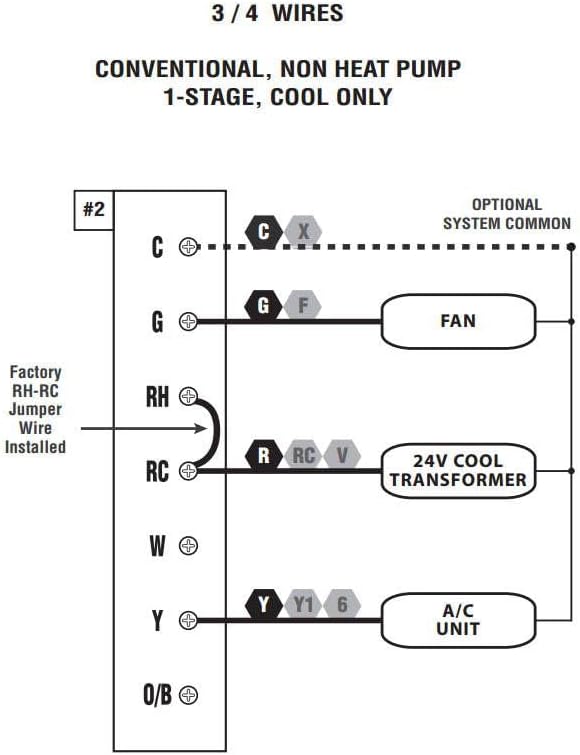
Image 6.1: Wiring diagram for 3 or 4 wire conventional systems with 1-stage só refrixeración.

Image 6.2: Wiring diagram for 4 or 5 wire conventional systems with 1-stage calefacción e 1-stage refrixeración.

Image 6.3: Wiring diagram for 5 or 6 wire conventional systems with 1-heat and 1-cool, utilizing two transformers. Note: Remove the factory RH-RC jumper wire for this configuration.
7. Funcionamento
This section details the basic controls and functions of your P711V-010 thermostat.

Image 7.1: Labeled diagram of the P711V-010 control panel, indicating the LCD display, programming buttons (Set, Next, Hold), temperature adjustment buttons (Up, Down), Fan Mode switch, and System Mode switch.
7.1 Controis básicos
- Fan Switch (Auto/On):
- Automático: O ventilador só funciona cando o sistema de calefacción ou refrixeración está activo.
- En: O ventilador funciona continuamente.
- Mode Switch (Heat/Off/Cool):
- Calor: O termostato controla o sistema de calefacción.
- Desactivado: Tanto os sistemas de calefacción como de refrixeración están desactivados.
- Cool: O termostato controla o sistema de refrixeración.
- Botóns ARRIBA (▲) / ABAIXO (▼): Adjust the set temperature or navigate programming menus.
- Botón SET: Used to enter and confirm programming settings.
- Botón SEGUINTE: Advances through programming steps.
- Botón HOLD: Maintains the current temperature indefinitely, overriding any programmed schedule. Press again to cancel HOLD and resume program.
7.2 Programación
The P711V-010 offers 7-day, 5/2-day, or non-programmable modes. Refer to the full instruction manual for detailed programming steps for each mode. Generally, programming involves setting the time, day, and desired temperatures for specific periods (e.g., Wake, Leave, Return, Sleep).
7.3 Bloqueo do teclado
To prevent unauthorized changes, the thermostat features a keypad lock. Consult the detailed manual for instructions on how to activate and deactivate this feature.
8 Solución de problemas
Se tes problemas co teu termostato, ten en conta os seguintes pasos habituais para a súa resolución:
- Sen visualización/pantalla en branco: Check batteries and replace if necessary. Ensure power to the HVAC system is on.
- O sistema non responde: Verify the thermostat is set to the correct mode (Heat/Cool). Check wiring connections. Ensure the system's circuit breaker is not tripped.
- Lectura de temperatura incorrecta: The thermostat may require calibration. Refer to the full manual for calibration instructions.
- Program Not Running: Ensure the thermostat is not in 'HOLD' mode. Verify programming settings are correctly entered.
- Short Cycling: The 5/2-minute time delay is designed to prevent this. If short cycling persists, consult an HVAC professional.
For more detailed troubleshooting, refer to the comprehensive instruction manual included with your product or visit the LUX support websitio.
9. Garantía e soporte
The LUX Pro P711V-010 Thermostat comes with a 5 ano de garantía limitadaEsta garantía cobre defectos de materiais e fabricación en condicións normais de uso. Conserve o comprobante de compra para reclamacións de garantía.
For technical support, warranty service, or additional information, please refer to the contact details provided in the full product manual or visit the official LUX websitio.


