1. Información de seguridade
Lea atentamente todas as instrucións antes da instalación e o uso. Garde este manual para futuras consultas.
- AVISO: Risco de descarga eléctrica. Desconecte a alimentación no fusible ou no disyuntor antes da instalación ou do mantemento.
- Installation should be performed by a qualified electrician or a person with electrical knowledge.
- Asegurar a subministración voltage is compatible with the light fixture (240 Volts as per specifications).
- Non modifiques o aparello de ningún xeito.
- This product is not dimmable. Do not connect to a dimmer switch.
- Keep away from babies and children to avoid danger of suffocation from packaging materials.
2. Produto rematadoview
The Lepro 8.7-inch 15W LED Flush Mount Ceiling Light is designed for various indoor applications, including bathrooms, kitchens, bedrooms, hallways, and laundry rooms. Its slim, waterproof, and dustproof design ensures durability and seamless integration into any interior style.
Características principais:
- IP54 Water Resistant and Dustproof: Sealed design protects against splashing water and dust, making it suitable for damp ambientes como baños.
- Deseño fino: Blends seamlessly with any interior, ideal for low or sloped ceilings.
- Longa vida útil: Integrated LED lights are rated for over 20,000 hours of operation.
- Luz branca cálida: Provides 3000 Kelvin soft warm white illumination.
- High Brightness & Energy Saving: 15 watts, 1500 lumens, equivalent to a 100-watt incandescent bulb, offering up to 88% energy savings.
- Índice de reproducción cromática alto (CRI > 80): Ensures colors appear natural and vibrant.
- Wide Illumination Range: Effectively illuminates an area of 9 to 12 square meters (95-130 sq. ft).
- Non regulable: This light fixture is not compatible with dimmer switches.
Especificacións:
| Marca | Leproso |
| Número de modelo | PR1500024-WW |
| Cor | Branco Cálido |
| Material | Plástico |
| Dimensións do produto | 8.7" de longo x 8.7" de ancho x 1.97" de alto (220 mm x 220 mm x 50 mm) |
| Peso do elemento | 1.21 libras (0.55 quilogramos) |
| Fonte de enerxía | AC |
| Voltage | 240 voltios |
| Wattage | 15 vatios |
| Brillo | 1500 lúmenes |
| Temperatura da cor | 3000 Kelvin |
| Índice de reproducción da cor (CRI) | >80 (typically 85) |
| Vida Media | 20,000 horas |
| Nivel de resistencia á auga | IP54 (Impermeable) |
| Tipo de instalación | Montar a lavar |
| Característica especial | Non regulable |
3. Contido do paquete
Verifique que todos os compoñentes estean presentes e sen danos antes de comezar a instalación.
- Lámpara de techo LED empotrada
- Soporte de montaxe
- Ferraxes de montaxe (tornillos, ancoraxes de parede)
- Anti-scratch pads (3 pieces)
- Manual de instrucións

Image: Contents of the product package, showing the light fixture and mounting hardware.
4. Instrucións de instalación
Follow these steps carefully to install your Lepro LED Flush Mount Ceiling Light. Ensure power is OFF before starting.
Guía de vídeo:
Video: Official installation guide for Lepro ceiling lights, demonstrating the step-by-step process.
- Paso 1: Desconecte a enerxía
Before starting any electrical work, turn off the power at the circuit breaker or fuse box to prevent electric shock.
Image: A hand switching off a wall light switch, emphasizing the importance of cutting power before installation.
- Step 2: Remove the Mounting Bracket from the Fixture
Locate the bracket lock on the back of the light fixture. Press the bracket lock to detach the mounting bracket from the lamp corpo.
Image: Diagram illustrating the removal of the mounting bracket from the light fixture by pressing a lock mechanism.
- Paso 3: Instale o soporte de montaxe
Measure the hole spacing on the mounting bracket. Depending on your ceiling type (wooden, cement, or junction box), use the appropriate screws and wall anchors to securely fix the mounting bracket to the ceiling. Ensure the bracket is flush against the ceiling.
Image: Diagram showing the mounting bracket installation process for various ceiling types, including drilling holes for cement ceilings and attaching to a junction box.
- Step 4: Apply Anti-scratch Pads
Paste the three provided anti-scratch pads to the back of the lamp body. These pads help protect the ceiling surface and ensure a snug fit.
Image: Diagram illustrating where to attach the anti-scratch pads on the rear of the light fixture.
- Paso 5: Conecte os cables
Open the waterproof wires compartment on the light fixture. Insert the live (L) and neutral (N) wires from your ceiling into the corresponding polarities on the wire connector. Ensure a secure connection. Close the compartment.
Image: Diagram showing the electrical wiring connection process, highlighting the live (L) and neutral (N) terminals.
- Step 6: Attach the Light Fixture
Align the light fixture with the installed mounting bracket. Push the lamp body firmly against the ceiling and twist it clockwise until it locks securely into place. Ensure the light is flush with the ceiling.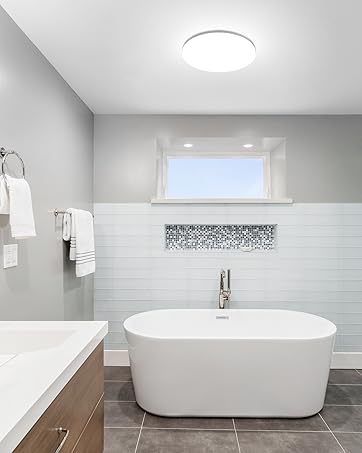
Image: Diagram showing the light fixture being attached to the mounting bracket on the ceiling.
- Paso 7: restaurar a enerxía
Once the light fixture is securely installed, restore power at the circuit breaker or fuse box. Test the light to ensure it functions correctly.
5. Funcionamento
This Lepro LED Flush Mount Ceiling Light is designed for simple operation. Once installed and powered, it functions as a standard on/off light fixture.
- Activar/Desactivar: Usa o interruptor de parede estándar para acender ou apagar a lámpada.
- Non regulable: This fixture provides a fixed brightness and cannot be dimmed. Do not use with dimmer switches.
6. Mantemento
To ensure the longevity and optimal performance of your light fixture, follow these maintenance guidelines:
- Limpeza: Desconecte a alimentación antes de limpar. Limpe o aparello cun pano suave, seco ou lixeiramente húmido.amp pano. Non use produtos químicos agresivos ou produtos de limpeza abrasivos.
- Sen substitución de lámpadas: This fixture uses integrated LED lights that are designed to last for 20,000 hours. There are no user-replaceable bulbs.
- Inspección: Comprobe periodicamente a instalación para detectar calquera signo de danos ou conexións soltas. Se atopa algún problema, desconecte a alimentación e consulte cun electricista cualificado.
7 Solución de problemas
If you encounter any issues with your light fixture, refer to the following troubleshooting steps:
| Problema | Causa posible | Solución |
|---|---|---|
| A luz non acende. | Sen fonte de alimentación. Conexión de cableado solta. Interruptor de parede avariado. | Comprobar o interruptor/fusible. Ensure wires are securely connected (power off first). Proba o interruptor de parede con outro dispositivo. |
| Luz parpadea. | Conexión de cableado solta. Interruptor regulador de intensidade incompatible (se está instalado). | Comprobe as conexións do cableado (apague primeiro a alimentación). Ensure no dimmer switch is used, as this fixture is not dimmable. |
| A luz non é o suficientemente brillante. | Room size exceeds recommended illumination area. Dust accumulation on the diffuser. | Consider additional lighting for larger areas. Clean the diffuser (power off first). |
8. Garantía e soporte
This Lepro LED Flush Mount Ceiling Light comes with a 3 ano de garantía desde a data de compra.
For warranty claims, technical support, or any questions regarding your product, please contact Lepro customer service through the retailer where you purchased the product or visit the official Lepro websitio para información de contacto.
Garde o comprobante de compra para validar a garantía.


