1. Produto rematadoview
O Maxview B2013 Single Weatherproof Outdoor Socket with RJ45 Connection is designed to provide a secure and weatherproof external entry point for network/Ethernet connections into mobile vehicles. This unit is ideal for routing external Wi-Fi aerials or network cables, ensuring reliable internet access while on the move.
Its robust design includes a tight closing lid that conceals cables during use, protecting the internal connections from environmental elements such as rain, wind, and snow. A self-adhesive EPDM foam seal ensures water ingress protection between the socket and the vehicle.
Características principais:
- Specially designed to provide a neat, external weatherproof cable entry point into any vehicle.
- Features an RJ45 connection for network/Ethernet cables.
- Includes a 3-meter cable length for flexible installation.
- Ideal for various portable satellite systems and touring aerials.
- Equipped with a waterproof self-adhesive EPDM foam seal for enhanced protection.
2. Información de seguridade
Lea atentamente todas as instrucións de seguridade antes da instalación e o uso. O incumprimento destas instrucións pode provocar danos no produto, materiais ou lesións persoais.
- Ensure the installation surface is clean, dry, and free from debris before applying the seal.
- Do not attempt to modify the product. Any modifications will void the warranty and may compromise safety.
- Manter fóra do alcance dos nenos.
- When drilling, be aware of any existing wiring or pipes behind the installation surface.
- Empregue sempre as ferramentas e o equipo de protección individual axeitados durante a instalación.
3. Contido do paquete
Comprobe que todos os compoñentes estean presentes antes de comezar a instalación:
- 1 x Máxview B2013 Single Weatherproof Outdoor Socket with RJ45 Connection
- 1 x Self-adhesive EPDM foam seal
- Parafusos de montaxe
- 3-meter RJ45 cable
4. Guía de instalación
Follow these steps for proper installation of your Maxview B2013 weatherproof socket:
- Escolla localización: Select a flat, clean, and accessible surface on your vehicle for mounting. Ensure there is sufficient space for the unit and for cables to be routed internally.
- Preparar superficie: Clean the mounting area thoroughly to remove any dirt, grease, or moisture. This ensures proper adhesion of the EPDM foam seal.
- Marcar os puntos de perforación: Place the socket against the chosen surface and mark the positions for the mounting screws. Also, mark the center point for the cable entry hole.
- Perforación: Carefully drill pilot holes for the mounting screws and a larger hole for the cable entry, ensuring not to damage any internal wiring or structures.
- Aplicar selo: Apply the self-adhesive EPDM foam seal to the back of the socket, aligning it with the edges to create a watertight barrier.
- Cable de ruta: Feed the RJ45 cable through the drilled cable entry hole from the inside of the vehicle to the outside. Connect the RJ45 end to the socket's internal connector.
- Mount Socket: Position the socket over the drilled holes, ensuring the cable is properly routed and connected. Secure the socket to the vehicle using the provided mounting screws. Tighten firmly but do not overtighten.
- Pechar tapa: Ensure the lid is securely closed when the socket is not in use or when cables are connected, to maintain its weatherproof integrity.

Figure 4.1: Maxview B2013 socket with an RJ45 cable connected, demonstrating its primary function.
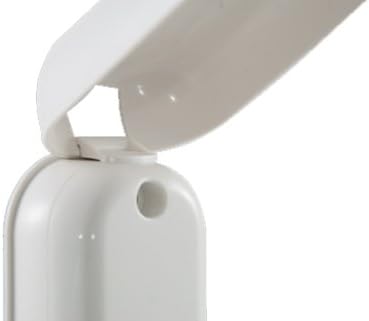
Figure 4.2: Detail of the robust hinge mechanism for the weatherproof lid.
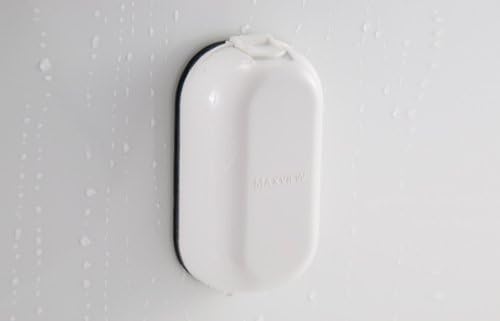
Figure 4.3: The Maxview B2013 socket with its lid closed, illustrating its weatherproof capability against water.
5. Instrucións de funcionamento
Using the Maxview B2013 socket is straightforward:
- Tapa aberta: Gently lift the weatherproof lid to expose the RJ45 port.
- Cable de conexión: Insert your external RJ45 network cable into the port until it clicks securely into place.
- Cable de ruta: Ensure the cable is routed neatly and does not obstruct the lid's closing mechanism. The design allows the lid to close around the cable.
- Pechar tapa: Once the cable is connected, carefully close the lid. The lid is designed to provide a tight seal around the connected cable, maintaining the weatherproof integrity.
- Desconectar o cable: To disconnect, open the lid, press the release tab on the RJ45 connector, and gently pull the cable out.
- Tapa segura: Always ensure the lid is fully closed when no cable is connected to protect the port from environmental exposure.
6. Mantemento
To ensure the longevity and optimal performance of your Maxview B2013 socket, follow these maintenance guidelines:
- Limpeza: Periodically clean the exterior of the socket with a soft, damp cloth. Avoid using abrasive cleaners or solvents that could damage the plastic or seal.
- Inspección do selo: Regularly inspect the EPDM foam seal for any signs of wear, cracking, or damage. A compromised seal can lead to water ingress. If damaged, replace the seal promptly.
- Mecanismo de tapa: Check the lid's hinge and latch mechanism to ensure it operates smoothly and closes securely. Lubricate with a silicone-based spray if necessary, avoiding contact with electrical components.
- Conexión por cable: Ensure the internal RJ45 connection remains free of dirt and moisture. If exposed, clean gently with compressed air.
- Apertura do parafuso: Periodically check the mounting screws for tightness. Vibrations during travel can loosen them over time.
7 Solución de problemas
If you encounter issues with your Maxview B2013 socket, refer to the following common problems and solutions:
| Problema | Causa posible | Solución |
|---|---|---|
| Water ingress around the socket. | Damaged or improperly installed EPDM seal. Loose mounting screws. | Inspect and re-apply or replace the EPDM seal. Tighten mounting screws. Ensure the surface was clean and dry during installation. |
| RJ45 cable does not connect securely. | Debris in the port. Damaged RJ45 connector on the cable. | Inspect the port for obstructions and clean with compressed air. Try a different RJ45 cable to rule out cable issues. |
| A tapa non se pecha correctamente. | Obstruction in the hinge or latch mechanism. Misalignment during installation. | Check for debris in the hinge area. Ensure the socket is mounted flush and not warped. |
| No network connection after plugging in. | Internal cable issue. External device issue. | Verify the internal RJ45 cable connection. Test the external network device and cable directly. Consult a professional if internal wiring is suspected. |
8. Especificacións
| Característica | Detalle |
|---|---|
| Modelo de produto | MaxV-B2013 |
| Tipo de conexión | Single RJ45 |
| Dimensións do produto | 4.53 x 2.64 x 4.53 polgadas (11.5 x 6.7 x 11.5 cm) |
| Peso do elemento | 15.8 onzas (447.9 gramos) |
| Lonxitude do cable | 3 metros (aprox. 9.8 pés) |
| Fabricante | Máxview |
| Primeira data dispoñible | 19 de novembro de 2019 |
9. Garantía e soporte
Máxview products are manufactured to high standards and are designed for reliable performance. For specific warranty information, please refer to the documentation included with your purchase or visit the official Maxview websitio.
For technical support, troubleshooting assistance, or to inquire about replacement parts, please contact Maxview customer service. Contact details can typically be found on the manufacturer's websitio web ou na embalaxe do produto.
Conserve o comprobante de compra para reclamacións de garantía.


