1. Introdución
This manual provides detailed instructions for the installation, operation, and maintenance of your Zebronics H61 Motherboard. Please read this manual thoroughly before proceeding with installation to ensure proper setup and functionality.
The Zebronics H61 Motherboard is designed to support Intel LGA 1155 socket processors (i7/i5/i3/Pentium/Celeron series) and DDR3 dual-channel memory. It features an Intel H61 chipset, providing a stable and efficient platform for your computing needs.
2. Información de seguridade
- Desconecte sempre a fonte de alimentación antes de instalar ou retirar calquera compoñente.
- Handle the motherboard by its edges to avoid electrostatic discharge (ESD) damage. Use an anti-static wrist strap if available.
- Asegúrate de ventilar axeitadamente a carcasa do teu ordenador para evitar o sobrequecemento.
- Non expoñas a placa base á humidade nin a temperaturas extremas.
- Refer to the component manufacturer's manuals for specific installation instructions for your CPU, RAM, and other peripherals.
3. Contido do paquete
Verifica que todos os elementos estean presentes no paquete:
- Zebronics H61 Motherboard
- Escudo de E / S
- SATA Data Cable(s)
- Driver CD (for operating systems that do not automatically install drivers)
- Manual de usuario (este documento)
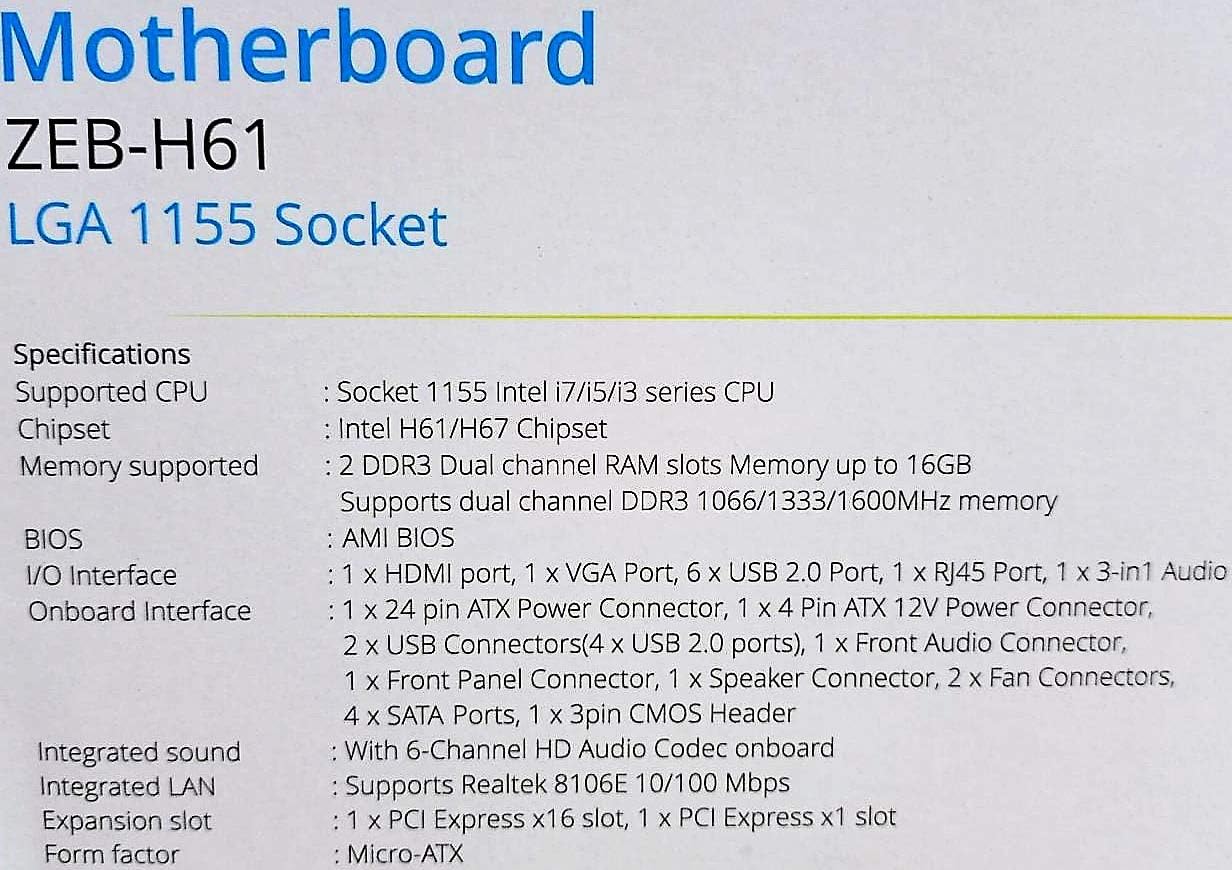
4. Especificacións
| Característica | Descrición |
|---|---|
| Modelo | H61 |
| Chipset | Intel H61 Express |
| Socket CPU | LGA 1155 |
| Procesadores compatibles | Intel i7/i5/i3/Pentium/Celeron processors (2nd and 3rd Generation) |
| Slots de memoria | 2 x DDR3 Dual-channel slots |
| Soporte de memoria | DDR3 1066/1333/1600MHz, up to 16GB |
| Interface gráfica | 1 x PCI-Express x16 slot |
| Ranuras de expansión | 1 x ranura PCI Express x1 |
| Almacenamento | 4 x SATA II ports |
| LAN | Realtek 8106E 10/100 Mbps Ethernet |
| Audio | 6-Channel HD Audio Codec onboard (5.1 surround sound support) |
| Portos de E/S traseiros | 1 x HDMI, 1 x VGA, 6 x USB 2.0, 1 x RJ45, 1 x 3-in-1 Audio Jacks (Line-in, Line-out, Mic-in), PS/2 (Keyboard/Mouse) |
| Factor de forma | ATX |
| Dimensións | 25 x 20 x 3 cm |
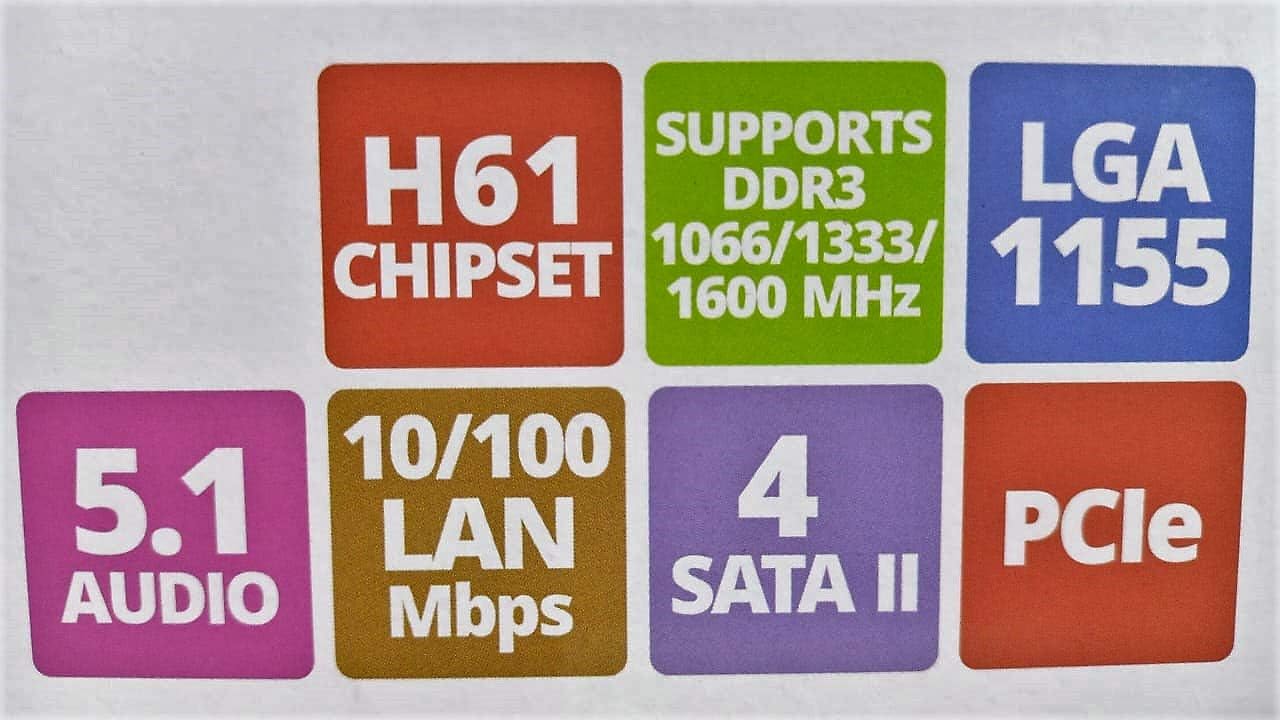
Image: Detailed specifications of the Zebronics H61 Motherboard, including chipset, CPU socket, memory support, and I/O interfaces.

Image: Visual representation of key features such as H61 Chipset, DDR3 support, LGA 1155 socket, 5.1 Audio, 10/100 LAN, 4 SATA II ports, and PCIe.
5. Configuración e instalación
5.1 Deseño da placa base

Imaxe: De arriba abaixo view of the Zebronics H61 Motherboard, showing the CPU socket, RAM slots, PCIe slot, and various headers.

Image: Another top-down perspective of the Zebronics H61 Motherboard, highlighting component placement.
5.2 Panel de E/S traseiro

Image: Rear I/O panel of the Zebronics H61 Motherboard, displaying ports for PS/2 keyboard/mouse, VGA, HDMI, USB 2.0, LAN, and audio jacks.
Imaxe: Un pechador view of the rear I/O ports, detailing the VGA, HDMI, USB, LAN, and audio connections.
5.3 Pasos de instalación de compoñentes
- Instalar a CPU:
- Abra a panca do socket da CPU.
- Carefully align the CPU with the socket, ensuring the golden triangle on the CPU matches the mark on the socket.
- Coloque a CPU no socket con coidado sen forzala.
- Peche a palanca para fixar a CPU.
- Aplica pasta térmica e instala o refrigerador da CPU segundo as instrucións do fabricante.
- Instalar RAM:
- Abra os clips en ambos extremos das ranuras de memoria DDR3.
- Aliña o módulo de memoria coa ranura, asegurándote de que a muesca do módulo coincida coa chave da ranura.
- Prema firmemente os dous extremos do módulo de memoria ata que os clips encaixen no seu lugar.
- Instalar a tarxeta gráfica (opcional):
- Locate the PCI-Express x16 slot.
- Retire a tapa da ranura de expansión correspondente da caixa do seu PC.
- Align the graphics card with the slot and press down firmly until it is seated correctly.
- Fixa a tarxeta á carcasa do PC cun parafuso.
- Conectar dispositivos de almacenamento:
- Connect SATA data cables from the motherboard's SATA ports to your hard drives or SSDs.
- Ensure power cables from the power supply are connected to these devices.
- Conectar fonte de alimentación:
- Conecta o conector de alimentación ATX de 24 pines da fonte de alimentación á placa base.
- Connect the 4-pin ATX 12V power connector (CPU power) to the motherboard.
- Conectar as cabeceiras do panel frontal:
- Connect the power switch, reset switch, HDD LED, and power LED cables from your PC case to the corresponding pins on the motherboard's front panel header. Refer to the motherboard diagram for pin assignments.
- Connect front USB and audio headers.
6. Instrucións de funcionamento
6.1 Primeiro arranque e configuración da BIOS
- Despois de montar todos os compoñentes, conecte o monitor, o teclado e o rato.
- Acende o teu ordenador.
- Press the designated key (usually DEL or F2) repetidamente durante o inicio para entrar na utilidade de configuración da BIOS/UEFI.
- Na BIOS, verifica que todos os compoñentes instalados (CPU, RAM, almacenamento) sexan detectados correctamente.
- Configura a orde de arranque para instalar o sistema operativo desde unha unidade USB ou unha unidade óptica.
- Garda os cambios e sae da BIOS. O sistema reiniciarase.
6.2 Instalación do controlador
After installing your operating system, install the necessary drivers for optimal performance. Drivers can be found on the included driver CD or downloaded from the official Zebronics websitio.
- Controladores de chipsets
- Controladores gráficos (se se usan gráficos integrados ou unha GPU dedicada)
- Controladores LAN
- Controladores de audio
- USB Drivers (if applicable)
7. Mantemento
- Mantéñase limpo: Regularly clean dust from inside your PC case, especially from fans and heatsinks, to ensure proper airflow and prevent overheating. Use compressed air.
- Actualizacións da BIOS: Check the Zebronics website periodically for BIOS updates. BIOS updates can improve system stability, compatibility, and performance. Follow update instructions carefully.
- Actualizacións de controladores: Keep your drivers updated to ensure compatibility and optimal performance with your operating system and applications.
- Batería CMOS: The motherboard uses a CR2032 battery to retain BIOS settings. If your system frequently loses time or BIOS settings, the battery may need replacement.
8 Solución de problemas
- No Power / System Does Not Boot:
- Ensure all power cables (24-pin ATX, 4-pin ATX 12V) are securely connected to the motherboard.
- Check if the power supply unit (PSU) is switched on and functioning.
- Verifique a conexión do interruptor de alimentación do panel frontal.
- Try reseating RAM modules and the graphics card.
- Sen visualización no monitor:
- Ensure the monitor is connected to the correct video output (either integrated graphics on the motherboard or dedicated graphics card).
- Check monitor power and input selection.
- Reseat the graphics card (if installed) and RAM modules.
- Inestabilidade/fallos do sistema:
- Comproba as temperaturas da CPU e da GPU. O sobrequecemento pode causar inestabilidade.
- Ensure RAM modules are properly seated and compatible. Test with one RAM stick if multiple are installed.
- Actualiza os controladores e a BIOS ás versións máis recentes.
- Executa ferramentas de diagnóstico de memoria para comprobar se hai defectos na RAM.
- CMOS Battery Issue (Loss of Time/Settings):
- If the system loses time or BIOS settings after being powered off, the CMOS battery (CR2032) may need replacement.
- To reset CMOS: Disconnect power, remove the CMOS battery, short the battery socket's positive and negative terminals for 30 seconds, then reinsert the battery.
9. Garantía e soporte
For warranty information and technical support, please refer to the official Zebronics websitio web ou póñase en contacto co seu departamento de atención ao cliente. Garde o recibo da compra como proba de compra para reclamacións de garantía.
Zebronics Official Websitio: www.zebronics.com


