1. Introdución
This manual provides comprehensive instructions for the assembly, operation, and maintenance of your Levenhuk Skyline Travel 70 Portable Refractor Telescope. Please read these instructions carefully before using your telescope to ensure proper function and longevity of the instrument. This telescope is designed for both astronomical and terrestrial observations, offering a compact and lightweight solution for beginners and enthusiasts.

Image 1.1: The Levenhuk Skyline Travel 70 Portable Refractor Telescope with its included backpack, ready for transport.
2. Contido do paquete
Verifique que todos os compoñentes que se indican a continuación estean presentes no seu paquete:
- Levenhuk Skyline Travel 70 Refractor Telescope Optical Tube
- Monte Altazimutal
- Trípode de aluminio
- Optical Finderscope
- K10mm Eyepiece
- K20mm Eyepiece
- 3x Lente Barlow
- Espello diagonal
- Backpack for storage and transport

Image 2.1: Included K10mm and K20mm eyepieces, 3x Barlow lens, and diagonal mirror.

Image 2.2: The telescope and its accessories neatly packed inside the provided backpack, demonstrating its portability.
3. Diagrama de pezas
Familiarize yourself with the various parts of your telescope using the diagram below:
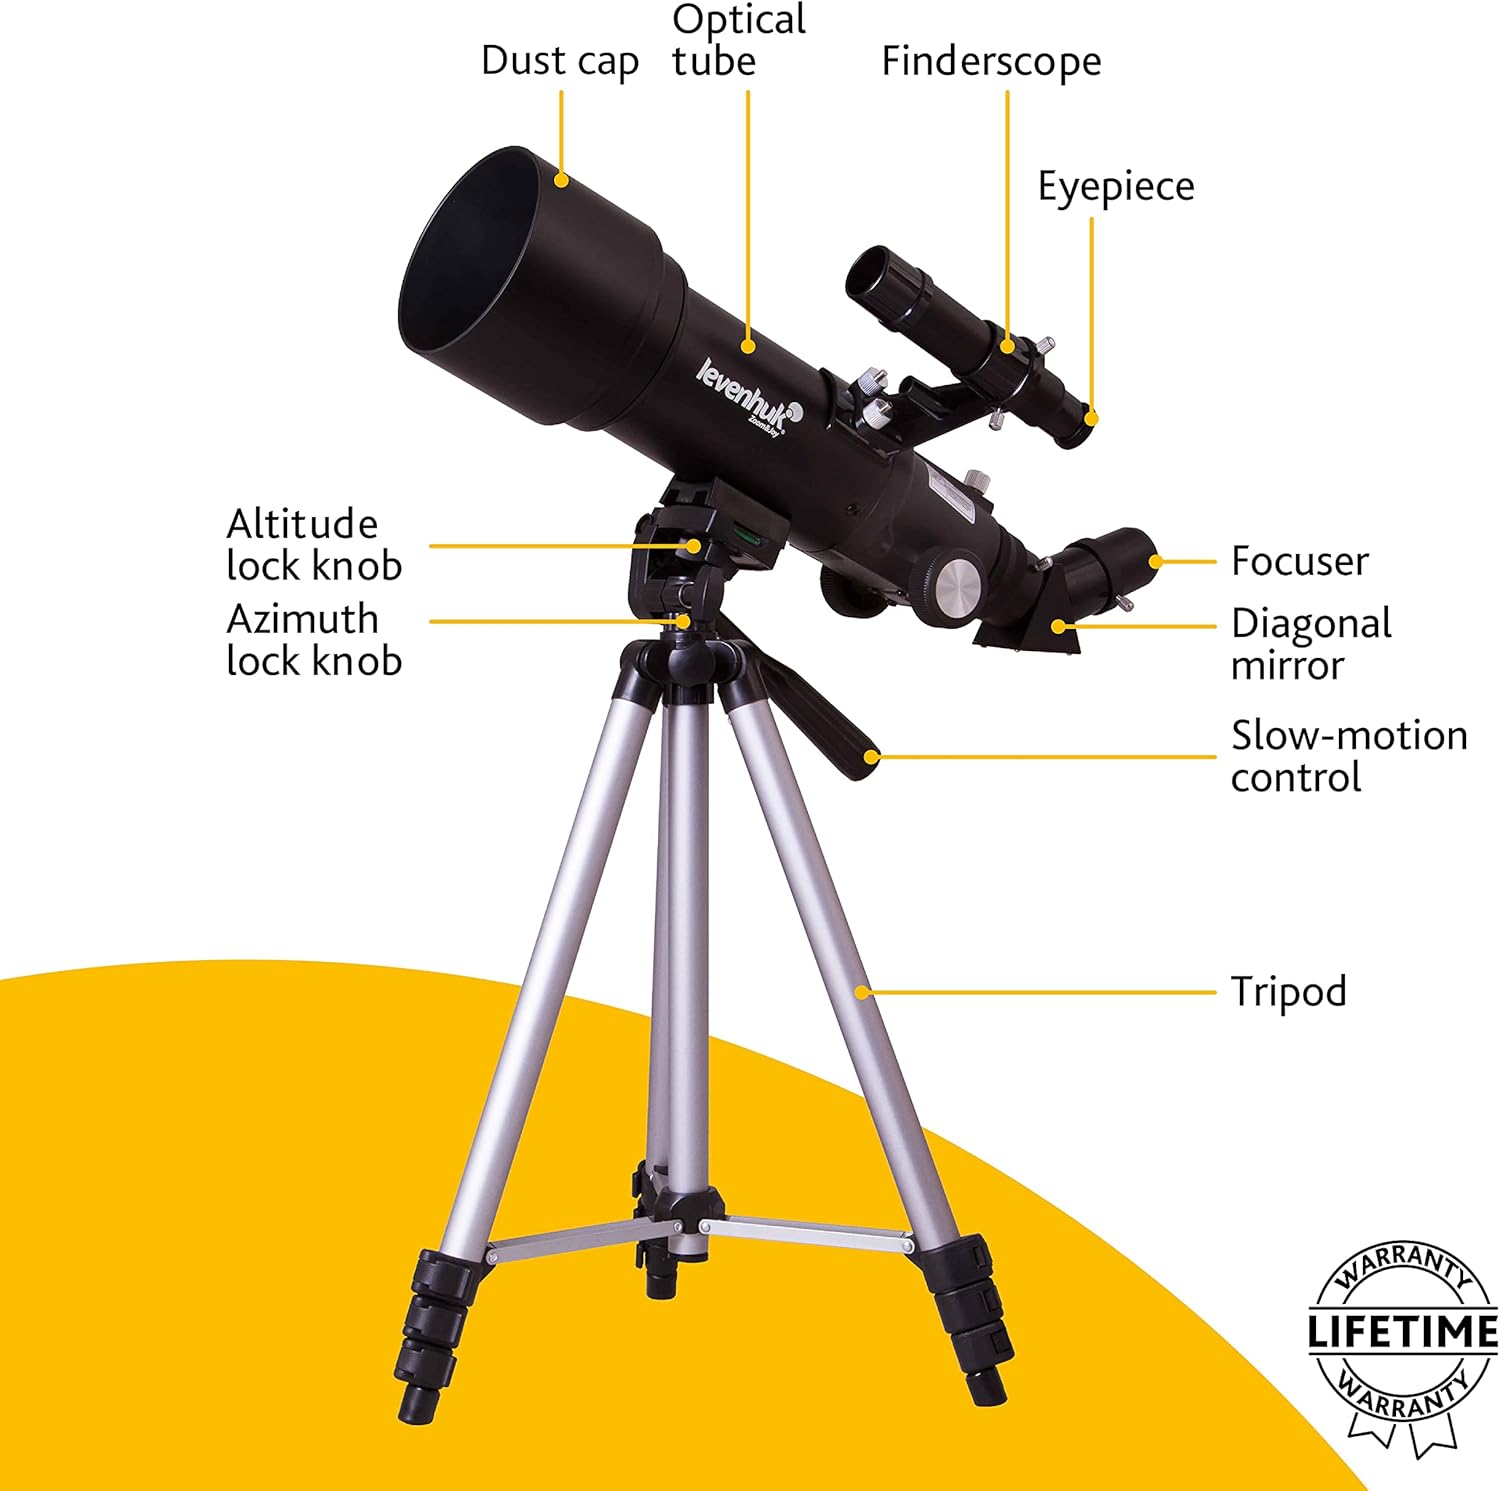
Image 3.1: A detailed diagram illustrating the key components of the Levenhuk Skyline Travel 70 telescope, including the optical tube, dust cap, finderscope, eyepiece, focuser, diagonal mirror, slow-motion control, altitude lock knob, azimuth lock knob, and tripod.
4. Configuración
Sigue estes pasos para montar o teu telescopio:
- Montar o trípode: Extend the tripod legs to a stable height. Ensure the tripod is placed on a level surface.
- Fixar o soporte: The altazimuth mount is pre-attached to the tripod. Ensure all knobs are tightened for stability.
- Conecte o tubo óptico: Secure the telescope optical tube to the mount using the provided screws or clamps. Make sure it is firmly attached.
- Instala o buscador: Slide the finderscope into its bracket on the optical tube and tighten the retaining screws. Remove the dust caps from both ends of the finderscope.
- Inserir o espello diagonal: Afrouxa o parafuso do enfocador e insira o espello diagonal. Aperte o parafuso para fixalo.
- Inserir un ocular: Loosen the thumbscrew on the diagonal mirror and insert either the K10mm or K20mm eyepiece. Tighten the thumbscrew. The K20mm eyepiece provides lower magnification and a wider field of view, useful for locating objects.
- Retirar a tapa antipo: Remove the large dust cap from the front of the telescope's optical tube.
5. Funcionamento do telescopio
Once assembled, you can begin observing.
5.1 Aliñamento do buscador
The finderscope helps you locate objects quickly. It must be aligned with the main telescope tube:
- Apunte o telescopio principal a un obxecto distante e estacionario (por exemplo, unha árbore ou un edificio) durante as horas de luz.
- Centra o obxecto no ocular principal do telescopio.
- Mire a través do buscador e axuste os seus parafusos de aliñamento ata que o mesmo obxecto estea centrado na retícula do buscador.
5.2 Focalización
To achieve a clear image, rotate the focuser knob until the object appears sharp. You may need to make fine adjustments as objects move or as your eyes adjust.
5.3 Observing
Use the altitude and azimuth lock knobs to move the telescope up/down and left/right. For fine adjustments, use the slow-motion control knob.
- Astronomical Observations: Start with the K20mm eyepiece to locate celestial objects. Once centered, you can switch to the K10mm eyepiece for higher magnification.
- Terrestrial Observations: The diagonal mirror provides a corrected image for land viewing.
5.4 Using the Barlow Lens
The 3x Barlow lens increases the magnification of any eyepiece by three times. Insert the Barlow lens into the focuser first, then insert an eyepiece into the Barlow lens. This is useful for observing finer details on planets or the moon.

Image 5.1: A user observing through the Levenhuk Skyline Travel 70 telescope, demonstrating typical usage.
6. Mantemento
Proper care will ensure your telescope provides years of enjoyment.
- Óptica de limpeza: Use a soft, clean brush to remove dust from lenses. For smudges, use a specialized optical cleaning solution and a microfiber cloth. Apply solution to the cloth, not directly to the lens. Avoid touching optical surfaces with your fingers.
- Limpeza xeral: Limpe o tubo e a montura do telescopio cun pano suave eamp pano. Evite produtos de limpeza abrasivos.
- Almacenamento: Always replace dust caps on the objective lens and eyepiece when not in use. Store the telescope in its backpack in a dry, dust-free environment. Avoid extreme temperatures and humidity.
7 Solución de problemas
Aquí tes solucións para problemas comúns cos que podes atoparte:
| Problema | Causa posible | Solución |
|---|---|---|
| A imaxe está borrosa ou desenfocada | Improper focus setting | Axuste o botón do enfocador ata que a imaxe sexa nítida. |
| Cannot find objects easily | Finderscope is not aligned | Align the finderscope with the main telescope (refer to Section 5.1). Use the K20mm eyepiece for wider field of view. |
| A imaxe é tenue ou escura | High magnification eyepiece used in low light; dust cap still on | Use a lower magnification eyepiece (e.g., K20mm). Ensure the objective lens dust cap is removed. |
| Image is upside down or reversed | Normal for astronomical telescopes without an erecting prism; diagonal mirror provides corrected image for terrestrial viewing | Isto é normal para astronómicos viewing. Para terrestre viewing, ensure the diagonal mirror is correctly installed. |
8. Especificacións
| Característica | Especificación |
|---|---|
| Marca | Levenhuk |
| Nome do modelo | Levenhuk Refractor telescope magnification 140x (max) |
| Diámetro da lente obxectivo | 70 milímetros |
| Distancia focal | 400 mm |
| Montaxe de telescopio | Monte Altazimutal |
| Descrición da lente ocular | Barlow (includes 3x Barlow lens) |
| Buscador | Directo |
| Tipo de foco | Enfoque manual |
| Peso do elemento | 2.5 quilogramos |
9. Garantía e soporte
Levenhuk products are designed for durability and performance. This product includes a Garantía de por vida, ensuring coverage against defects in materials and workmanship for the life of the product. For detailed warranty terms, service, or technical support, please refer to the official Levenhuk websitio web ou póñase en contacto directamente co servizo de atención ao cliente.
Para obter máis axuda, visite o Tenda Levenhuk en Amazon.


