Introdución
This manual provides essential information for the safe and efficient operation, installation, and maintenance of your Utilitech 2-Sone 70-CFM White Bathroom Fan. Please read all instructions carefully before installation and use. Keep this manual for future reference.
Información de seguridade
AVISO:
- Desconecte sempre a alimentación no panel de servizo antes de realizar o mantemento ou a limpeza da unidade.
- A instalación debe ser realizada por un electricista cualificado de acordo con todos os códigos eléctricos locais e nacionais.
- Do not use this fan in a kitchen. This fan is designed for bathroom ventilation only.
- Asegúrese de conectar a terra adecuada para reducir o risco de descarga eléctrica.
- Never insert objects into the fan grille while the fan is operating.
- This product is designed for general ventilating use only. Do not use to exhaust hazardous or explosive materials and vapors.
Contido do paquete
Comprobe que todos os compoñentes estean presentes antes de comezar a instalación:
- Utilitech 2-Sone 70-CFM Bathroom Fan Unit
- Cuberta da reixa
- Ferraxes de instalación (parafusos, porcas para cables)
- Manual de usuario (este documento)
Configuración e instalación
Follow these steps for proper installation of your bathroom fan. It is recommended to have a second person assist during installation.
Ferramentas necesarias:
- Desaparafusador (Phillips e Flathead)
- Pelacables
- Drill (if creating new opening)
- Cinta métrica
- Coitelo de utilidade ou serra de drywall
- Luvas e lentes de seguridade
Pasos de instalación:
1. Desconectar a alimentación:
Before starting any work, turn off the power to the circuit at the main service panel. Verify power is off using a voltagprobador.
2. Prepare Opening:
If replacing an existing fan, remove the old unit. If installing in a new location, cut an opening in the ceiling that matches the fan housing dimensions (7.5 x 7.2 inches). Ensure there is sufficient clearance above the ceiling for the fan housing and ductwork.
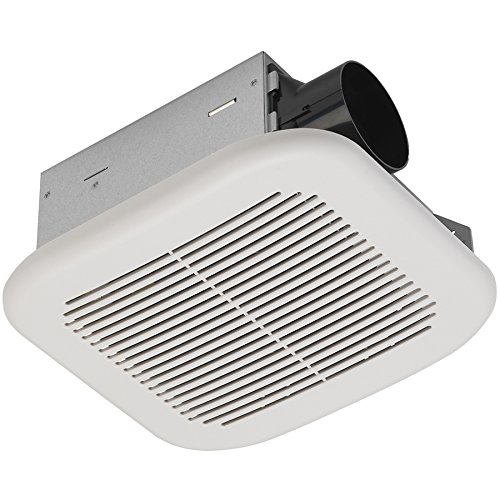
Image: The Utilitech 2-Sone 70-CFM Bathroom Fan unit, showing the white grille cover, the metal housing, and the circular duct connection port on the side.
3. Mount Fan Housing:
Insert the fan housing into the ceiling opening. Secure the housing to the ceiling joists using the provided mounting brackets and screws. Ensure the fan is level and securely fastened.
4. Connect Ductwork:
Connect appropriate ductwork (typically 4-inch round duct) to the fan's exhaust port. Secure the duct with duct tape or clamps to ensure an airtight seal. Route the ductwork to an exterior vent cap.
5. Cableado eléctrico:
Remove the wiring cover plate on the fan housing. Connect the household electrical wires to the fan's wires according to the wiring diagram provided inside the fan's junction box. Typically, this involves connecting black to black (hot), white to white (neutral), and green/bare copper to green (ground). Use wire nuts to secure connections. Replace the wiring cover plate.
6. Install Grille Cover:
Once the fan is wired and secured, attach the grille cover. The grille typically has spring clips that fit into slots on the fan housing. Push the grille firmly until it snaps into place.
7. Restore Power:
Turn the power back on at the main service panel. Test the fan to ensure it operates correctly.
Instrucións de funcionamento
The Utilitech 2-Sone 70-CFM Bathroom Fan is designed for simple operation. Once installed and wired to a wall switch (not included), simply toggle the switch to turn the fan ON or OFF. For optimal performance, operate the fan during and after showering or bathing to effectively remove moisture and odors from the bathroom.
Mantemento
Regular maintenance ensures the longevity and efficiency of your fan.
Cleaning the Grille and Fan Housing:
1. Desconectar a alimentación:
Always turn off power to the fan at the circuit breaker before cleaning.
2. Remove Grille:
Gently pull down the grille cover to disengage the spring clips. Remove the grille from the fan housing.
3. Clean Grille:
Wash the grille cover with mild soap and water. Rinse thoroughly and allow it to dry completely before reattaching.
4. Clean Fan Housing and Blades:
Using a soft cloth or a vacuum cleaner with a brush attachment, carefully remove dust and debris from the fan motor, fan blades, and interior of the housing. Do not use abrasive cleaners or solvents.
5. Reattach Grille:
Once clean and dry, reattach the grille cover by aligning the spring clips with the slots and pushing it firmly into place.
6. Restore Power:
Volve a conectar o interruptor.
No lubrication is required for the fan motor. The motor is permanently lubricated.
Resolución de problemas
If you experience issues with your fan, consult the following table before contacting customer support.
| Problema | Causa posible | Solución |
|---|---|---|
| O ventilador non funciona | Non hai enerxía para o ventilador | Check circuit breaker or fuse. Ensure wall switch is ON. Verify wiring connections. |
| O ventilador é ruidoso | Loose mounting screws or ductwork; debris in fan blades; motor issue | Ensure fan housing is securely mounted. Check ductwork for obstructions or loose connections. Clean fan blades. If noise persists, motor may need replacement. |
| Poor air movement | Blocked ductwork; dirty fan blades/grille; fan too small for room | Check ductwork for obstructions. Clean fan blades and grille. Ensure fan CFM rating is appropriate for bathroom size. |
| O ventilador vibra excesivamente | Improper mounting; unbalanced fan blade | Re-check mounting screws for tightness. Inspect fan blade for damage or debris causing imbalance. |
Especificacións
| Característica | Especificación |
|---|---|
| Marca | Utilitech |
| Número de modelo | 7111-04-L |
| Dimensións do produto | 7.5 x 7.2 x 3.9 polgadas |
| Peso do elemento | 4.7 libras |
| Capacidade de caudal de aire | 70 pés cúbicos por minuto (CFM) |
| Nivel de ruído | 2.0 Sones (equivalent to 70 dB) |
| Voltage | 120 voltios |
| Cor | Branco |
| Tipo de habitación | Baño |
| Uso recomendado | Ventilación |
Garantía e Soporte
Utilitech products are manufactured to high-quality standards. For warranty information or technical support, please refer to the warranty card included with your purchase or contact Utilitech customer service. Keep your proof of purchase for warranty claims.
Para obter máis axuda, visite a páxina oficial de Utilitech websitio web ou póñase en contacto coa súa liña de atención ao cliente. A información de contacto adoita atoparse na embalaxe do produto ou na ficha do fabricante. websitio.


