1. Produto rematadoview
The Anlapus 8-Channel 720P Hybrid Digital Video Recorder (DVR) is designed for comprehensive security surveillance. This 4-in-1 system supports various camera types including 960H Analog, 720P/1080P AHD, 720P/1080P TVI, and CVI cameras across all 8 channels. It features customizable motion detection with instant email alerts and supports remote access via a dedicated mobile application.

Figura 1: Anlapus 8-Channel DVR highlighting key features like 1080N/720P recording, H.264+ compression, 4-in-1 compatibility, HDMI output, PTZ support, motion detection, email alerts, remote access, mouse operation, and USB backup.
Contido do paquete
- 1 x Anlapus 8-Channel DVR
- Adaptador de alimentación
- Rato USB
- Manual de usuario (este documento)
- (Note: Hard drive may be pre-installed or sold separately depending on the specific package.)

Figura 2: The Anlapus 720P 4-in-1 Security Video DVR Recorder, showcasing its compact design and suitability for various security camera setups.
2. Configuración e instalación
Follow these steps to set up your Anlapus DVR system. Ensure all components are present before beginning installation.
2.1 Connecting the DVR
- Conectar cámaras: Attach your security cameras to the "VIDEO IN" BNC ports on the back of the DVR. The DVR supports up to 8 cameras.
- Conectar o monitor: Connect a monitor to the DVR using either the HDMI or VGA port. An HDMI cable (not included) or VGA cable (not included) can be used.
- Conectar o rato: Plug the included USB mouse into one of the USB 2.0 ports on the DVR.
- Conectar á rede (opcional): Para control remoto viewing and email alerts, connect the DVR to your router using an Ethernet cable (not included) via the "NETWORK" port.
- Conectar enerxía: Plug the power adapter into the "DC 12V" power input on the DVR, then connect it to a power outlet. The DVR will power on automatically.

Figura 3: Rear panel of the Anlapus DVR, showing video input (BNC), audio input/output, VGA, HDMI, network (Ethernet), USB, and power ports. Dimensions are also indicated.
2.2 Hard Drive Installation (If Applicable)
This DVR model often comes with a pre-installed 1TB security-grade hard drive. If your unit did not include one or if you need to replace it, follow the manufacturer's instructions for opening the casing and connecting a compatible SATA hard drive. Ensure the DVR is powered off before performing any internal installations.
2.3 Configuración inicial
Upon first power-on, the DVR will guide you through an initial setup wizard. This typically includes setting the date and time, creating a password, and configuring network settings. Follow the on-screen prompts using the connected mouse.

Figura 4: The DVR supports multiple output options, including HDMI and VGA, allowing connection to various display devices like TVs and computer monitors.
3. Funcionamento do sistema DVR
3.1 Modos de gravación
The Anlapus DVR offers flexible recording options:
- Gravación manual: Inicia e detén a gravación manualmente segundo sexa necesario.
- Gravación de detección de movemento: The DVR records only when motion is detected in the camera's field of view, saving storage space.
- Gravación programada: Set specific times and days for continuous recording.
These settings can be configured through the DVR's main menu, typically found under "Record" or "Schedule" options.

Figura 5: Visual representation of different recording modes: Manual Recording, Motion Detection Recording, and Scheduled Recording, with a timeline showing recorded events.
3.2 Detección de movemento e alertas
To configure motion detection:
- Access the DVR's main menu and navigate to "Alarm" or "Motion Detect" settings.
- Select the camera(s) for which you want to enable motion detection.
- Define the detection area by drawing a grid on the screen.
- Configure sensitivity levels.
- Enable "Email Alert" to receive notifications with images when motion is detected. Ensure your network settings and email server details are correctly configured.
- Enable "Mobile Push" for app notifications.
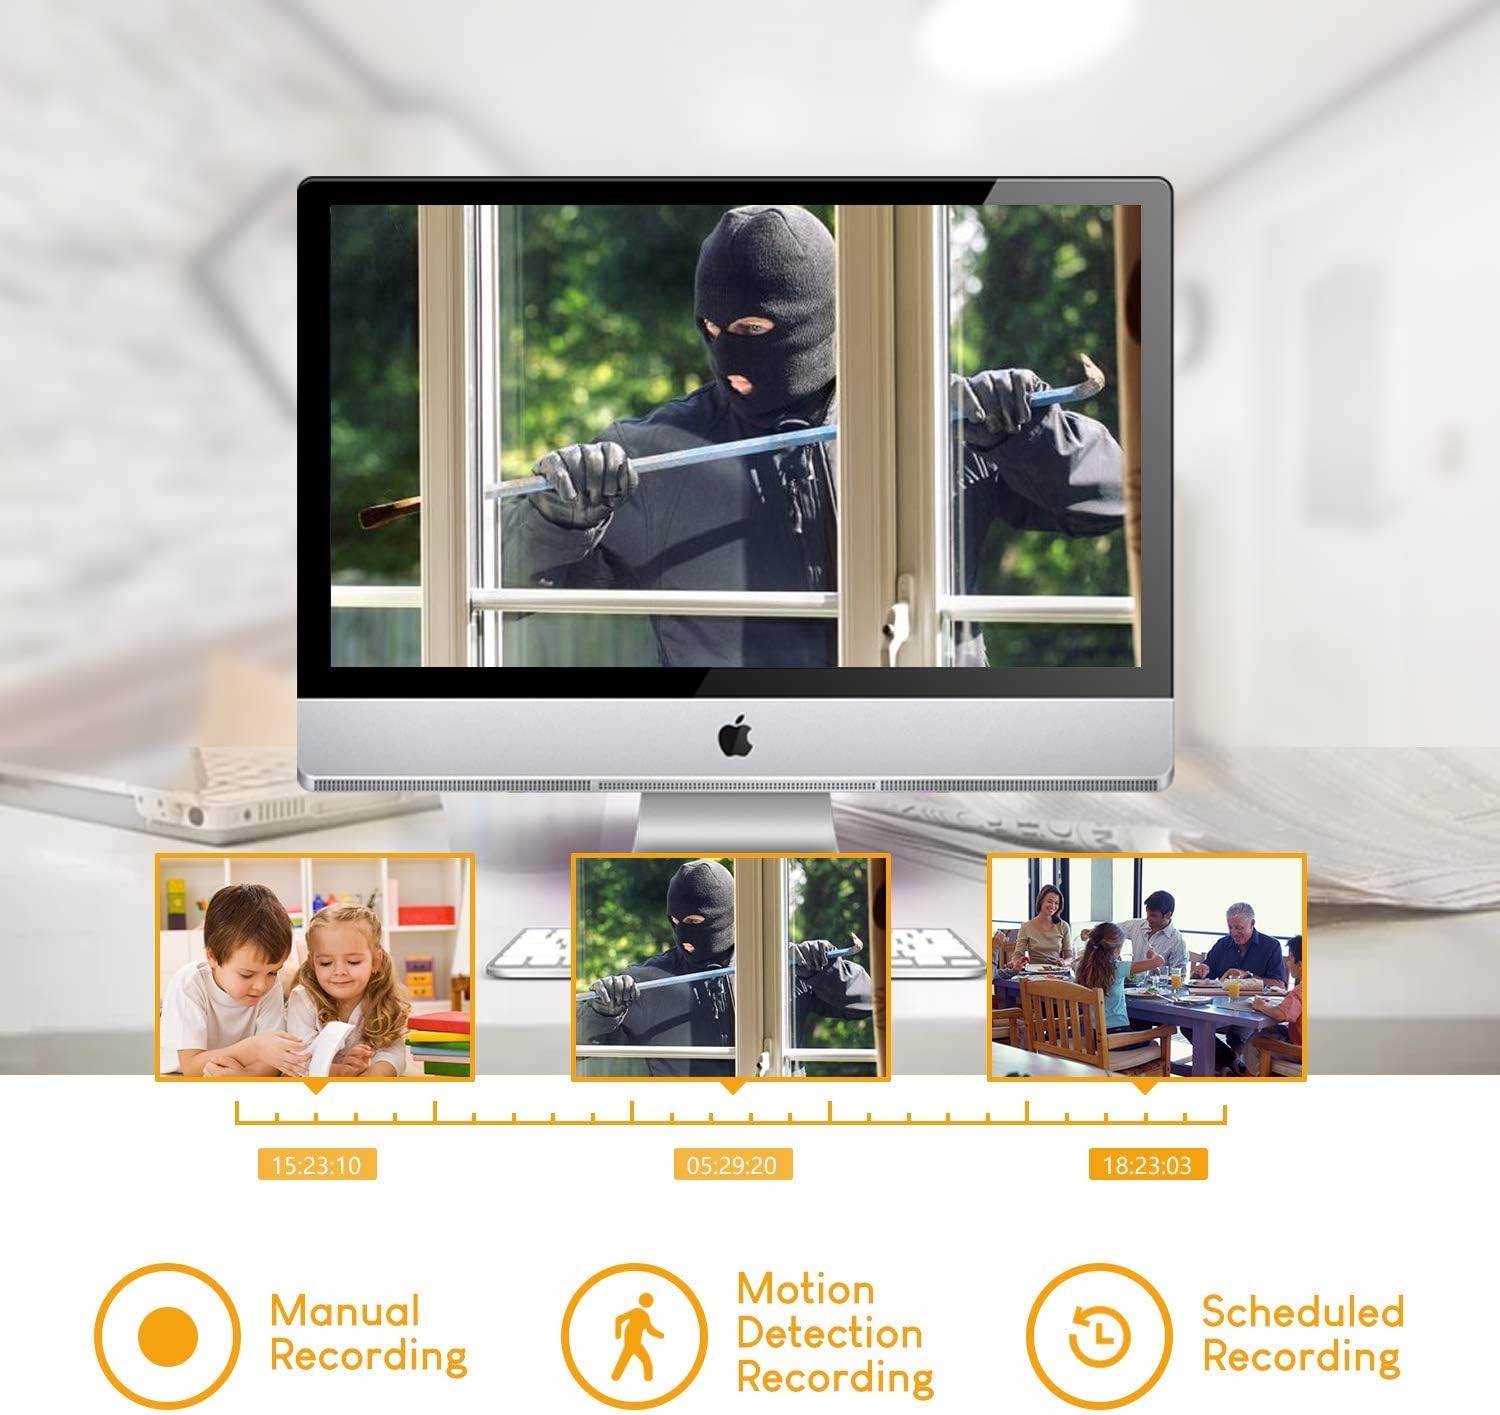
Figura 6: Illustration of the motion detection feature, showing an area being monitored and an instant email alert/app notification being triggered upon detection.
3.3 Acceso remoto a través da aplicación móbil
The Anlapus DVR supports remote viewing on Android and iOS devices. To set up:
- Download the free Anlapus app from your device's app store.
- Open the app and register an account if required.
- Add your DVR by scanning the QR code displayed on the DVR's monitor (usually found in the network settings or P2P menu).
- Unha vez engadido, podes view live feeds, playback recordings, and receive push notifications from anywhere with an internet connection.
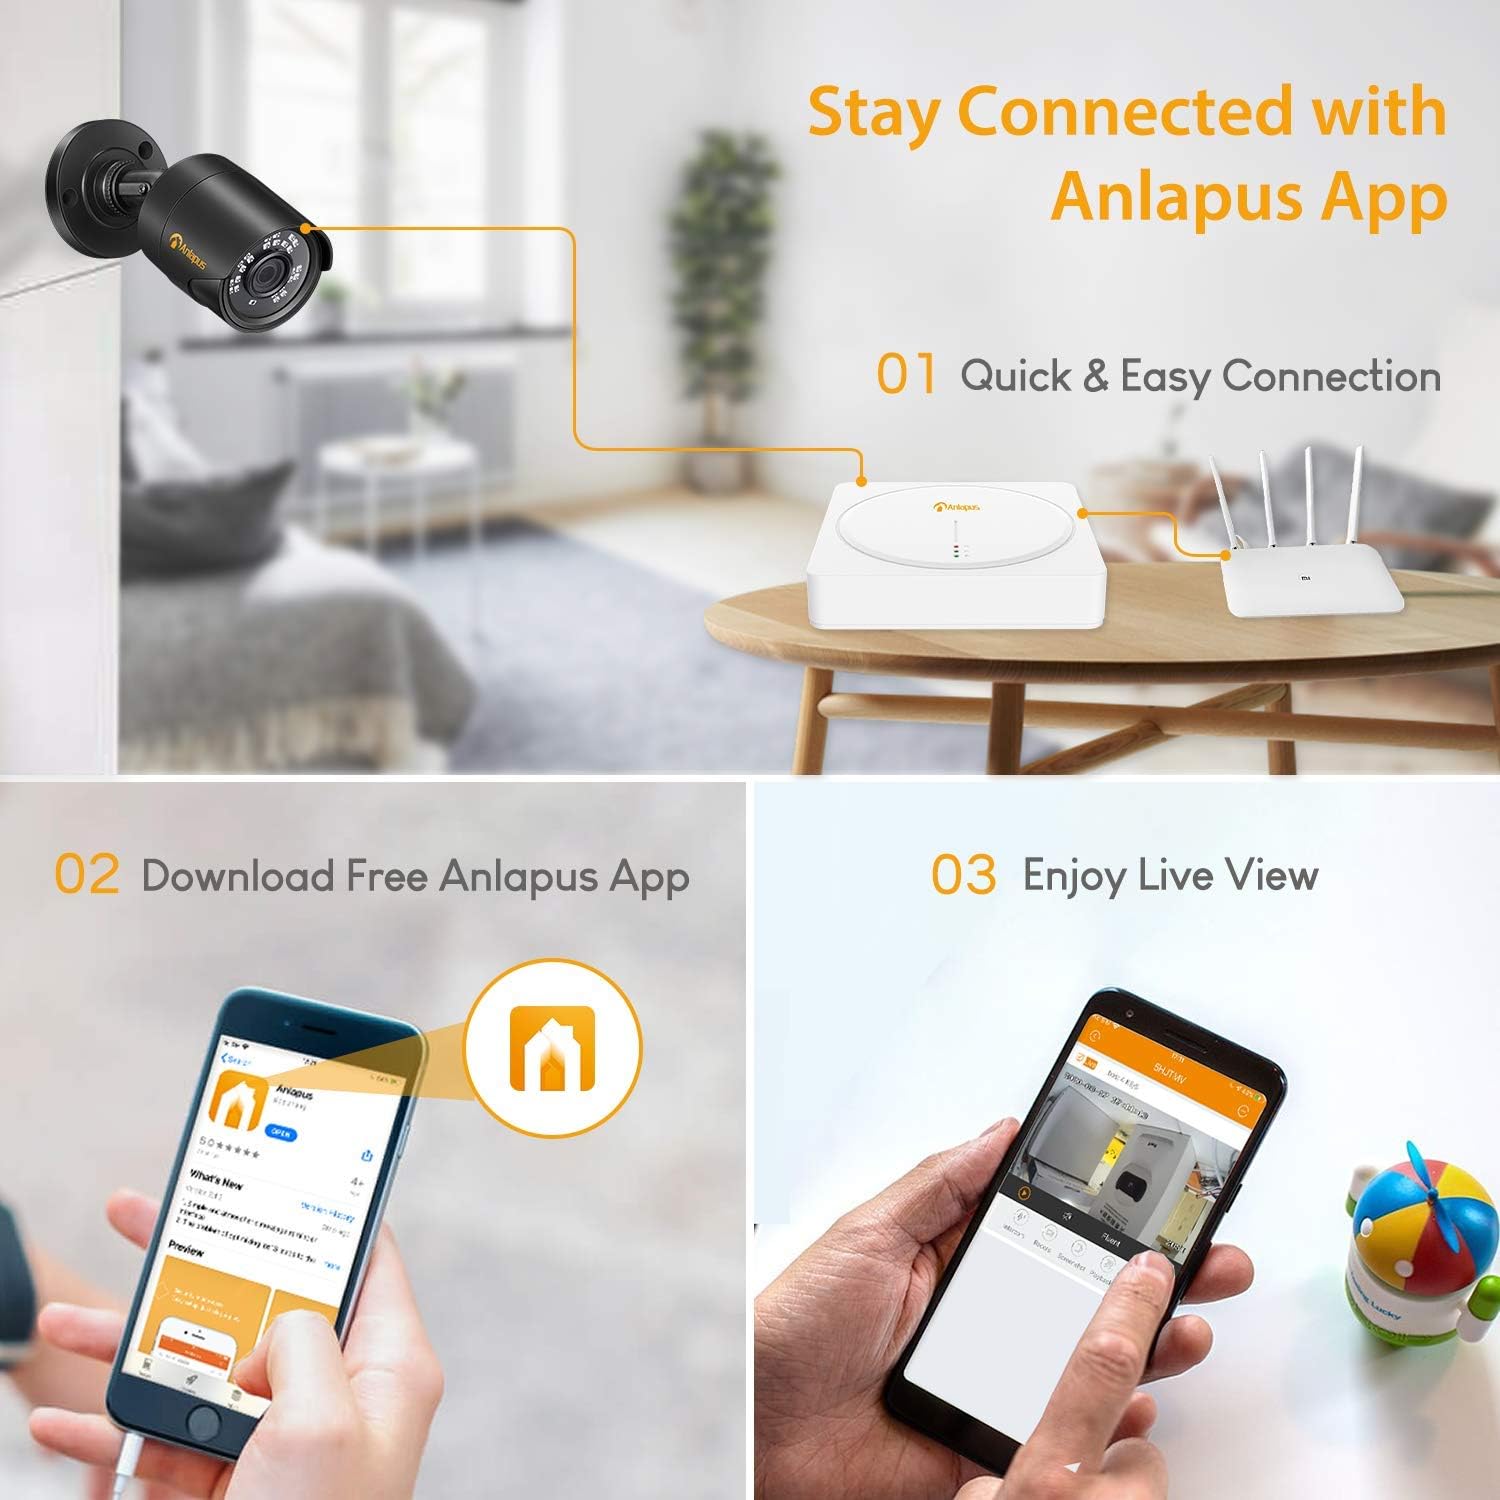
Figura 7: Steps to connect to the Anlapus App: Quick & Easy Connection, Download Free Anlapus App, and Enjoy Live View, demonstrating the mobile interface.
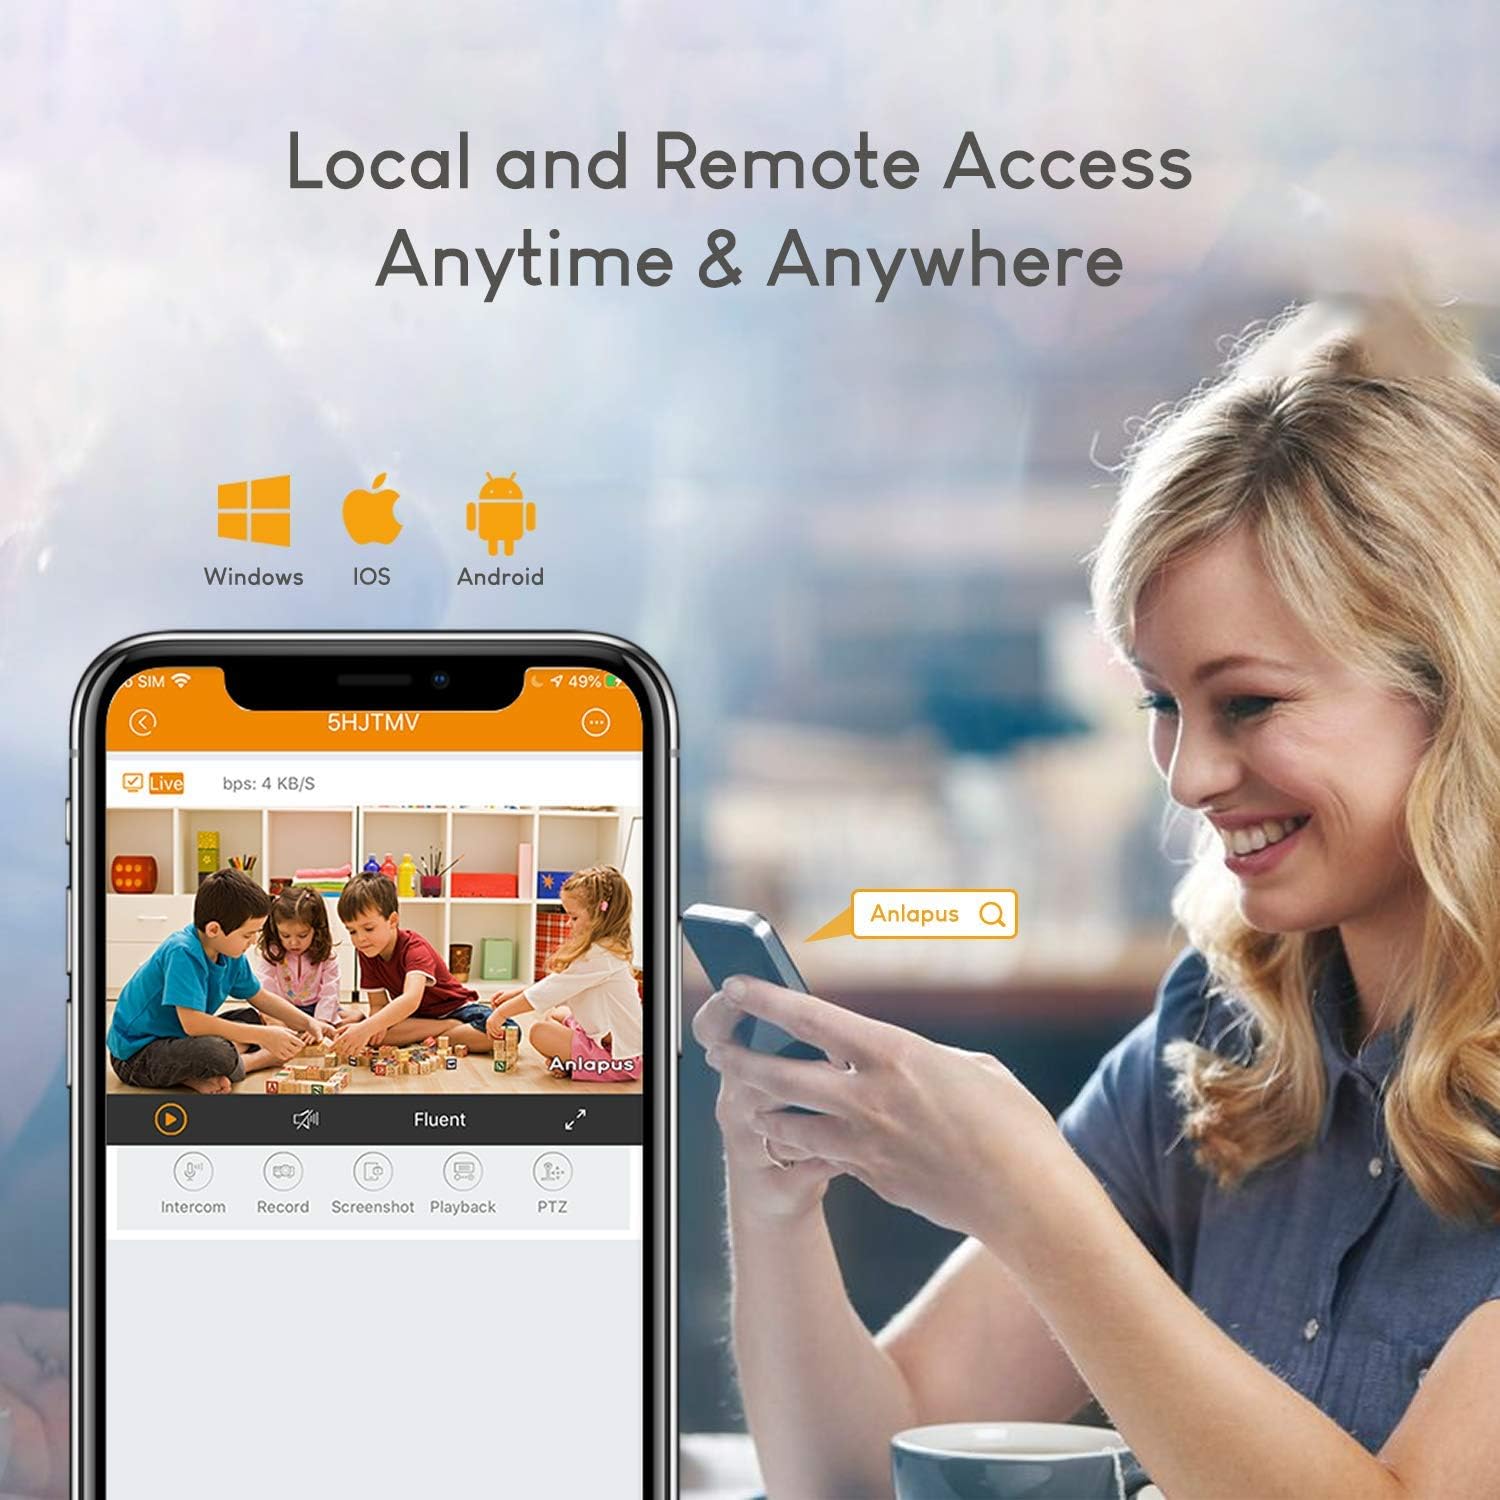
Figura 8: The Anlapus app interface on a smartphone, illustrating local and remote access capabilities for live viewing and playback on Windows, iOS, and Android devices.
3.4 Playback and Backup
Para review gravado footage:
- Access the "Playback" menu on the DVR.
- Select the date, time, and camera channel you wish to review.
- Usa a liña de tempo para navegar polas gravacións.
- To back up footage, insert a USB flash drive into a USB port on the DVR. Select the desired footage and use the backup function in the menu.
4. Mantemento
4.1 Xestión do disco duro
The DVR's 1TB hard drive provides continuous recording. When the hard drive is full, the system is typically configured to overwrite the oldest footage automatically. You can adjust this setting in the DVR's storage or record menu. Regularly back up important footage to an external USB drive.
4.2 Limpeza
Keep the DVR unit clean and free from dust to ensure proper ventilation. Use a soft, dry cloth for cleaning. Do not use liquid cleaners or aerosols directly on the unit.
4.3 Actualizacións de firmware
Periodically check the Anlapus official website for firmware updates. Updating firmware can improve system performance, add new features, or resolve known issues. Follow the provided instructions carefully when performing firmware updates to avoid damaging the device.
5 Solución de problemas
| Problema | Causa posible | Solución |
|---|---|---|
| Sen saída de vídeo no monitor. | Loose cable connection, incorrect input source on monitor, DVR not powered on. | Check HDMI/VGA cable connections. Ensure monitor is set to the correct input. Verify DVR power indicator lights are on. |
| Cameras not displaying video. | Camera power issue, loose BNC connection, incompatible camera type. | Ensure cameras are powered. Check BNC cable connections. Verify camera type (Analog, AHD, TVI, CVI) is supported and configured correctly in DVR settings. |
| Mando a distancia viewnon funciona. | No network connection, incorrect app settings, firewall issues. | Ensure DVR is connected to the internet. Check network settings on DVR and app. Verify QR code was scanned correctly. Consult your router's manual for firewall settings if necessary. |
| DVR not recording. | Hard drive full, recording schedule not set, motion detection not configured. | Check hard drive status and ensure overwrite is enabled. Verify recording schedules are active. Confirm motion detection settings are correct for desired channels. |
If you encounter issues not listed here or require further assistance, please contact Anlapus customer support.
6. Especificacións
| Característica | Detalle |
|---|---|
| Número de modelo | 124-W-08IS |
| Entrada de vídeo | 8 canles (BNC) |
| Resolución de vídeo | 720P (Recording), supports 960H/720P/1080P (Input) |
| Supported Camera Types | 960H Analog, 720P/1080P AHD, 720P/1080P TVI, CVI |
| Saída de vídeo | HDMI, VGA |
| Entrada/Saída de audio | Yes (specific number of channels not detailed in input, assuming standard) |
| Tecnoloxía de conectividade | Ethernet, HDMI, USB, VGA |
| Dispositivos compatibles | Camera, Tablet, Smartphone (via app) |
| Tamaño do disco duro | 1 TB (pre-installed, security grade) |
| Peso do elemento | 2.85 libras |
| Dimensións do paquete | 16.9 x 11.2 x 3.7 polgadas |
| Fabricante | Nine Star Security & Technology Inc. |

Figura 9: The Anlapus HD 4-in-1 Hybrid DVR demonstrating compatibility with various camera technologies: HD-TVI, CVBS, CVI, and AHD.
7. Garantía e soporte
7.1 Garantía do produto
The Anlapus 8-Channel 720P Hybrid DVR comes with a 2 ano de garantía from the date of purchase. This warranty covers manufacturing defects and ensures the product functions as intended under normal use. If the product ceases to function within the first year due to a defect, it will be replaced.
7.2 Soporte técnico
Anlapus provides soporte técnico de por vida for this product. For any technical assistance, troubleshooting, or inquiries regarding your DVR system, please contact Anlapus customer support. Contact information can typically be found on the official Anlapus websitio web ou na embalaxe do produto.