1. Introdución
This manual provides essential information and instructions for the safe and efficient use of your Nokia 8 Sirocco TA-1005 smartphone. Please read this guide thoroughly before operating your device to ensure optimal performance and longevity. This device is designed for use with GSM, 3G, and 4G LTE networks. Compatibility with CDMA networks, including Verizon, Sprint, and US Cellular, is not supported. Verify network compatibility with your service provider prior to use.
2. Que hai na caixa
Upon unboxing your Nokia 8 Sirocco TA-1005, verify that all components are present:
- Nokia 8 Sirocco TA-1005 Device
- Cable USB Tipo-C
- Adaptador de alimentación
- Auriculares
- Ferramenta de expulsión de SIM
- Guía de inicio rápido
- Información de seguridade e garantía
3. Disposición do dispositivo
Familiarize yourself with the physical components of your Nokia 8 Sirocco TA-1005.
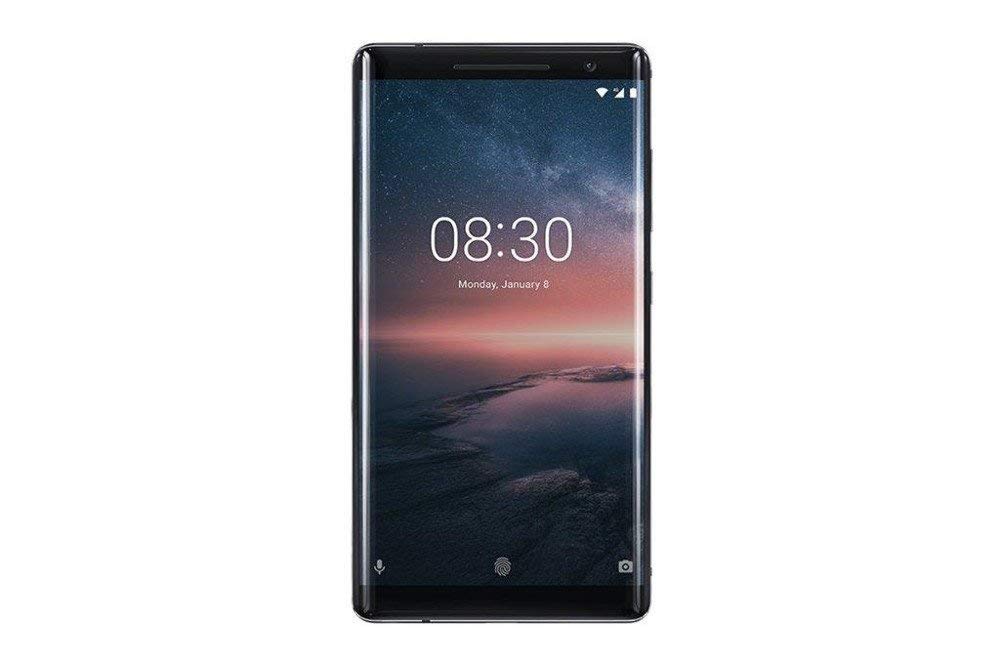
Figura 3.1: Traseira view of the Nokia 8 Sirocco TA-1005. This image displays the dual camera setup with ZEISS optics, the circular fingerprint sensor below the camera, and the Nokia logo centrally placed. The 'androidone' branding is visible towards the bottom.
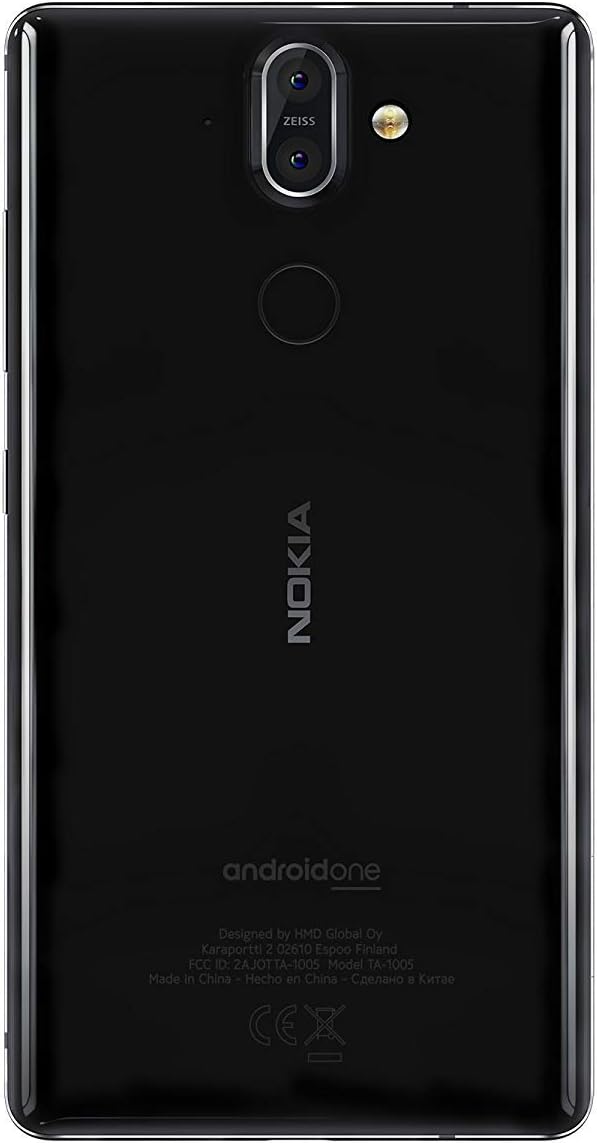
Figura 3.2: Fronte view of the Nokia 8 Sirocco TA-1005. The image highlights the 5.5-inch P-OLED curved display, the front-facing camera at the top, and the on-screen navigation buttons. The device features minimal bezels.

Figura 3.3: Lado view of the Nokia 8 Sirocco TA-1005. This image illustrates the slim profile of the device, with the power button and volume rocker located on the right side for easy access.
Compoñentes clave:
- Cámara frontal: Situado na parte superior da pantalla.
- Auricular: Para chamadas, situado enriba da pantalla.
- Visualización: 5.5-inch P-OLED capacitive touchscreen.
- Botóns de volume: On the right side, to adjust audio levels.
- Botón de acendido/bloqueo: On the right side, to power on/off or lock/unlock the screen.
- Porto USB tipo C: Na parte inferior, para cargar e transferir datos.
- Micrófono: Located at the bottom and top.
- Relator: Situado na parte inferior.
- Bandexa da tarxeta SIM/memoria: On the side, for inserting SIM cards.
- Cámaras traseiras: Dual cameras with ZEISS optics on the back.
- Flash: Dual-tone flash next to the rear cameras.
- Sensor de impresión dixital: On the back, below the rear cameras.
4. Configuración
4.1. Inserir a tarxeta SIM
- Localiza a bandexa da tarxeta SIM no lateral do teu dispositivo.
- Insira a ferramenta de expulsión da tarxeta SIM no pequeno orificio da bandexa para abrila.
- Place your Nano-SIM card(s) into the designated slot(s) on the tray, ensuring the gold contacts face downwards.
- Empuxa coidadosamente a bandexa de novo no dispositivo ata que faga clic.
Nota: This device does not support external memory cards.
4.2. Acendido e apagado
- Para acender: Press and hold the Power/Lock button until the Nokia logo appears.
- Para apagar: Press and hold the Power/Lock button until the power options menu appears, then select "Power off".
4.3. Configuración inicial
Upon first power-on, the device will guide you through the initial setup process. This includes selecting your language, connecting to a Wi-Fi network, setting up your Google account, and configuring security features like fingerprint unlock or a PIN/pattern.
5. Instrucións de funcionamento
5.1. Facer chamadas
- Abre a aplicación "Teléfono".
- Introduza o número de teléfono usando o teclado numérico ou seleccione un contacto da súa axenda de enderezos.
- Toca a icona de chamada para iniciar a chamada.
5.2. Envío de mensaxes
- Open the "Messages" application.
- Toca a icona "Iniciar chat" ou "Nova mensaxe".
- Introduza o número do destinatario ou seleccione un dos contactos.
- Escribe a túa mensaxe no campo de texto.
- Tap the send icon.
5.3. Usando a cámara
- Abre a aplicación "Cámara".
- Enmarca o tema na pantalla.
- Toca o botón do obturador para sacar unha foto.
- Switch between photo and video modes, or access advanced settings like portrait mode or panorama, as desired.
5.4. Conectividade a Internet
- Wi-Fi: Ir a Configuración > Rede e internet > Wi-Fi. Turn Wi-Fi on and select an available network. Enter the password if required.
- Datos móbiles: Ir a Configuración > Rede e Internet > Rede móbil. Ensure "Mobile data" is enabled.
5.5. Características de seguridade
Your Nokia 8 Sirocco TA-1005 offers various security options:
- Desbloqueo de impresión dixital: Register your fingerprints via Settings > Security & Location > Fingerprint.
- Bloqueo de pantalla: Set a PIN, pattern, or password via Settings > Security & Location > Screen lock.
6. Mantemento
6.1. Limpeza do dispositivo
Use a soft, lint-free cloth to clean your device. Avoid using harsh chemicals or abrasive materials, which can damage the screen or finish.
6.2. Coidado da batería
- Charge your device using only Nokia-approved chargers and cables.
- Evite expoñer o dispositivo a temperaturas extremas.
- Non permitas que a batería se descargue completamente con frecuencia.
6.3. Actualizacións de software
Comprobe e instale actualizacións de software regularmente para garantir que o seu dispositivo teña as últimas funcións, parches de seguridade e melloras de rendemento. Vaia a Configuración > Sistema > Actualización do sistema.
7 Solución de problemas
Se tes problemas co teu dispositivo, consulta as seguintes solucións habituais:
| Problema | Solución |
|---|---|
| O dispositivo non se acende | Asegúrate de que a batería estea cargada. Conéctaa a un cargador durante polo menos 30 minutos. Se non responde, realiza un reinicio forzado mantendo premido o botón de acendido durante 10-15 segundos. |
| Sinal de rede deficiente | Check SIM card insertion. Move to an area with better network coverage. Restart the device. Verify network settings in Configuración > Rede e Internet > Rede móbil. |
| Applications are crashing | Limpar a caché da aplicación (Configuración > Aplicacións e notificacións > [Nome da aplicación] > Almacenamento e caché > Borrar cachéActualiza a aplicación desde Google Play Store. Se o problema persiste, desinstálaa e volve instalala. |
| A batería esgotarase rapidamente | Reduce screen brightness. Close unused background apps. Disable Wi-Fi, Bluetooth, and GPS when not in use. Check battery usage in Axustes> Batería para identificar aplicacións que consumen enerxía. |
| O dispositivo non responde | Perform a force restart by holding the Power button for 10-15 seconds. If the issue continues, consider a factory reset (Configuración > Sistema > Opcións de restablecemento > Borrar todos os datos (restablecemento de fábrica)). Aviso: A factory reset will erase all data on your device. Back up important data before proceeding. |
8. Especificacións
Detailed technical specifications for the Nokia 8 Sirocco TA-1005:
| Característica | Detalle |
|---|---|
| Nome do modelo | 8 Sirocco |
| Número de modelo | TA-1005 |
| Sistema Operativo | Android 8.0 (Oreo) |
| Procesador | Qualcomm MSM8998 Snapdragon 835, Octa-core (4x2.5 GHz Kryo & 4x1.8 GHz Kryo) |
| GPU | Adreno 540 |
| RAM | 6 GB |
| Almacenamento interno | 128 GB |
| Mostrar | 5.5 inches, P-OLED capacitive touchscreen, 1440 x 2560 pixels, Corning Gorilla Glass 5 |
| Cámara traseira | 12MP Wide (f/1.7) + 13 MP Tele (f/2.6), dual-tone flash |
| Cámara frontal | 5 MP |
| Capacidade da batería | 3250 mAh |
| Cargando | Soporte de carga rápida |
| Conectividade | Wi-Fi 802.11a/b/g/n, Bluetooth, USB Type-C |
| Dimensións | 43.36 x 43.17 x 0.75 cm |
| Peso | 181 g |
| Tipo de SIM | Nano-SIM |
| Soporte de rede | 2G GSM, 3G, 4G LTE (Note: Not compatible with CDMA networks) |
9. Safety and Warranty Information
9.1. Pautas de seguridade
- Do not use the device in prohibited areas, such as aircraft or hospitals.
- Evite expoñer o dispositivo á auga ou a unha humidade excesiva.
- Use só accesorios orixinais ou homologados.
- Non intente desmontar ou reparar o dispositivo vostede mesmo.
- Desfágase do dispositivo e da súa batería de forma responsable segundo a normativa local.
9.2. Información da garantía
Your Nokia 8 Sirocco TA-1005 is covered by a limited manufacturer's warranty. Please refer to the separate warranty document included in your product packaging or visit the official Nokia support websitio web para obter termos e condicións detallados. Garda o comprobante de compra para reclamacións de garantía.