Produto rematadoview
The Lux Pro Model P111 is a non-programmable thermostat designed for straightforward and reliable temperature control in your home. It offers essential features for managing your heating and cooling systems with ease.

Figure 1: Lux Pro P111 Non-Programmable Thermostat. This image displays the front view of the thermostat, showing its LCD screen, fan and system mode switches, and temperature adjustment buttons.
- Fácil instalación: Designed for simple setup with clear instructions.
- Operación non programable: Provides direct temperature control without complex scheduling.
- Potencia dual: Operates on 2 AA alkaline batteries (included) or 24-volt system power.
- Pantalla retroiluminada: Features an easy-view backlight for clear temperature readings.
- Protección de equipos: Includes a selectable 5- or 2-minute time delay to safeguard your HVAC equipment.
- Adjustable Limits: Allows setting of heating and cooling temperature limits.
- Opcións de visualización da temperatura: Switch between Fahrenheit (℉) or Celsius (℃) display.

Figure 2: Key Features of Lux Pro P111 Thermostat. This graphic highlights features such as Keyboard Lockout, Adjustable Heating and Cooling Limits, Back-Lit Display, Dual Power, and a 5-Year Limited Warranty.
Compatibilidade do sistema
The Lux Pro P111 thermostat is designed for compatibility with various HVAC systems. Please review the following compatibility chart to ensure it meets your system requirements.

Figure 3: System Compatibility Chart. This chart details which heating and cooling systems are compatible (e.g., Gas/Oil/Electric Furnace, Heat Pump without Auxiliary Heat, 2-wire Hydronic, 750 Millivolt, Gas Fireplaces, Single Stage Cooling) and which are not (e.g., Heat Pump Multistage, Radiant Ceiling Heat, Electric Baseboards, 3-wire Hydronic, Multistage systems, Portable space heaters, Plug-in air conditioners).
Configuración e instalación
Unha instalación axeitada é fundamental para o rendemento óptimo do termostato. Se tes dúbidas sobre algún paso, recoméndase consultar cun técnico cualificado de climatización.
1. Requisitos de enerxía
The P111 thermostat can be powered by two (2) AA alkaline batteries or by a 24-volt system. Batteries are included for convenience and reliable operation.
2. Diagramas de cableado
Refer to the following diagrams for common wiring configurations. Ensure power to your HVAC system is turned off at the circuit breaker before beginning any wiring.
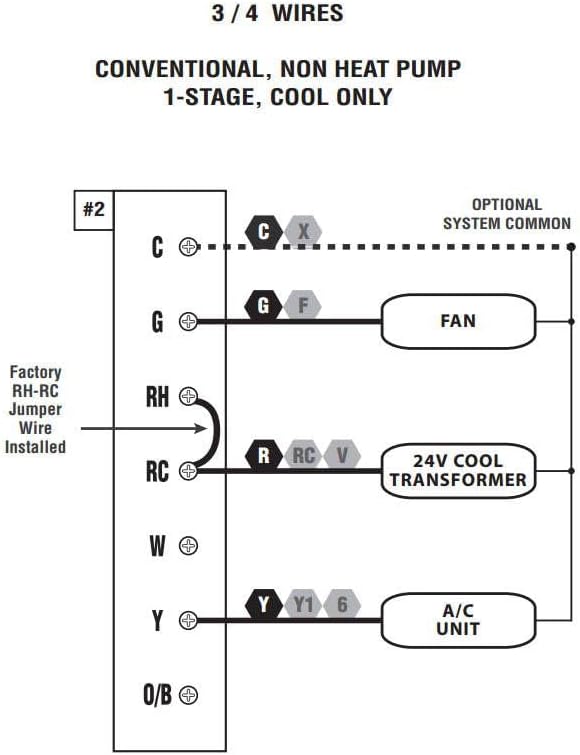
Figure 4: Wiring Diagram for 3/4 Wires. This diagram illustrates the wiring for a conventional, non-heat pump, 1-stage, cool-only system, showing connections for C (optional system common), G (FAN), RH (24V COOL TRANSFORMER), RC (24V COOL TRANSFORMER), and Y (A/C UNIT). A factory RH-RC jumper wire is installed.

Figure 5: Wiring Diagram for 4/5 Wires. This diagram shows the wiring for a conventional, non-heat pump, 1-stage calor e 1-stage cool system, with connections for C (optional system common), G (FAN), RH (24V TRANSFORMER), RC (24V TRANSFORMER), W (HEATER), and Y (A/C UNIT). A factory RH-RC jumper wire is installed.

Figure 6: Wiring Diagram for 5/6 Wires. This diagram illustrates the wiring for a conventional, non-heat pump, 1-heat / 1-cool system with two transformers, showing connections for C (optional system common), G (FAN), RH (24V HEAT TRANSFORMER), RC (24V COOL TRANSFORMER), W (HEATER), and Y (A/C UNIT). The factory RH-RC jumper wire must be removed for this configuration.
3. Montaxe
The thermostat is designed for wall mounting. Use the provided screws and wall anchors for secure installation. Ensure the thermostat is level for accurate temperature readings.
Instrucións de funcionamento
The Lux Pro P111 thermostat features an intuitive control panel for easy operation.

Figure 7: Control Panel Diagram. This diagram labels the key components of the thermostat's front panel: Fan Mode Switch (Fan Auto/On), System Mode Switch (Heat/Off/Cool), LCD Display Screen, SET Button, and UP and DOWN Buttons.
1. System Mode Switch
- CALENTACIÓN: Activa o sistema de calefacción.
- OFF: Apaga tanto os sistemas de calefacción como os de refrixeración.
- FRÍO: Activa o sistema de refrixeración.
2. Fan Mode Switch
- AUTOMÁTICO: O ventilador só funciona cando o sistema de calefacción ou refrixeración está en funcionamento.
- ACTIVADO: O ventilador funciona continuamente, independentemente de se o sistema de calefacción ou de refrixeración está activo.
3. Axuste da temperatura
Usa o UP (▲) e ABAIXO (▼) buttons to set your desired temperature. The current temperature will be displayed prominently on the LCD screen.
4. Activación da retroiluminación
Press any button to activate the backlight for improved visibility in low-light conditions. The backlight will automatically turn off after a short period of inactivity.
5. Visualización da temperatura (Fahrenheit/Celsius)
The thermostat allows you to switch between Fahrenheit (℉) and Celsius (℃) temperature displays. Refer to the full instruction manual for specific steps on how to change this setting, typically found in the advanced settings menu.
6. Equipment Protection Time Delay
The thermostat features a selectable 5- or 2-minute time delay for equipment protection. This delay prevents short cycling of your heating and cooling system, which can extend the lifespan of your equipment. This setting is usually configured during initial setup or in advanced settings.
7. Bloqueo do teclado
To prevent unauthorized adjustments, the thermostat includes a keypad lockout feature. Consult the detailed manual for instructions on how to activate and deactivate this function.
Mantemento
1. Substitución da batería
When the battery indicator appears on the display, replace the two (2) AA alkaline batteries. Ensure proper polarity when inserting new batteries. The thermostat retains settings during battery replacement.
2. Limpeza
Limpar o exterior do termostato cun pano suave eamp pano. Non empregue produtos de limpeza abrasivos nin disolventes, xa que poden danar o acabado ou os compoñentes internos.
Resolución de problemas
If you encounter issues with your Lux Pro P111 thermostat, consider the following common solutions:
- Sen pantalla ou indicador de batería baixa: Replace the batteries with fresh AA alkaline batteries.
- O sistema non responde (calefacción/refrixeración):
- Check that the system mode switch is set to HEAT or COOL.
- Ensure the fan mode switch is set to AUTO or ON.
- Verify that the circuit breaker for your HVAC system is not tripped.
- Confirm that the wiring connections are secure and correct according to the installation diagrams.
- Allow for the equipment protection time delay (5 or 2 minutes) to elapse before the system activates.
- Lectura de temperatura incorrecta: Asegúrate de que o termostato non estea exposto á luz solar directa, a correntes de aire ou a fontes de calor que poidan afectar o seu sensor.
- O teclado non responde: Check if the keypad lockout feature is active. Refer to the manual for deactivation steps.
Para problemas persistentes, consulte o manual de usuario completo ou póñase en contacto co servizo de atención ao cliente.
Especificacións
| Característica | Detalle |
|---|---|
| Marca | LUX |
| Nome do modelo | P111 |
| Dimensións do produto | 4" D x 7" W x 7" H |
| Tipo de controlador | Pulsador |
| Características especiais | Lighted Display, Temperature Display |
| Cor | P111-white |
| Usos específicos | Aire acondicionado, bomba de calor |
| Tipo de control de temperatura | Manual |
| Compoñentes incluídos | Pro P111 Non-Programmable Thermostat; 1 Heat, 1 Cool |
| Fonte de enerxía | Battery Powered (2 AA batteries required), 24V System Powered |
| Peso do elemento | 1.6 onzas |
| Voltage | 24 voltios |
| Material | Plástico |
| Tipo de montaxe | Soporte de parede |
| Estilo | Non programable |
| Retroiluminación | Si |
| UPC | 021079141111 |
Garantía e Soporte
Información da garantía
The Lux Pro P111 thermostat comes with a 5 ano de garantía limitadaEsta garantía cobre defectos de materiais e fabricación en condicións normais de uso. Conserve o comprobante de compra para reclamacións de garantía.
Atención ao cliente
For technical assistance, troubleshooting not covered in this manual, or warranty inquiries, please contact Lux customer support. Refer to the product packaging or the official Lux websitio para obter a información de contacto máis actualizada.
You can visit the official LUX Store for more information: Tenda LUX en Amazon