1. Introdución
This manual provides essential information for the proper setup, operation, and maintenance of your RCA RT2781HB 1000-Watt Audio Receiver Home Theater System. Please read this manual thoroughly before using the product to ensure optimal performance and safety. This system delivers Dolby Digital 5.1 surround sound, an AM/FM tuner, Bluetooth connectivity, and USB playback capabilities.
2. Información de seguridade
- Fonte de enerxía: Connect the unit only to the specified power supply as indicated on the product label.
- Ventilación: Asegúrese de que haxa unha ventilación axeitada. Non bloquee as aberturas de ventilación.
- Auga e humidade: Non expoña a unidade á choiva, á humidade nin a goteos/salpicaduras de líquidos.
- Calor: Manteña a unidade lonxe de fontes de calor como radiadores, reixas de calor, estufas ou outros aparellos que produzan calor.
- Servizo: Non intente atender este produto vostede mesmo. Remita todo o servizo a persoal de servizo cualificado.
- Limpeza: Desconecte a unidade da toma de corrente antes de limpala. Use un pano seco para limpar.
3. Contido do paquete
Verifique que todos os elementos que se indican a continuación estean incluídos no seu paquete:
- 1 x RCA RT2781HB Audio Receiver
- 5 x Satellite Surround Sound Speakers
- 1 x Subwoofer
- 1 x mando a distancia (pilas incluídas)
- 1 x Antena FM
4. Produto rematadoview
The RCA RT2781HB system is designed to provide an immersive audio experience. It includes a central receiver unit, five satellite speakers, and a subwoofer.

Figure 4.1: Complete RCA RT2781HB Home Theater System
4.1 Compoñentes
- Receptor: The central unit for audio processing, amplification, and input management.
- Satellite Speakers (5): Four compact speakers for front left/right and rear left/right channels, and one center channel speaker for dialogue clarity.
- Subwoofer (1): Provides deep bass frequencies for a rich audio experience.
- Control remoto: Para un funcionamento cómodo de todas as funcións do sistema.
4.2. Panel frontal rematadoview
The front panel of the receiver features controls for power, volume, input selection, and sound adjustments, along with a display and front-facing input ports.
4.3. Panel traseiroview
The rear panel provides various connection ports for speakers, audio/video sources, and the power supply.

Figure 4.2: Rear Panel Digital and Analog Audio Inputs
This image illustrates the digital audio inputs (Coaxial, Optical 1, Optical 2) and analog audio inputs (AUX 1 R/L) on the rear panel of the receiver. These ports are used to connect external audio sources such as Blu-ray/DVD players, game systems, and cable boxes.

Figure 4.3: Rear Panel HDMI Inputs and Output
This image shows the HDMI IN ports (HDMI IN 1, HDMI IN 2, HDMI IN 3) and the HDMI OUT (to TV) port on the rear panel. These are used for connecting HDMI-enabled devices and outputting video to your television.
5. Configuración
5.1. Conexión de altofalantes
Connect the included speakers to the corresponding terminals on the rear of the receiver. Ensure correct polarity (+ to + and - to -) for each speaker.
- Dianteira esquerda/dereita: Connect the two satellite speakers to the FRONT L/R terminals.
- Centro: Connect the center speaker to the CENTER terminal.
- Rear Left/Right: Connect the remaining two satellite speakers to the SURROUND L/R terminals.
- Subwoofers: Connect the subwoofer to the SUBWOOFER output.
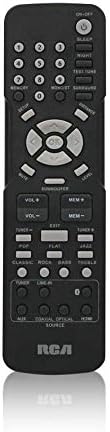
Figure 5.1: Subwoofer Unit
This image displays the subwoofer unit, which connects to the receiver to provide low-frequency audio.
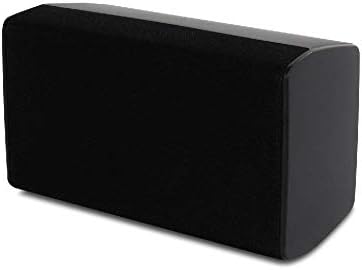
Figure 5.2: Center Speaker Unit
This image shows the center channel speaker, crucial for clear dialogue in your home theater setup.

Figure 5.3: Satellite Speaker Unit
This image illustrates one of the satellite speakers, used for front and surround sound channels.
5.2. Audio/Video Connections
Connect your audio and video sources to the receiver using the appropriate cables.
- Conexións HDMI: Use HDMI cables to connect devices like Blu-ray players, game consoles, or cable boxes to the HDMI IN ports. Connect your TV to the HDMI OUT (to TV) port.
- Conexións de audio dixital: For devices with optical or coaxial digital audio outputs, use the OPTICAL or COAXIAL inputs on the receiver.
- Conexións de audio analóxico: Use RCA stereo cables for devices with analog audio outputs (e.g., CD players, VCRs) to the AUX IN ports.
5.3. Conexión de alimentación
Once all speakers and audio/video sources are connected, plug the receiver's power cord into a standard AC outlet.
6. Instrucións de funcionamento
6.1. Funcionamento básico
- Encendido/apagado: Preme o POTENCIA botón do panel frontal ou do control remoto para activar ou desactivar o sistema.
- Axuste de volume: Usa o VOLUME +/- buttons on the remote or the main volume knob on the receiver to adjust the master volume.
6.2. Selección de entrada
Preme o FONTE button on the front panel or the corresponding input buttons (e.g., HDMI 1, OPTICAL, AUX, BT) on the remote control to select your desired audio/video source.
6.3. Emparellamento Bluetooth
- Seleccione o BT input source on the receiver. The display will show "BT PAIRING".
- No teu dispositivo con Bluetooth (teléfono intelixente, tableta, etc.), activa Bluetooth e busca os dispositivos dispoñibles.
- Select "RCA RT2781HB" from the list of devices.
- Once paired, the receiver will indicate a successful connection, and you can stream audio wirelessly.
6.4. Reprodución USB
Insira unha unidade flash USB que conteña audio files into the USB port on the front panel. The system will automatically switch to USB mode and begin playback. Use the remote control to navigate tracks and control playback.
6.5. Sintonizador AM/FM
Seleccione o Tuner input source. Use the TUNE +/- buttons on the remote to scan for radio stations. Use the MEMORIA buttons to save and recall your favorite stations.
6.6. Axustes de son
Use the dedicated controls on the front panel or remote for fine-tuning your audio:
- Graves/Agudos: Adjust these to enhance low or high frequencies.
- Saldo: Adjust the left/right speaker output balance.
- Volume do subwoofer: Control the output level of the subwoofer independently.
6.7. Control remoto
The included remote control provides full functionality for your home theater system.

Figura 6.1: Deseño do control remoto
This image displays the remote control for the RCA RT2781HB system, featuring buttons for power, volume, input selection, tuner controls, and sound adjustments.
7. Mantemento
- Limpeza: Wipe the unit with a soft, dry cloth. Do not use liquid or aerosol cleaners.
- Ventilación: Periodically check that the ventilation openings on the receiver are clear of dust and debris.
- Almacenamento: Se garda a unidade durante un período prolongado, desconéctea da toma de corrente e gárdea nun lugar fresco e seco.
8 Solución de problemas
| Problema | Causa posible | Solución |
|---|---|---|
| Sen poder | Cable de alimentación non conectado; Toma de corrente non activa. | Asegúrate de que o cable de alimentación estea ben conectado; proba a toma de corrente con outro dispositivo. |
| Sen son | Incorrect input selected; Speaker wires loose; Volume too low. | Select correct input source; Check all speaker connections; Increase volume. |
| Bluetooth non se sincroniza | O receptor non está en modo de emparellamento; o dispositivo está demasiado lonxe; a interferencia. | Ensure receiver is in BT mode; Move device closer; Restart both devices. |
| Mala recepción de radio | FM antenna not connected or positioned incorrectly. | Connect FM antenna securely; Adjust antenna position for better reception. |
9. Especificacións
| Característica | Especificación |
|---|---|
| Dimensións do produto | 16.93 x 12.68 x 5.47 polgadas |
| Peso do elemento | 20.9 libras |
| Número de modelo do artigo | RT2781HB U |
| Baterías | 2 pilas AAA necesarias (incluídas) |
| Tecnoloxía de conectividade | Auxiliary, Bluetooth, Coaxial, HDMI, Optical, RCA, USB |
| Tipo de controlador | Eléctrico con cable |
| Dispositivos compatibles | Televisión, locutor |
| Total de portos HDMI | 4 (3 entradas, 1 saída) |
| Modo de saída de audio | Envolvente |
| Configuración da canle de son envolvente | 5.1 |
10. Garantía e soporte
For warranty information and customer support, please refer to the documentation included with your purchase or visit the official RCA websitio. Garda o comprobante de compra para calquera reclamación de garantía.


