1. Introdución
This manual provides detailed instructions for the installation, operation, and maintenance of your Dynavin N7-VT7 PRO Radio Navigation System. This system is designed as a direct replacement for the factory radio in VW Touareg models from 2003 to 2009, integrating seamlessly with your vehicle's existing systems.
As características principais inclúen:
- 7-inch capacitive LCD touch screen display (1024 x 600 resolution)
- Integrated GPS navigation with maps for North America, Europe, or Australia
- Bluetooth para chamadas mans libres e transmisión de audio
- Apple CarPlay and Android Auto compatibility via USB
- USB and Micro SD card media playback
- Sintonizador de radio AM/FM
- Backup camera readiness
- Integration with vehicle's DSP processor (if equipped)
2. Información de seguridade
Aviso legal importante:
- Installation must be performed by a trained specialist.
- Ensure the vehicle is de-energized before beginning installation.
- In some cases, the vehicle battery may need to be disconnected. Consult your vehicle manufacturer's guidelines.
- Modifying vehicle electronics may affect manufacturer warranty.
Always prioritize safety during installation and operation. Avoid operating the system's complex functions while driving to prevent distractions.
3. Configuración e instalación
The Dynavin N7-VT7 PRO is designed for plug-and-play installation, integrating with your vehicle's factory wiring and controls. Professional installation is highly recommended to ensure proper functionality and to avoid damage to the unit or vehicle.
3.1 Contido do paquete
Verifica que todos os compoñentes estean presentes no paquete:
- Dynavin N7-VT7 PRO Head Unit
- Antena GPS
- Cable USB
- Wiring Harnesses (vehicle-specific)
- Manual de usuario (este documento)
- External Microphone (if included)
3.2 Instalación rematadaview
The unit replaces the existing factory radio. Specific steps for removal of the old unit and installation of the new Dynavin system will vary slightly depending on your vehicle's trim. Refer to a qualified installer or vehicle-specific guides for detailed instructions.

Figura 3.1: The Dynavin N7-VT7 PRO unit seamlessly integrated into a Volkswagen Touareg dashboard, demonstrating its OEM-look design.
After physical installation, connect all wiring harnesses, the GPS antenna, and any external accessories like a backup camera or SiriusXM tuner (sold separately).
4. Instrucións de funcionamento
The Dynavin N7-VT7 PRO features an intuitive touchscreen interface. Most functions are accessible via the main menu or dedicated physical buttons.
4.1 Main Interface Overview
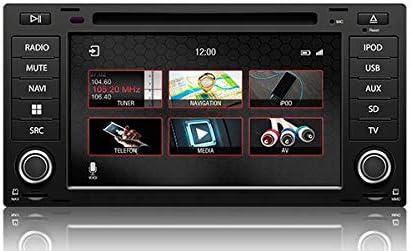
Figura 4.1: The main menu screen displaying various function icons such as Radio, Navigation, Telephone, Media, and AV input.
From the main screen, tap on the desired icon to access functions like Radio, Navigation, Bluetooth (Telefon), Media (USB/SD), and AV input.
4.2 Funcionamento da radio
Tap the "Radio" icon from the main menu or press the physical "RADIO" button. You can tune to AM/FM stations, save presets, and access features like RDS (Radio Data System) where available.

Figura 4.2: The radio interface showing station presets and current frequency. Users can navigate between stations using the on-screen arrows or physical controls.
For SiriusXM compatibility, an SXV300 Tuner (sold separately) is required. Once installed, access SiriusXM through the dedicated icon or source selection.

Figura 4.3: The SiriusXM interface displaying channel information and presets, allowing access to satellite radio content.
4.3 Sistema de navegación
Tap the "Navigation" icon to launch the integrated GPS navigation software. The system comes pre-loaded with maps for North America, Europe, or Australia, depending on your region.
- Entrada de destino: Enter addresses, points of interest, or coordinates.
- Guía de ruta: Follow turn-by-turn voice prompts and on-screen directions.
- Mapa View: Cambia entre 2D e 3D views, adjust zoom levels.
4.4 Conectividade Bluetooth
Vincula o teu smartphone a través de Bluetooth para facer chamadas mans libres e transmitir audio.
- Go to the "Telefon" (Bluetooth) menu.
- Activa o Bluetooth no teu smartphone e busca os dispositivos dispoñibles.
- Select "Dynavin" from the list on your phone and confirm the pairing code.
- Unha vez emparellado, podes facer/recibir chamadas e transmitir música en streaming.
4.5 Apple CarPlay e Android Auto
Connect your compatible smartphone via USB to use Apple CarPlay or Android Auto. This allows you to access select phone apps directly on the Dynavin display.

Figura 4.4: The Apple CarPlay interface displaying common applications like Phone, Music, Maps, and Messages, integrated with the Dynavin unit.
Ensure your phone's operating system is up to date for optimal performance with CarPlay or Android Auto.
4.6 Reprodución multimedia (USB/SD)
Insert a USB drive or Micro SD card into the designated ports. The system supports various audio and video formats. Tap the "Media" icon to browse and play content.
4.7 Configuración de son
Access the sound settings to adjust audio output, equalizer, and balance/fader controls. The system integrates with your vehicle's DSP processor if equipped.

Figura 4.5: The sound settings interface, allowing users to adjust audio parameters such as balance, fader, and specific sound profiles within the vehicle cabin.
Additional sound options may include confirmation tones, PDC (Park Distance Control) and warning tones, and settings for factory amplevantadores.
4.8 Configuración do sistema
The system settings menu allows you to configure various aspects of the unit, including:
- Rexión: Set the geographical region for radio and navigation.
- Cor: Adjust display color schemes.
- Cámara: Configure backup camera settings.
- Brillo: Manually adjust screen brightness.
- Zona horaria: Establece o fuso horario correcto.
- Reverso: Configure reverse camera and PDC integration.

Figura 4.6: The system settings interface, showing options for region, display color, camera settings, brightness adjustment, time zone, and reverse camera configuration.
5. Mantemento
5.1 Limpeza da pantalla
Usa un pano suave e sen pelusa para limpar con suavidade a pantalla táctil. Para manchas difíciles, limpa lixeiramenteampLimpe o pano con auga ou cun limpador de pantallas. Evite materiais abrasivos ou produtos químicos agresivos.
5.2 Actualizacións de firmware
Periodic firmware updates may be released to improve performance, add features, or address issues. Check the official Dynavin website or contact your distributor for information on available updates and instructions for installation.
6 Solución de problemas
If you encounter issues with your Dynavin N7-VT7 PRO, refer to the following common solutions:
- Sen enerxía: Check all wiring connections and vehicle fuses. Ensure the vehicle battery is properly connected.
- Sen son: Verifica as conexións dos altofalantes. Comproba os niveis de volume e a configuración de silenciamento. Asegúrate de que estea seleccionada a fonte de audio correcta.
- Perda de sinal GPS: Asegúrese de que a antena GPS estea instalada correctamente e teña unha visión clara view do ceo.
- Problemas de sincronización Bluetooth: Delete previous pairings from both the unit and your phone. Restart both devices and attempt pairing again.
- Pantalla táctil sen resposta: Perform a soft reset (refer to specific instructions from Dynavin support if available).
- Apple CarPlay/Android Auto Not Connecting: Ensure your phone is compatible and its operating system is updated. Try a different USB cable.
For persistent issues, contact Dynavin customer support or your authorized dealer for assistance.
7. Especificacións
| Característica | Especificación |
|---|---|
| Número de modelo | N7-VWTG-PRO |
| Tamaño de visualización | 7 polgadas |
| Resolución de visualización | 1024 x 600 |
| Tipo de visualización | Capacitive LCD, Anti-glare Touchscreen |
| Sistema Operativo | DynOS |
| Conectividade | USB, Bluetooth |
| Tipo de mapa | North America, Europe, or Australia (region-specific) |
| Tipo de servizo do vehículo | Car (VW Touareg 2003-2009) |
| Dimensións do paquete | 13 x 11 x 9 polgadas |
8. Garantía e soporte
For warranty information, please refer to the documentation provided with your purchase or contact your authorized Dynavin dealer. J&T Distributing is the official distributor of Dynavin in North America and can provide support for products purchased through their channels.
For technical assistance, troubleshooting, or inquiries regarding firmware updates, please visit the official Dynavin websitio ou póñase en contacto co seu servizo de atención ao cliente.


