Introdución
This user manual provides detailed instructions for the proper use and maintenance of your AUTOPHIX OM123 OBD2 Scanner. The OM123 is a universal automotive diagnostic scan tool designed to read and clear engine fault codes, view live data, and retrieve vehicle information for OBDII/EOBD+CAN compliant vehicles. Please read this manual thoroughly before operating the device.
Produto rematadoview
The AUTOPHIX OM123 OBD2 Scanner is a compact and user-friendly diagnostic tool. It features a large LCD display with backlight for clear readability and intuitive navigation buttons.
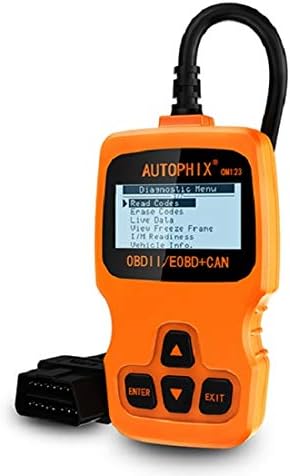
Figura 1: Fronte view of the AUTOPHIX OM123 OBD2 Scanner, showing the display and control buttons.
Características principais:
- Funcións de diagnóstico: Reads and clears Diagnostic Trouble Codes (DTCs), turns off the Malfunction Indicator Lamp (MIL), views live data streams, and displays freeze frame data.
- Dispoñibilidade I / M: Checks the status of emission-related monitors to ensure vehicle readiness for emissions testing.
- Recuperación de información do vehículo: Accesses Vehicle Identification Number (VIN), Calibration ID (CIN), and Calibration Verification Number (CVN).
- Compatibilidade ampla: Supports all OBDII protocols, including CAN, J1850 PWM, J1850 VPW, ISO9141, and KWP2000. Compatible with most vehicles manufactured from 1996 onwards.
- Interface fácil de usar: Features a large 128 x 64 pixel LCD display with white backlight and contrast adjustment. Built-in OBD2 fault code definitions eliminate the need for external lookup.
- Non se necesitan pilas: Powered directly via the detachable OBDII cable from the vehicle's OBDII port.
- Soporte multilingüe: Available in English, French, German, Spanish, Dutch, Finnish, Portuguese, and Russian.

Figura 2: The OM123 scanner's display showing the main diagnostic menu options: Read Codes, Erase Codes, Live Data, View Freeze Frame, I/M Readiness, and Vehicle Info.
Dimensións do dispositivo:

Figura 3: Dimensions of the AUTOPHIX OM123 scanner: approximately 125mm (height), 70mm (width), and 22mm (thickness).
Configuración
- Localiza o porto OBDII: The OBDII port is typically located under the dashboard on the driver's side of the vehicle. Refer to your vehicle's owner's manual for the exact location.
- Conecta o escáner: With the vehicle's ignition off, firmly plug the OM123 scanner's OBDII connector into the vehicle's OBDII port.
- Encendido: Turn the vehicle's ignition to the "ON" position (do not start the engine). The scanner will automatically power on and display the main menu.
- Selección de idioma (se é necesario): If the device is not in your preferred language, navigate to the "Settings" or "System Setup" menu (if available) to select the desired language.
Instrucións de funcionamento
Once the scanner is connected and powered on, use the UP e ABAIXO arrow buttons to navigate through the menu options, the ENTRAR button to confirm a selection, and the SAIR botón para volver á pantalla anterior.
1. Ler Códigos
This function retrieves Diagnostic Trouble Codes (DTCs) from the vehicle's computer. These codes indicate specific issues detected by the vehicle's onboard diagnostic system.
- No menú principal, seleccione "Ler códigos" e prema ENTRAR.
- The scanner will communicate with the vehicle and display any stored DTCs.
- Usa o UP e ABAIXO buttons to scroll through multiple codes if present. The built-in DTC library provides definitions for common codes.
2. Borrar códigos
This function clears all Diagnostic Trouble Codes (DTCs) from the vehicle's computer and turns off the Malfunction Indicator Lamp (MIL), also known as the "Check Engine" light. Ensure any underlying issues are resolved before clearing codes, as they may reappear if the problem persists.
- No menú principal, seleccione "Borrar códigos" e prema ENTRAR.
- Confirme a súa selección cando se lle solicite.
- The scanner will clear the codes and the MIL should turn off.
3. Datos en directo
This function displays real-time operational parameters from the vehicle's sensors and modules. This data can be useful for diagnosing intermittent problems or verifying repairs.
- No menú principal, seleccione "Datos en directo" e prema ENTRAR.
- The scanner will display a list of available data parameters.
- Usa o UP e ABAIXO buttons to scroll through the data.
4. View Conxelar marco
When an emission-related fault occurs, the vehicle's computer stores a "freeze frame" of data, capturing the engine conditions at the moment the fault was detected. This snapshot can help in diagnosing the cause of the problem.
- No menú principal, seleccione "View Freeze Frame" e prema ENTRAR.
- The scanner will display the stored freeze frame data.
5. Preparación I/M
I/M Readiness (Inspection/Maintenance Readiness) indicates whether the various emission-related systems on the vehicle are functioning correctly and have completed their self-tests. This is crucial for emissions testing.
- No menú principal, seleccione "Preparación I/M" e prema ENTRAR.
- The scanner will display the status of various monitors (e.g., Catalyst Monitor, O2 Sensor Monitor). "OK" or "Complete" indicates the test has passed; "INC" or "Not Complete" indicates the test has not yet run or failed.
6. Información do vehículo
This function allows you to retrieve important vehicle identification information.
- No menú principal, seleccione "Vehicle Info." e prema ENTRAR.
- The scanner will display information such as VIN (Vehicle Identification Number), CIN (Calibration Identification Number), and CVN (Calibration Verification Number).
Mantemento
- Limpeza: Use un pano suave e seco para limpar a parte traseira do escáner.asing and screen. Avoid using abrasive cleaners or solvents.
- Almacenamento: Store the device in a clean, dry environment, away from extreme temperatures and direct sunlight.
- Coidado do cable: Ensure the OBDII cable is not kinked or damaged. Always grasp the connector when plugging or unplugging, not the cable itself.
- Actualizacións de software: Consulte o do fabricante website periodically for any available software updates to ensure optimal performance and compatibility.
Resolución de problemas
| Problema | Causa posible | Solución |
|---|---|---|
| Scanner does not power on or screen is blank. |
|
|
| Erro de comunicación co vehículo. |
|
|
| Codes cannot be cleared. |
|
|
Especificacións
| Característica | Detalle |
|---|---|
| Número de modelo | OM123 |
| Mostrar | 128 x 64 pixel LCD with white backlight and contrast adjustment |
| Vol. Operativotage | 9-16V (via OBDII port) |
| Protocolos admitidos | CAN, J1850 PWM, J1850 VPW, ISO9141, KWP2000 |
| Temperatura de funcionamento | 0 °C a 60 °C (32 °F a 140 °F) |
| Temperatura de almacenamento | -20 °C a 70 °C (-4 °F a 158 °F) |
| Dimensións | Aprox. 125 mm x 70 mm x 22 mm |
| Peso | Aproximadamente 10.4 onzas (295 gramos) |
| Certificacións | FCC, CE, RoHS |
Garantía e Soporte
The AUTOPHIX OM123 OBD2 Scanner comes with a one-year warranty from the date of purchase, covering manufacturing defects. For technical support, warranty claims, or further assistance, please contact AUTOPHIX customer service through their official websitio web ou o vendedor onde se comprou o produto.
Para máis información, visite o oficial AUTOPHIX Store.


