Introdución
Grazas pola compraasing the Caliber Alarm Clock with QI Charging Station. This device combines a digital alarm clock with a convenient wireless charging pad and a USB charging port, designed to simplify your bedside setup. It also features an adjustable night light and a large LED display for clear visibility.
This manual provides detailed instructions on how to set up, operate, maintain, and troubleshoot your new alarm clock. Please read it thoroughly before use to ensure optimal performance and longevity of the product.
Configuración
Desembalaxe: Carefully remove the alarm clock from its packaging. Ensure all components are present: the alarm clock unit and the power adapter.
Conexión de alimentación: Connect the provided power adapter to the DC input port on the back of the alarm clock. Plug the other end of the adapter into a standard wall outlet. The display will illuminate.
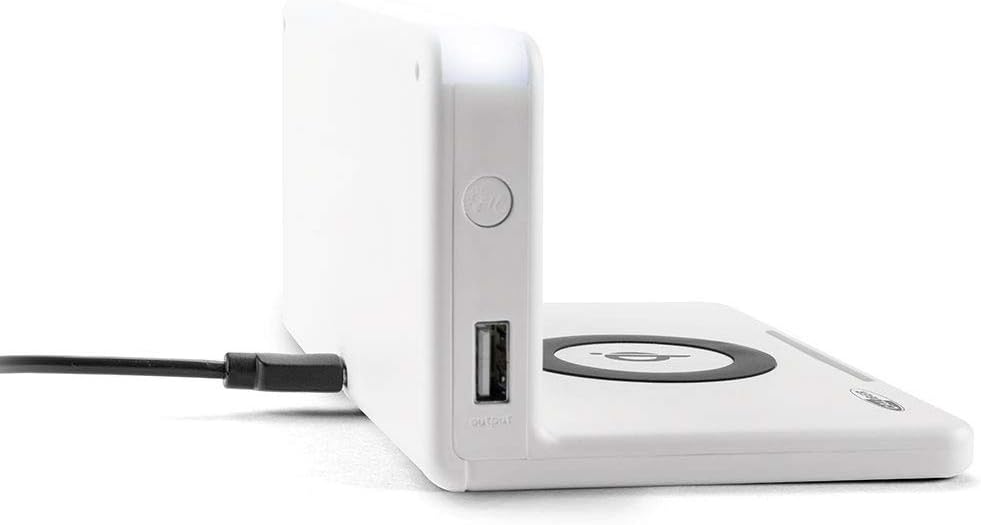
Imaxe: Lateral view of the alarm clock, illustrating the power input port (left) and the USB output port (right).
Battery Installation (Backup): The unit includes 1 Lithium Ion battery for backup. This battery maintains time settings during power outages. No user installation is typically required for this pre-installed battery.
Configuración da hora inicial: Upon first power-up, the clock may display a default time or require manual setting. Refer to the "Operating" section for detailed instructions on setting the time.
Instrucións de funcionamento
Axuste da hora e da data
- Manteña premido o HORARIO button (location may vary, typically on the back or top) until the hour digits flash.
- Usa o + or - botóns para axustar a hora.
- Preme HORARIO de novo para pasar aos minutos e, a seguir, axusta con + or -.
- Repeat for year, month, and day if applicable.
- Preme HORARIO one last time to confirm and exit.
Configuración de alarmas
- Manteña premido o CONXUNTO DE ALARMA button (or similar) until the alarm hour digits flash.
- Axuste a hora e os minutos da alarma usando o botón + or - botóns.
- Preme CONXUNTO DE ALARMA para confirmar.
- Para activar/desactivar a alarma, prema o botón ALARMA ON / OFF botón. Aparecerá/desaparecerá unha icona de alarma na pantalla.
- Cando soe a alarma, prema o botón AMORTAR button for a temporary pause, or any other button to turn it off for the day.
Using the QI Wireless Charging Station
The alarm clock features a built-in QI wireless charging pad for compatible devices.
- Asegúrate de que o reloxo despertador estea acendido.
- Place your QI-compatible smartphone or device directly onto the charging pad, centering it over the Logotipo de QI.
- A charging indicator (e.g., an LED light or on-screen icon) will illuminate to confirm charging has begun. If charging does not start, reposition your device.

Image: A smartphone placed on the QI charging pad of the alarm clock, showing the charging interface on the phone screen.

Image: The alarm clock with a phone positioned on its wireless charging surface, indicating active charging.
Usando o porto de carga USB
A USB output port is available on the side of the unit for charging non-QI compatible devices or for faster wired charging.
- Connect your device's USB charging cable to the USB output port on the alarm clock.
- Conecta o outro extremo do cable ao teu dispositivo. A carga comezará automaticamente.
Adjusting Display Brightness and Night Light
- The alarm clock features adjustable display brightness. Look for a DIMMER or BRILLO button, typically on the back or top. Press it repeatedly to cycle through brightness levels.
- To activate or adjust the night light, locate the dedicated LUZ DE NOITE button. Press it to turn the light on/off or cycle through different brightness settings if available.
Mantemento
- Limpeza: Disconnect the power adapter before cleaning. Use a soft, dry cloth to wipe the surface of the alarm clock. Do not use abrasive cleaners, waxes, or solvents as they may damage the finish.
- Almacenamento: Se garda a unidade durante un período prolongado, desconéctea da corrente e gárdea nun lugar fresco e seco.
- Manexo: Avoid dropping the unit or subjecting it to strong impacts. Keep it away from water and high humidity.
Resolución de problemas
| Problema | Causa posible | Solución |
|---|---|---|
| A pantalla do reloxo está en branco. | Sen conexión de alimentación. | Asegúrate de que o adaptador de corrente estea conectado correctamente á unidade e a unha toma de corrente que funcione. |
| QI charging not working. | Device not QI-compatible; device not properly aligned; foreign objects on pad; phone case too thick. | Verify device compatibility. Reposition device on the center of the pad. Remove any foreign objects. Remove thick phone cases. |
| Non soa a alarma. | Alarma non activada; volume demasiado baixo; hora de alarma incorrecta. | Ensure the alarm icon is displayed. Check alarm volume settings. Verify the alarm time is set correctly. |
| A hora é incorrecta. | Hora non axustada correctamente; corte de corrente. | Reset the time manually. If power was interrupted, the backup battery should maintain time, but a manual check is recommended. |
Especificacións
| Característica | Detalle |
|---|---|
| Marca | Calibre |
| Número de modelo | HCG018QI/W |
| Cor | Branco |
| Tipo de visualización | Dixital |
| Característica especial | Night light, QI charging station, USB charging port |
| Fonte de enerxía | Eléctrico con cable |
| Dimensións do produto | 7.09 x 4.25 x 3.86 polgadas |
| Peso do elemento | 7.9 onzas (225 gramos) |
| Baterías | 1 Lithium Ion battery (included, for backup) |
| GTIN | 08714505047157 |
Garantía e Soporte
This Caliber product is designed for reliability and performance. For information regarding warranty coverage, please refer to the warranty card included with your purchase or visit the official Caliber websitio.
Should you encounter any issues not covered in the troubleshooting section, or require further assistance, please contact Caliber customer support. Contact details can typically be found on the product packaging or the manufacturer's official websitio.


