1. Introdución
This manual provides detailed instructions for the installation, operation, and maintenance of your Anlapus 1080p HD-TVI Surveillance Camera. Please read this manual thoroughly before using the product to ensure proper function and safety.
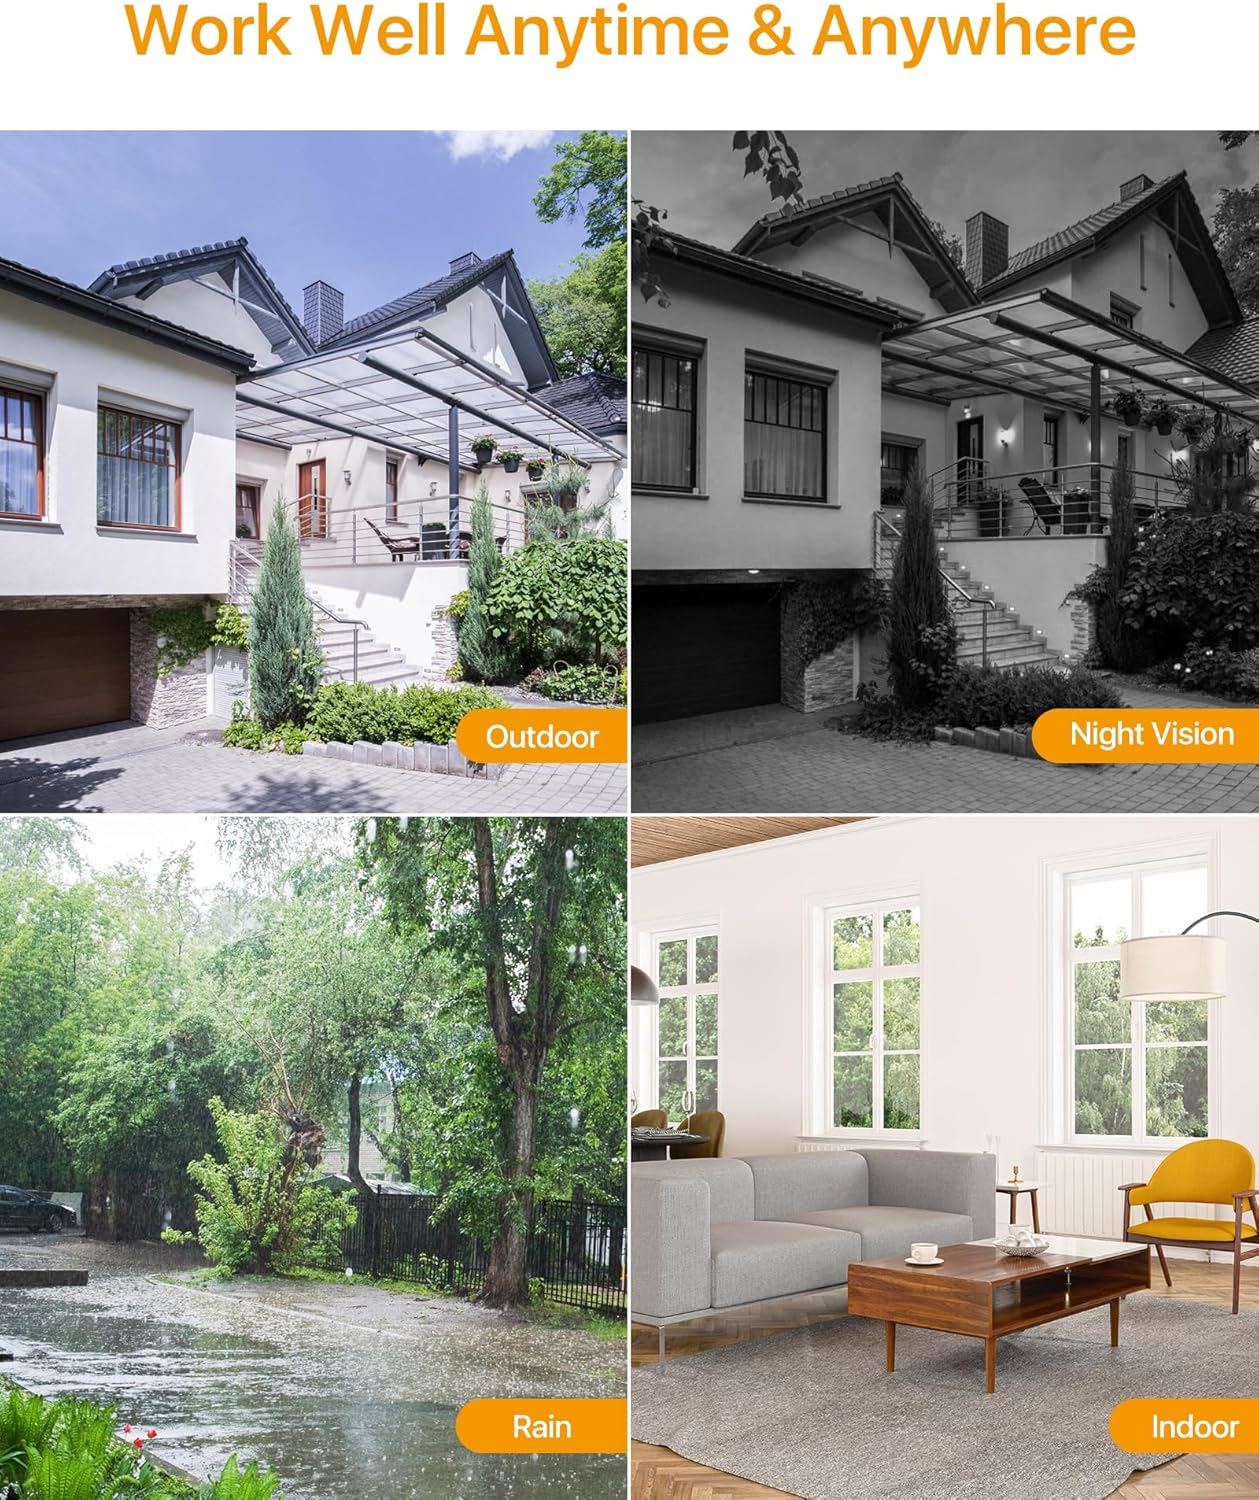
The Anlapus HD-TVI camera is designed for both indoor and outdoor surveillance, offering high-definition video quality and robust performance in various environmental conditions.
2. Contido do paquete
Verifique que todos os elementos que se indican a continuación estean incluídos no seu paquete. Se falta algún elemento ou está danado, póñase en contacto co servizo de atención ao cliente.
- 4 x Anlapus 1080p HD-TVI Cameras
- 4 x BNC Video Cables
- 1 x fonte de alimentación
- 1 x 1-to-4 Power Splitter Cable
- 4 adhesivos de advertencia
- 4 x Mounting Screw Bags (including screws and wall plugs)
- 4 modelos de orificios de montaxe
- 1 x Guía de inicio rápido
3. Características do produto
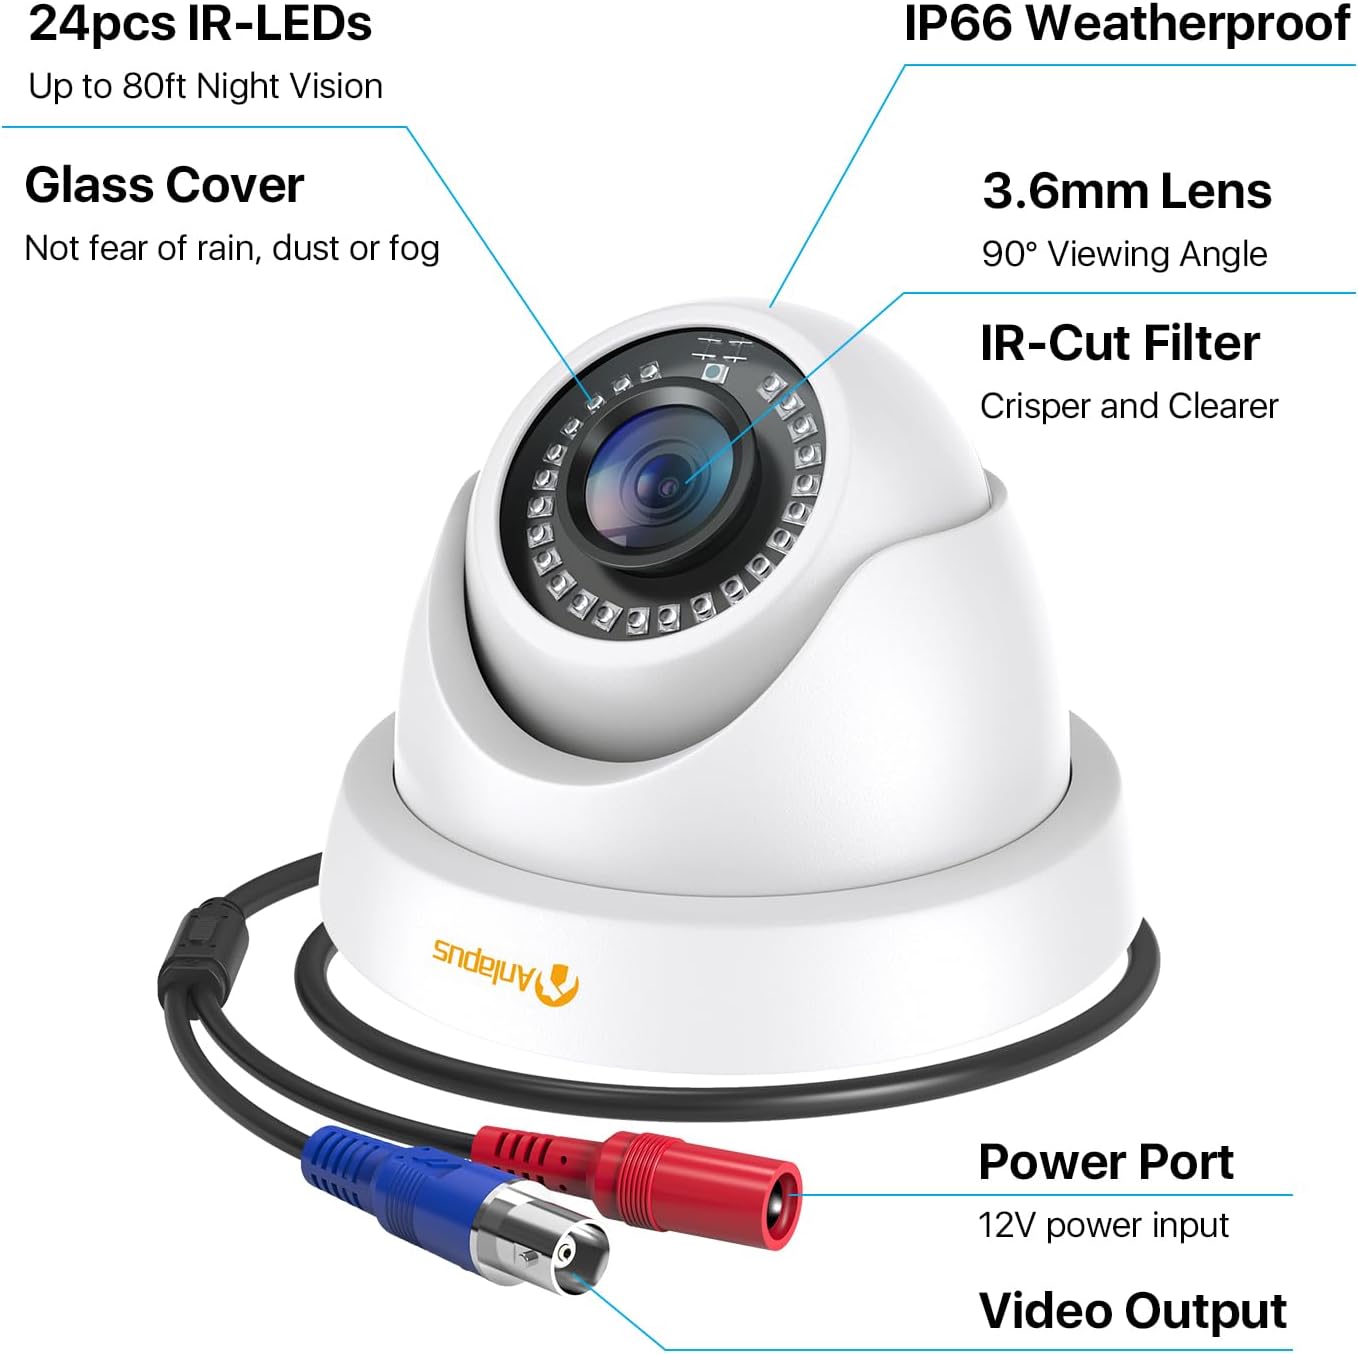
- Resolución HD 1080p: Ofrece un vídeo claro e detalladotage (1920 x 1080 píxeles).
- Amplo ViewÁngulo de ing: Equipped with a 3.6mm lens, offering a 90-degree field of view.
- HD-TVI Compatibility: Designed to work with HD-TVI DVRs. Ensure your DVR supports HD-TVI technology.
- Visión nocturna avanzada: Features 24 IR-Cut LEDs for up to 24 meters (80 feet) of clear black and white night vision.
- Clasificación de resistencia ás inclemencias meteorolóxicas IP66: Robust metal housing ensures protection against dust and water, suitable for both indoor and outdoor use in various weather conditions.
- Montaxe flexible: Features a 3-axis adjustable bracket for ceiling or wall mounting, allowing 360-degree horizontal and 180-degree vertical adjustment.


4. Configuración e instalación
4.1 Lista de comprobación previa á instalación
- Ensure your DVR is compatible with HD-TVI cameras.
- Plan the camera placement to cover desired surveillance areas.
- Ensure power outlets are accessible for the camera power supply.
- Gather necessary tools: drill, screwdriver, ladder (if mounting high).
4.2 Montaxe da cámara
- Select a suitable mounting location (wall or ceiling) that provides the desired viewing angle and is within reach of the BNC cable and power supply.
- Use the provided mounting hole template to mark the drill points on the surface.
- Perforar orificios piloto nas posicións marcadas.
- Insert the wall plugs into the drilled holes (if mounting on masonry or drywall).
- Fixe a base da cámara á superficie cos parafusos proporcionados.
- Adjust the camera angle using the 3-axis bracket. The bracket allows for 360-degree horizontal rotation and 180-degree vertical tilt. Tighten the adjustment screws once the desired angle is achieved.
4.3 Conectando a cámara
Consulte o diagrama de conexións a continuación para o cableado correcto.
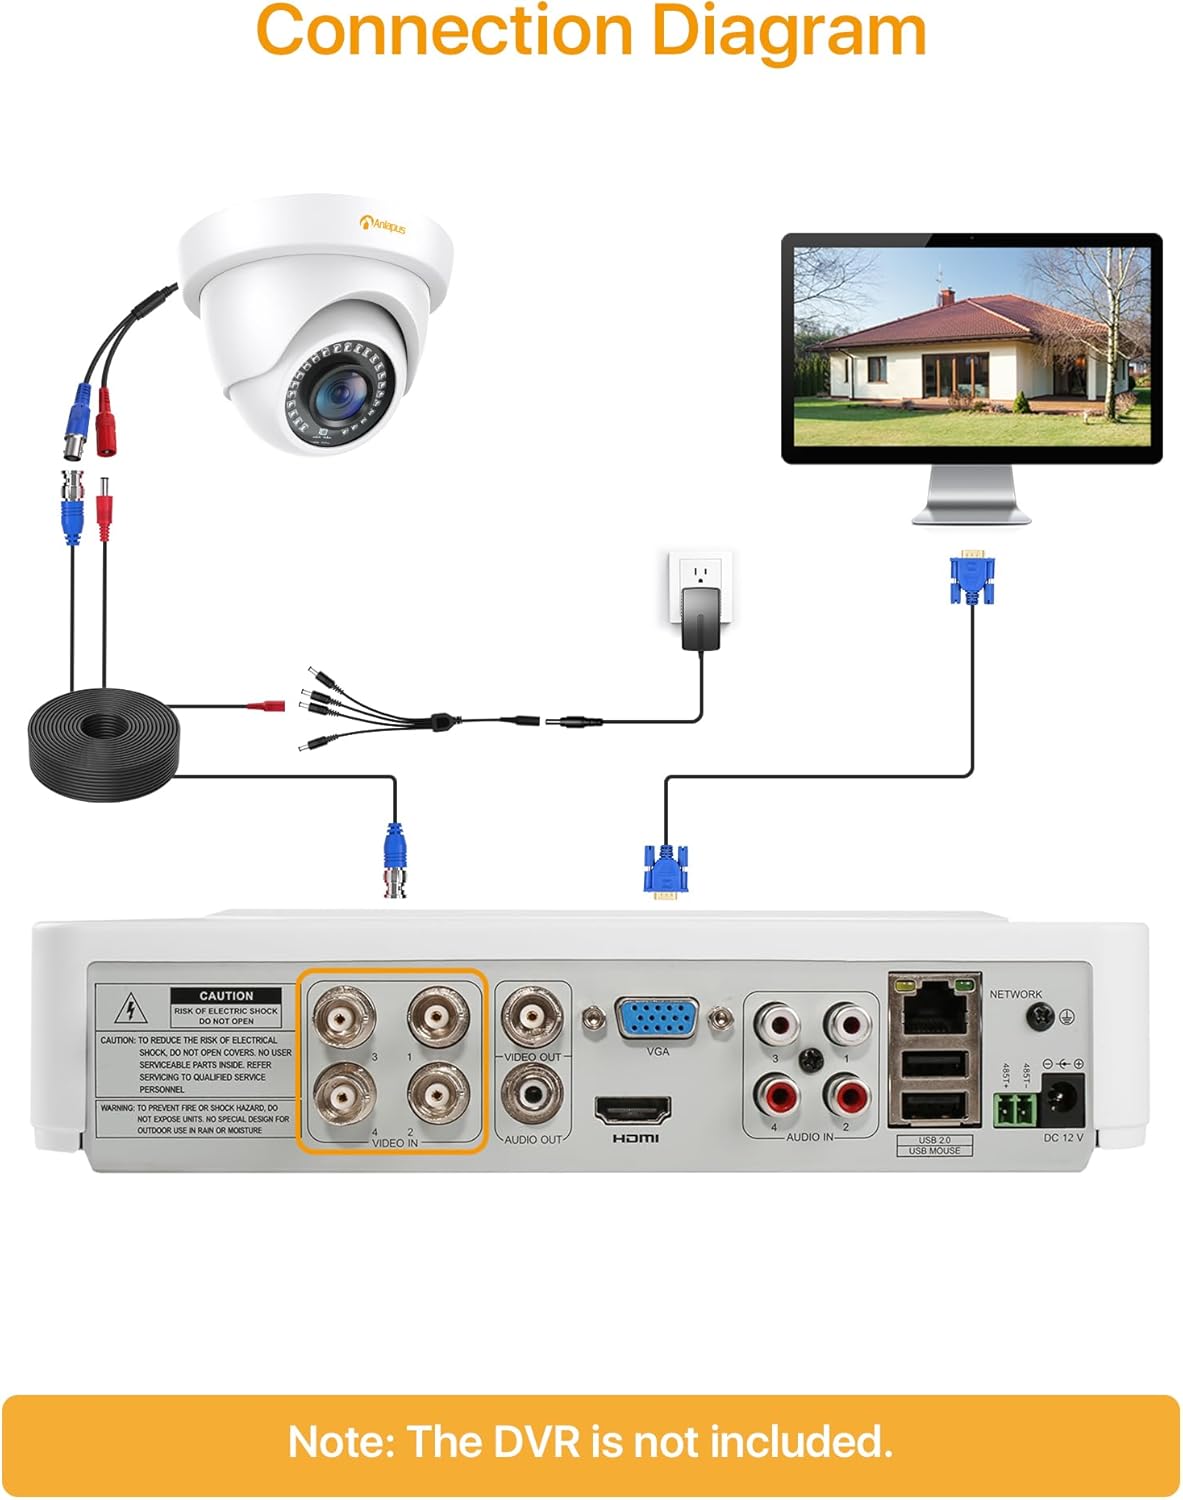
- Connect one end of the BNC video cable to the video output port of the camera.
- Connect the other end of the BNC video cable to a "VIDEO IN" port on your HD-TVI DVR.
- Connect the camera's power input to one of the outputs on the 1-to-4 power splitter cable.
- Connect the power supply to the 1-to-4 power splitter cable.
- Plug the power supply into a standard electrical outlet.
- Repeat these steps for all cameras.
Importante: Asegúrese de que todas as conexións estean seguras antes de encender o sistema.
5. Instrucións de funcionamento
Once the cameras are properly installed and connected to your HD-TVI DVR, refer to your DVR's instruction manual for specific operating procedures, including:
- Viewing vivo footage das cámaras.
- Recording and playback of video.
- Configuring motion detection and alerts.
- Accessing the system remotely via mobile app or web interface.
- Adjusting camera settings (if supported by your DVR).
The Anlapus camera provides a continuous video feed to the DVR. Its night vision capabilities activate automatically in low-light conditions.
6. Mantemento
- Limpeza: Limpe periodicamente a lente e a carcasa da cámara cun pano suave eamp pano. Evite produtos de limpeza abrasivos ou solventes.
- Inspección de cables: Regularly check all cables for signs of wear, damage, or loose connections.
- Actualizacións de firmware: While the camera itself does not typically require firmware updates, ensure your DVR's firmware is up-to-date for optimal performance and compatibility.
- Protección ambiental: Although the camera is IP66 weatherproof, extreme weather conditions (e.g., heavy snow, ice) may temporarily affect performance. Ensure the camera is securely mounted to withstand strong winds.
7 Solución de problemas
| Problema | Causa posible | Solución |
|---|---|---|
| No image on DVR screen |
|
|
| Mala calidade de imaxe / vídeo borroso |
|
|
| A visión nocturna non funciona |
|
|
If you encounter issues not covered here, please contact Anlapus customer support.
8. Especificacións
| Número de modelo | AJ-A4K-202T4-WPES |
| Resolución de vídeo | 1080p (1920 x 1080 píxeles) |
| Lente | 3.6 mm |
| Viewángulo ing | 90 graos |
| Range de visión nocturna | Ata 24 metros (80 pés) |
| LEDs IR | 24 pcs IR-Cut LEDs |
| Clasificación de resistencia á intemperie | IP66 |
| Material | Metal |
| Tecnoloxía de conectividade | Con cable (BNC) |
| Entrada de enerxía | 12 voltios |
| Consumo de enerxía | 12 vatios |
| Dimensións (L x W x H) | 42.9 x 27 x 8.71 cm |
| Peso | 2.61 kilograms (for the package) |
| Uso recomendado | Vixilancia |
| Dispositivos compatibles | Gravadora de vídeo dixital (DVR) |
9. Garantía e soporte
Anlapus products are designed for reliability and performance. For warranty information and technical support, please refer to the warranty card included in your package or visit the official Anlapus websitio.
If you require assistance with installation, troubleshooting, or have any questions regarding your Anlapus surveillance camera, please contact our customer support team. Contact details can typically be found on the Anlapus brand store page or in the quick start guide.