1. Instrucións de seguridade importantes
Please read these safety instructions carefully before using the appliance and keep them for future reference. Incorrect use may lead to injury or damage.
- Asegúrese de que o aparello estea conectado a unha toma de corrente con conexión a terra e o voltaxe correctotage (220 V).
- Non mergullo o aparello, o cable ou o enchufe en auga ou en calquera outro líquido.
- Always unplug the appliance before cleaning, refilling water, or when not in use.
- Do not operate the appliance with a damaged cord or plug, or if it has been dropped or damaged in any way.
- Manteña o aparello fóra do alcance dos nenos e das mascotas.
- Do not block the air inlets or outlets. Ensure adequate ventilation around the unit.
- Use o aparello só para o propósito doméstico para o que está previsto, tal e como se describe neste manual.
- Do not place the appliance near heat sources, direct sunlight, or in excessively humid environments.
- Always place the appliance on a stable, flat surface to prevent tipping.
2. Produto rematadoview
The ADLER AD 7913 is a versatile evaporative cooler designed to provide cooling, ventilation, humidification, and air purification. It features a portable design with wheels for easy movement.

Figura 2.1: Fronte view of the ADLER AD 7913 Evaporative Cooler, showing the air outlet, control panel, and water level indicator.
Compoñentes clave:
- Panel de control: Located on the top, with buttons for power, speed, mode, and oscillation.
- Saída de aire: Grella frontal por onde sae o aire arrefriado.
- Depósito de auga: 12-litre capacity, located at the bottom, accessible for refilling.
- Indicador de nivel de auga: Transparent window on the front to monitor water level.
- Rodas: Four castor wheels for easy portability.
- Air Filter/Cooling Pad: Located at the rear, responsible for air filtration and evaporation.
3. Configuración
3.1 Desembalaxe
- Carefully remove the evaporative cooler from its packaging.
- Retire todos os materiais de embalaxe, incluídas as películas ou cintas protectoras.
- Inspeccione o aparello para detectar calquera sinal de dano. Se está danado, non o use e póñase en contacto co servizo de atención ao cliente.
3.2 Colocación
Place the evaporative cooler on a firm, level surface. Ensure there is at least 20 cm of clear space around the back and sides of the unit for proper airflow. For optimal cooling, place the unit near an open window or door to allow fresh air intake.
3.3 Enchendo o depósito de auga
The ADLER AD 7913 has a 12-litre water tank. For cooling and humidification, the tank must be filled with water.
- Asegúrese de que o aparello estea desconectado da toma de corrente.
- Locate the water filling port, typically at the top or rear of the unit.
- Slowly pour clean, cold water into the tank. Do not exceed the 'MAX' fill line indicated on the water level indicator.
- For enhanced cooling, you may add ice packs (if included or purchased separately) to the water tank.
- Pecha ben a tapa do depósito de auga.

Figure 3.1: The evaporative cooler positioned in a living space, demonstrating its portable nature.
4. Instrucións de funcionamento
4.1 Panel de control rematadoview
The control panel on the top of the unit allows you to manage all functions.
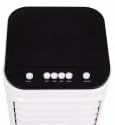
Figura 4.1: Arriba view do panel de control con varios botóns de función.
4.2 Encendido/apagado
- Enchufe o cable de alimentación nunha toma eléctrica adecuada.
- Preme o POTENCIA button (usually marked with ⑉) to turn the unit on or off.
4.3 Axuste da velocidade do ventilador
The unit offers 3 fan speed levels.
- Preme o VELOCIDADE repetidamente para alternar entre as velocidades do ventilador Baixa, Media e Alta.
4.4 Cooling Function (Evaporative Cooling)
To activate the cooling function, ensure the water tank is filled.
- Preme o XENIAL button. The water pump will activate, circulating water over the cooling pad, which then cools the air through evaporation.
- Preme o XENIAL button again to deactivate the cooling function. The unit will then operate as a fan.
4.5 Función de oscilación
The unit features 120° horizontal oscillation and 70° manual vertical oscillation to distribute air evenly.
- Preme o SWING or OSC button to activate automatic horizontal oscillation.
- Press the button again to stop oscillation at the desired position.
- To adjust vertical airflow, manually tilt the front louvers up or down.
4.6 Humidification and Air Purification
When the cooling function is active, the unit also humidifies the air and helps purify it by trapping dust particles in the cooling pad.
5. Mantemento
Regular maintenance ensures optimal performance and extends the lifespan of your evaporative cooler. Always unplug the unit before performing any maintenance.
5.1 Limpeza do exterior
- Limpe as superficies exteriores cun suave, damp pano.
- Non empregues produtos de limpeza abrasivos, ceras ou disolventes, xa que poden danar o acabado.
5.2 Limpeza do depósito de auga
To prevent mold and mildew growth, clean the water tank regularly, especially if the unit is used frequently.
- Drene a auga restante do tanque.
- Remove the water tank (if detachable) or access the tank interior.
- Clean the tank with a mild detergent and water. Rinse thoroughly to remove any soap residue.
- Allow the tank to air dry completely before reassembling or refilling.
5.3 Filter/Cooling Pad Maintenance
The cooling pad (also acts as a filter) should be cleaned periodically to maintain efficiency.
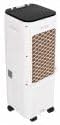
Figura 5.1: Traseira view of the unit, indicating the location of the air filter/cooling pad for maintenance.
- Desenchufe a unidade.
- Locate the filter access panel at the rear of the unit and remove it.
- Carefully slide out the cooling pad.
- Rinse the cooling pad under running water to remove dust and mineral deposits. For stubborn deposits, soak in a mild descaling solution (e.g., vinegar and water) for 30 minutes, then rinse thoroughly.
- Allow the cooling pad to air dry completely before reinserting it.
- Reinstall the cooling pad and secure the access panel.
5.4 Almacenamento
Se garda a unidade durante un período prolongado:
- Drain and clean the water tank and cooling pad thoroughly.
- Ensure all components are completely dry to prevent mold and mildew.
- Garde a unidade nun lugar fresco e seco, lonxe da luz solar directa e de temperaturas extremas.
6 Solución de problemas
Antes de contactar co servizo de atención ao cliente, consulte a seguinte táboa para ver os problemas comúns e as súas solucións.
| Problema | Causa posible | Solución |
|---|---|---|
| A unidade non se acende | Sen fonte de alimentación Non se preme o botón de acendido | Comprobe se o cable de alimentación está ben conectado e se a toma de corrente funciona. Preme o botón POWER. |
| No cool air / Weak cooling | Depósito de auga baleiro Función de refrixeración non activada Cooling pad dirty/clogged Ventilación insuficiente | Enche o depósito de auga. Press the COOL button. Clean the cooling pad as per maintenance instructions. Ensure adequate space around the unit and an open window for fresh air. |
| Cheiro desagradable | Stagauga no depósito Cooling pad needs cleaning | Drain and clean the water tank. Use fresh water. Clean the cooling pad. |
| Fuga de auga | Water tank overfilled A unidade non está sobre unha superficie nivelada | Non exceda a liña de recheo MÁX. Coloque a unidade nunha superficie plana e estable. |
7. Especificacións
| Característica | Especificación |
|---|---|
| Número de modelo | 7913 d.C. |
| Consumo de enerxía | 350 vatios |
| Voltage | 220 V |
| Capacidade do depósito de auga | 12 litros |
| Velocidades do ventilador | 3 niveis |
| Fluxo de aire | 342 m³/h |
| Oscilación horizontal | 120° |
| Oscilación vertical | 70° (Manual) |
| Nivel de ruído | 44 dB |
| Dimensións do produto (L x W x H) | 30 x 25 x 80 cm |
| Peso do elemento | 2.1 kg |
8. Garantía e soporte
Este produto está cuberto por unha garantía do fabricante. Consulta a tarxeta de garantía incluída coa túa compra para coñecer os termos e condicións específicos, incluído o período de garantía e os detalles da cobertura.
For technical assistance, troubleshooting beyond this manual, or to inquire about replacement parts, please contact Adler customer support. Contact information can typically be found on the product packaging, the official Adler websitio web ou o seu recibo de compra.