1. Introdución
The GVDA GD128 SMART Digital Multimeter is a professional testing instrument designed for accurate and reliable measurements. It is an ideal choice for professional electricians, engineers, electronics enthusiasts, and for general household use. This manual provides detailed instructions on the safe and effective operation of your GD128 multimeter.
As capacidades clave inclúen:
- AC e DC Voltage Medición
- Medición de corrente CA e CC
- Medición de resistencia
- Medición de capacitancia
- Medición de continuidade
- Medición de diodos
- NCV (Non-Contact Voltage) Medición
- True RMS for accurate readings of non-sinusoidal signals
- Large VA color HD LCD screen with 9999 counts display
- Rango automático e manual
- Flashlight and Input Connector LED Indication

Figure 1.1: GVDA GD128 Digital Multimeter with test probes.
2. Información de seguridade
WARNING: To avoid electrical shock or personal injury, please read and understand all instructions and safety information before using this multimeter.
- Asegúrese sempre de que o multímetro estea na función e no rango correctos antes de realizar medicións.
- Non excedas os valores de entrada máximos para ningún rango.
- Teña coidado ao traballar con voltagpor riba de 30 V CA RMS, 42 V pico ou 60 V CC. Estes voltagsupoñen un perigo de descarga.
- Inspeccione os cables de proba para detectar danos no illamento ou metal exposto antes do uso. Substitúaos se están danados.
- Do not operate the multimeter if it appears damaged or if it is not operating properly.
- Desconecte sempre a alimentación do circuíto e descargue todas as cargas de alto volumetage capacitores antes de probar resistencia, continuidade, diodos ou capacitancia.
- Asegúrese de que a tapa da batería estea ben pechada antes da operación.
- This device meets safety standards EN61010-1,-2-030, EN61010-2-033, EN61326-1 CAT III 1000V, CAT IV 600V.
3. Produto rematadoview e Compoñentes
Familiarize yourself with the different parts of your GVDA GD128 Digital Multimeter.

Figura 3.1: Fronte e lateral view of the GD128 Multimeter with labeled components.
- Área do sensor NCV
- Tecla de acendido
- Chave da lanterna
- Indicador de aviso
- Lanterna
- Indicador de toma de entrada
- Jack other than current and NCV
- COM jack (Common)
- mA (<600mA) jack
- Toma 10A
- Auto power off key
- Tecla de función
- Mostrar

Figura 3.2: Traseira view of the GD128 Multimeter highlighting the integrated LED flashlight.
4. Configuración
4.1 Instalación da batería
The GVDA GD128 Multimeter requires 3 x 1.5V AAA batteries (not included) for operation.
- Asegúrate de que o multímetro estea apagado.
- Localice o compartimento da batería na parte traseira do dispositivo.
- Use un desaparafusador para abrir a tapa do compartimento da batería.
- Insira 3 pilas AAA, observando a polaridade correcta (+ e -) tal como se indica no interior do compartimento.
- Coloque a tapa do compartimento da batería e fíxaa co parafuso.

Figura 4.1: Compartimento para 3 pilas AAA.
4.2 Conexión dos cables de proba
Connect the test leads to the appropriate input jacks for the desired measurement function. Always connect the black test lead to the COM (Common) jack. Connect the red test lead to the jack corresponding to the measurement type (e.g., VΩHz for voltage/resistance/frequency, mA for milliampere current, 10A for ampere current).
5. Instrucións de funcionamento
The GD128 features both auto-ranging and manual-ranging capabilities. The "SMART" function automatically identifies AC/DC voltage, resistencia e continuidade.
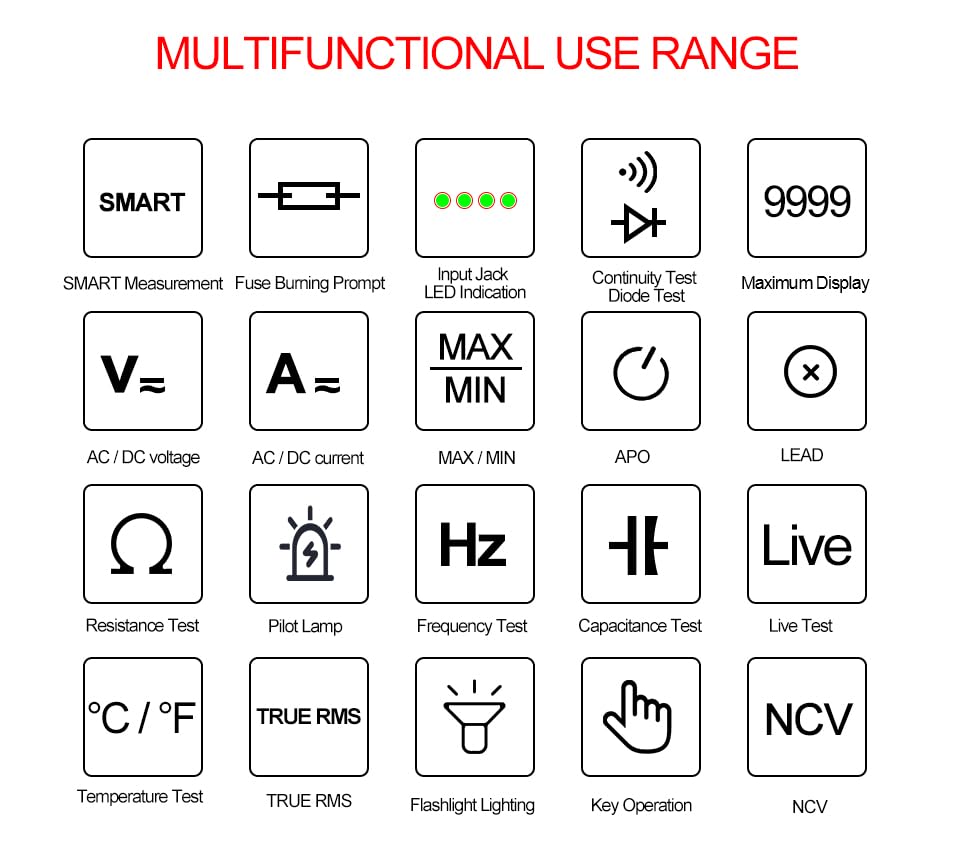
Figure 5.1: Multifunctional Use Range icons.
5.1 Encendido/apagado
Preme o Tecla de acendido (2) to turn the multimeter on or off.
5.2 Selección de funcións
The multimeter typically starts in SMART mode. Press the FUNC (Function) key (12) or SEL key to cycle through different measurement modes within a category (e.g., AC/DC voltage, resistencia/continuidade/díodo).
5.3 Common Measurement Functions
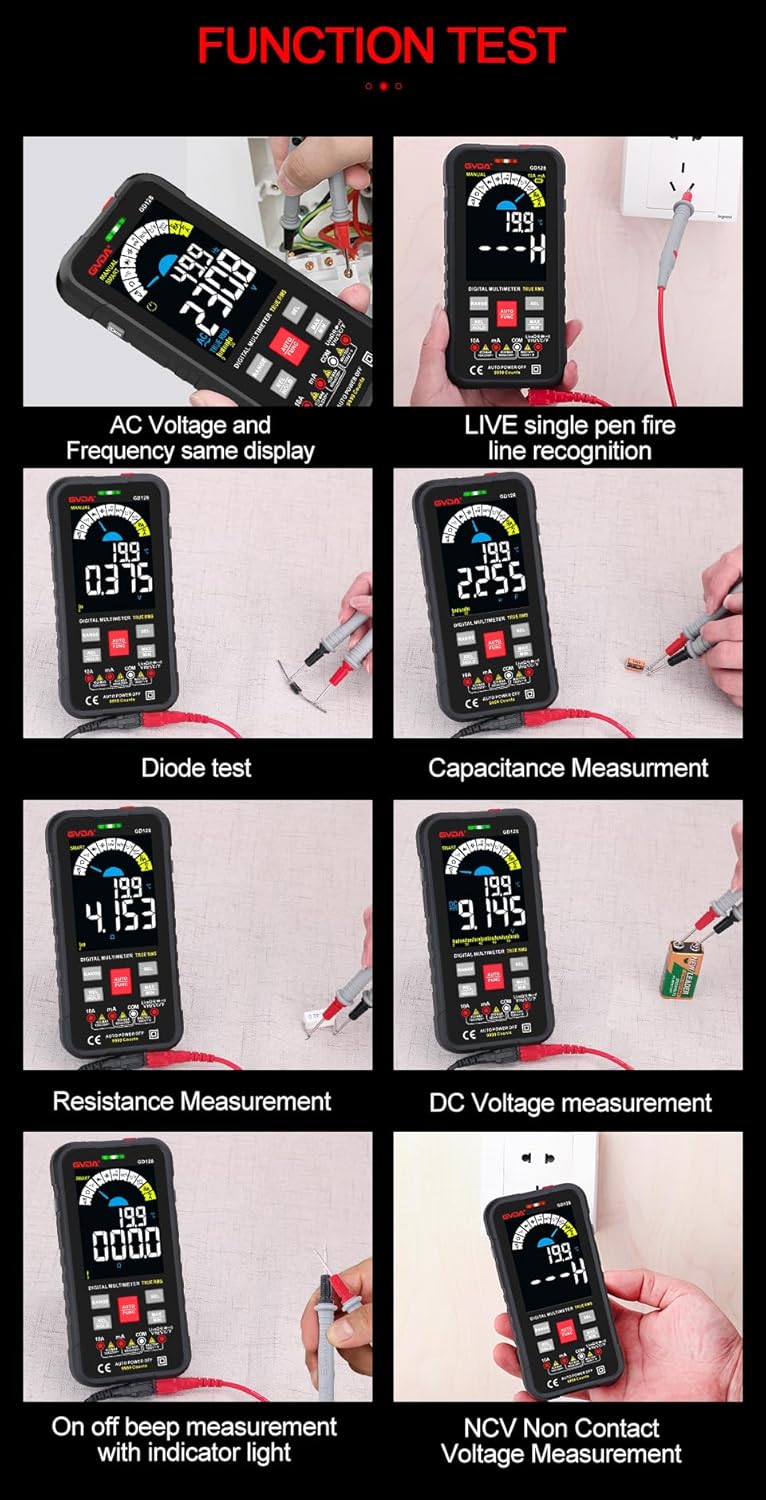
Figura 5.2: Examples of various function tests.
5.3.1 voltagMedición (CA/CC)
- Conecte o cable de proba negro á toma COM e o cable de proba vermello á toma VΩHz.
- Select the appropriate AC (~) or DC (---) voltagModo e.
- Conecte os cables de proba en paralelo ao circuíto ou compoñente que se vai medir.
- A pantalla mostrará o voltage lectura.
5.3.2 Medición de corrente (CA/CC)
- Conecte o cable de proba negro á toma COM.
- For current up to 600mA, connect the red test lead to the mA jack. For current up to 10A, connect the red test lead to the 10A jack.
- Select the appropriate AC (~) or DC (---) current mode.
- Connect the multimeter in series with the circuit to be measured.
- A pantalla mostrará a lectura actual.
5.3.3 Medición da resistencia (Ω)
- Conecte o cable de proba negro á toma COM e o cable de proba vermello á toma VΩHz.
- Select the Resistance (Ω) mode.
- Asegúrese de que o circuíto estea desenergizado antes de medir a resistencia.
- Conecte os cables de proba ao compoñente que se vai medir.
- A pantalla mostrará a lectura da resistencia.
5.3.4 Medición de capacitancia (F)
- Conecte o cable de proba negro á toma COM e o cable de proba vermello á toma VΩHz.
- Select the Capacitance (F) mode.
- Ensure the capacitor is fully discharged before measurement to avoid damage to the multimeter.
- Conecte os cables de proba aos terminais do condensador.
- The display will show the capacitance reading.
5.3.5 Proba de continuidade (Ω)
- Conecte o cable de proba negro á toma COM e o cable de proba vermello á toma VΩHz.
- Select the Continuity mode.
- Touch the test leads to the points you want to check for continuity. A continuous beep indicates a complete circuit.
5.3.6 Proba de díodos (→|)
- Conecte o cable de proba negro á toma COM e o cable de proba vermello á toma VΩHz.
- Seleccione o modo de proba de díodos.
- Conecta a punta de proba vermella ao ánodo e a punta de proba negra ao cátodo do díodo. A pantalla mostrará o volume directo.tagcaída de e. Inverta os cables; unha lectura de circuíto aberto (OL) indica un bo díodo.
5.3.7 NCV (Volumen sen contacto)tage) Medición
- Seleccione o modo NCV.
- Move the NCV sensor area (1) near the conductor. The multimeter will beep and the warning indicator (4) will light up with increasing frequency as it detects AC voltage.
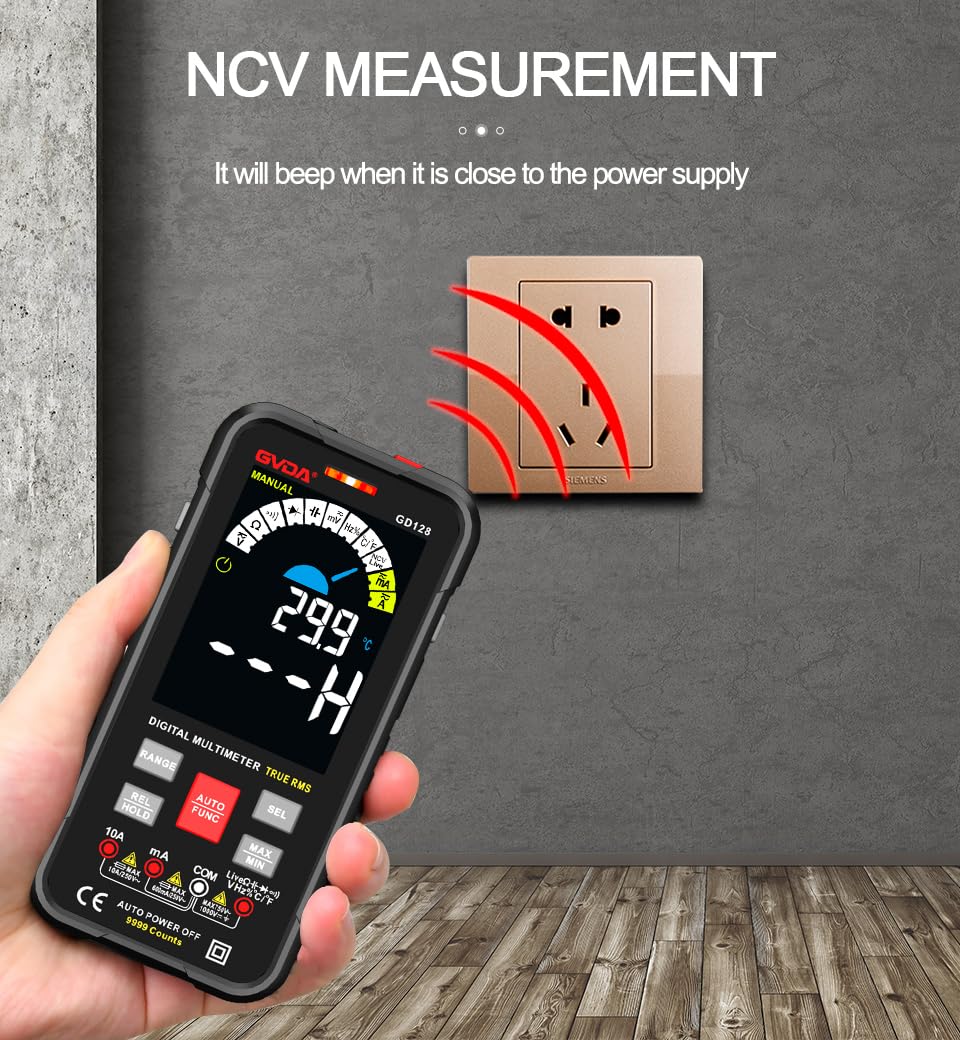
Figura 5.3: NCV (Volumen sen contacto)tage) measurement in progress.
5.3.8 Outras funcións
- RMS verdadeiro: Provides accurate readings for both sinusoidal and non-sinusoidal AC waveforms.
- MÁX/MÍN/MEDIA: Preme o MAX/MIN key to record maximum, minimum, and average readings.
- REL (Medición Relativa): Preme o REL/HOLD key briefly to set the current reading as a reference for subsequent measurements.
- Retención de datos: Preme o REL/HOLD key briefly to freeze the current reading on the display.
- Lanterna: Preme o Chave da lanterna (3) to turn the built-in flashlight on/off.
- Apagado automático (APO): O multímetro apagarase automaticamente despois dun período de inactividade para aforrar batería.
6. Aplicacións
The GVDA GD128 Digital Multimeter is versatile and suitable for a wide range of applications, including but not limited to:

Figure 6.1: Diverse applications of the GD128 Multimeter.
- Electronic beginners and hobbyists
- Electronic circuit installation and testing
- Electronic maintenance and repair
- Electromechanical maintenance
- Vehicle inspection and automotive electrical work
- Maintenance of household appliances
- General electrical troubleshooting
7. Especificacións
Detailed technical specifications for the GVDA GD128 Digital Multimeter:
| Característica | Rango | Precisión |
|---|---|---|
| DC Voltage | 99.99mV/999.9mV; 9.999V/99.9V/1000V | ±(0.5 %+3) |
| Vol. ACtage | 99.9mV/999.9/mV; 9.999V/99.9V/750V | ±(0.8 %+3) |
| Corrente DC | 9.999mA/99.99mA/999.9mA; 9.99A | ±(0.8%+3) for mA, ±(1.2%+3) for A |
| Corrente alterna | 9.999mA/99.99mA/999.9mA; 9.99A | ±(1.0%+3) for mA, ±(1.5%+3) for A |
| Resistencia | 99.99/999.9 ohms/9.999k/99.99k/999.9kohm; 9.999 m/99.99 m ohms | ±(0.8%+3) for kΩ, ±(1.2%+3) for MΩ |
| Capacitancia | 9.999/99.99/999.9nF/9.999/99.99/999.9uF; 9.999mF/99.99mF | ±(4.0%+3) for nF/uF, ±(5.0%+5) for mF |
| Frecuencia | 99.99/999.9/9.999k/99.99k/999.9kHz/9.999mHz | ±(1.0 %+3) |
| Ciclo de traballo | 0.1%-99.99% | ±(1.0 %+2) |
| Temperatura | -40~1000°C; -40-1832°F | ± 2 °C |
| Número de visualizacións | 9999 contas | |
| Tipo de visualización | Pantalla a cor VA | |
| Samptaxa de ling | Aprox. 3 veces por segundo | |
| Visualización sobre rango | "OL" | |
| Baixo Voltage Indicación | Indicación de batería baixa | |
| Fonte de alimentación | 3 pilas AAA de 1.5 V (non incluídas) | |
| Peso do produto | Aprox. 230 g | |
| Tamaño do produto | 83 x 23 x 165 mm | |
| Valoración de seguridade | EN61010-1,-2-030 EN61010-2-033, EN61326-1 CAT III 1000 V CAT IV 600 V |
8. Mantemento
Un mantemento axeitado garante a lonxevidade e a precisión do seu multímetro.
- Limpeza: Limpar o caso co anuncioamp pano e deterxente suave. Non use abrasivos nin disolventes.
- Substitución da batería: Substitúa as pilas canto antes apareza o indicador de pila baixa para garantir lecturas precisas.
- Substitución de fusibles: If the current measurement function fails, the fuse may be blown. Refer to the warning label inside the battery compartment for fuse specifications (e.g., F600mA/250V, F10A/250V). Ensure the multimeter is off and test leads are disconnected before replacing fuses.
- Almacenamento: Se o multímetro non se usa durante un período prolongado, retire as pilas para evitar fugas. Gárdeo nun lugar fresco e seco, lonxe da luz solar directa.
9 Solución de problemas
If you encounter issues with your GVDA GD128 Multimeter, try the following:
- Sen pantalla/Aceso: Comprobe a instalación das baterías e asegúrese de que non estean esgotadas. Substitúaas se é necesario.
- Lecturas incorrectas: Verify test lead connections, ensure the correct function and range are selected, and check if the circuit is de-energized for resistance/continuity/capacitance tests.
- Pantalla "OL": Indicates an over-range condition or an open circuit (e.g., when measuring resistance on an open wire).
- Sen pitido de continuidade: Check if the circuit is truly continuous. If not, the circuit is open.
- Fuse Blown Warning: If the current measurement function is not working, the fuse might be blown. Replace the fuse as per maintenance instructions.
Para problemas persistentes, póñase en contacto co servizo de atención ao cliente.
10. Garantía e soporte
Your GVDA GD128 Digital Multimeter comes with a Garantía de 30 días for system failures or factory problems. Please retain your proof of purchase for warranty claims.
For technical support, warranty claims, or further assistance, please refer to the contact information provided with your product packaging or visit the official GVDA websitio.
11. Contido do paquete
Upon opening your GVDA GD128 Digital Multimeter package, you should find the following items:

Figure 11.1: Contents included in the GD128 Multimeter package.
- 1 x GVDA GD128 Digital Multimeter
- 1 x Test Lead Set (Original pen cable)
- 1 x bolsa de tela
- 1 x Thermocouple Probe
- 1 x Manual de usuario
- 1 x Gift Box (Packaging)


