1. Introdución
This manual provides detailed instructions for the installation, operation, and maintenance of your MUSETEX G05N6-BB Mid Tower ATX Computer Case. Please read this manual thoroughly before beginning assembly to ensure proper setup and optimal performance.

Figura 1: Fronte view of the MUSETEX G05N6-BB Computer Case, showcasing its tempered glass front panel and six pre-installed ARGB fans.
2. Características do produto
- Outstanding Airflow: Equipped with 6 pre-installed 120mm ARGB fans to ensure efficient cooling and heat dissipation.
- Iluminación ARGB personalizable: Fans feature addressable RGB lighting controllable via a dedicated button on the I/O panel or through a compatible 5V 3-PIN motherboard header for synchronized effects.
- Paneis de vidro temperado: Features 4mm thick tempered glass side and front panels for a clear view of internal components and enhanced durability.
- Interior amplo: Supports ATX, Micro-ATX, and Mini-ITX motherboards. Accommodates GPUs up to 380mm, CPU coolers up to 160mm, and PSUs up to 245mm.
- AmpOpcións de almacenamento: Provides mounting for three 2.5" SSDs and two 3.5" HDDs.
- Dust-Proof Design: Includes two magnetic dust filters to protect internal components from dust accumulation.
- Interference-Free Connectivity: Equipped with a shielded USB cable for stable data transmission.

Figura 2: detallada view of the 120mm ARGB fans, highlighting their design and lighting capabilities.
3. Especificacións
| Característica | Especificación |
|---|---|
| Marca | MUSETEX |
| Número de modelo | G05N6-BB |
| Tipo de caso | Torre media |
| Compatibilidade da placa base | ATX, Micro ATX, Mini ITX |
| Dimensións do produto (LxWxH) | 17.7 x 17.6 x 8.3 polgadas |
| Peso do elemento | 18 libras |
| Material | Composite, Metal, Tempered Glass |
| GPU Max Length | 380 mm |
| Altura máxima do refrigerador da CPU | 160 mm |
| Lonxitude máxima da PSU | 245 mm |
| Unidade Bays | 3 x 2.5" SSD, 2 x 3.5" HDD |
| Ventiladores preinstalados | 6 ventiladores ARGB de 120 mm |
| Portos de E/S | 1 x USB 3.0, 2 x USB 2.0, HD Audio, LED Control Button, Power Button, Reset Button |
| Método de arrefriamento | Aire |

Figure 3: Internal layout of the case, illustrating motherboard, GPU, CPU cooler, PSU, and drive bay compatibility and dimensions.
4. Guía de configuración
Follow these steps for proper assembly of your computer components within the MUSETEX G05N6-BB case.
4.1. Preparación do caso
- Unpack the case and place it on a stable, flat surface.
- Carefully remove the tempered glass side panel by unscrewing the thumb screws and gently pulling the panel away.
4.2. Instalación da placa base
- Install the I/O shield into the motherboard tray opening.
- Align your ATX, Micro-ATX, or Mini-ITX motherboard with the standoffs in the case. Ensure all standoffs align with the motherboard's screw holes.
- Fixe a placa base cos parafusos proporcionados.
4.3. Instalación da unidade
- For 2.5" SSDs: Mount the SSDs onto the designated SSD trays located on the back of the motherboard tray. Secure with screws.
- For 3.5" HDDs: Install HDDs into the drive cage located at the bottom of the case. Use the provided HDD screws and rubber rings for vibration dampening.
4.4. GPU and PSU Installation
- Install your graphics card (GPU) into the appropriate PCIe slot on your motherboard and secure it with screws.
- Install the power supply unit (PSU) into its designated compartment at the bottom rear of the case. Secure it with screws from the rear of the case.
4.5. Cooling System Installation (Optional)
The case supports various cooling configurations:
- Front: Up to 3 x 120mm fans or 240mm/360mm radiator.
- Top: Up to 2 x 120mm fans or 240mm radiator.
- Rear: 1 x 120mm fan.
4.6. Xestión de cables
Utilize the cable routing cutouts and tie-down points behind the motherboard tray for clean cable management. This improves airflow and aesthetics.

Figure 4: Rear side of the case, illustrating the cable management channels and tie-down points for organized wiring.
For a visual guide on installation and features, please refer to the official product video:
Video 1: Official MUSETEX G05N6-BB Computer Case overview and installation guide, demonstrating component placement and features.
5. Instrucións de funcionamento
5.1. Acendido/apagado
Press the large power button on the top I/O panel to turn your computer on or off.
5.2. Control do ventilador ARGB
Os ventiladores ARGB preinstalados pódense controlar de dúas maneiras:
- Control do botón da caixa: Press the dedicated LED button on the top I/O panel to cycle through various lighting modes and colors.
- Sincronización da placa base: Connect the fan controller to a compatible 5V 3-PIN ARGB header on your motherboard. Once connected, you can control the fan lighting using your motherboard's RGB software (e.g., ASUS Aura Sync, MSI Mystic Light Sync, Gigabyte RGB Fusion 2.0, ASRock Polychrome Sync). Note: 12V 4-PIN motherboard headers are not compatible with this mode; use button control instead.

Figure 5: Top I/O panel, showing the power button, USB ports, and the LED control button for ARGB fans.
For a visual demonstration of ARGB lighting control, please refer to the official product video:
Video 2: MUSETEX PC Case 903N6W (similar model) showcasing various ARGB lighting effects and control options.
6. Mantemento
6.1. Limpeza do filtro de po
The MUSETEX G05N6-BB case is equipped with magnetic dust filters on the top and bottom to prevent dust buildup. Regularly clean these filters to maintain optimal airflow and cooling performance.
- Gently lift the magnetic dust filters from the top and bottom of the case.
- Clean the filters using compressed air or by rinsing them with water. Ensure they are completely dry before reattaching.
- Place the magnetic filters back onto their respective positions.
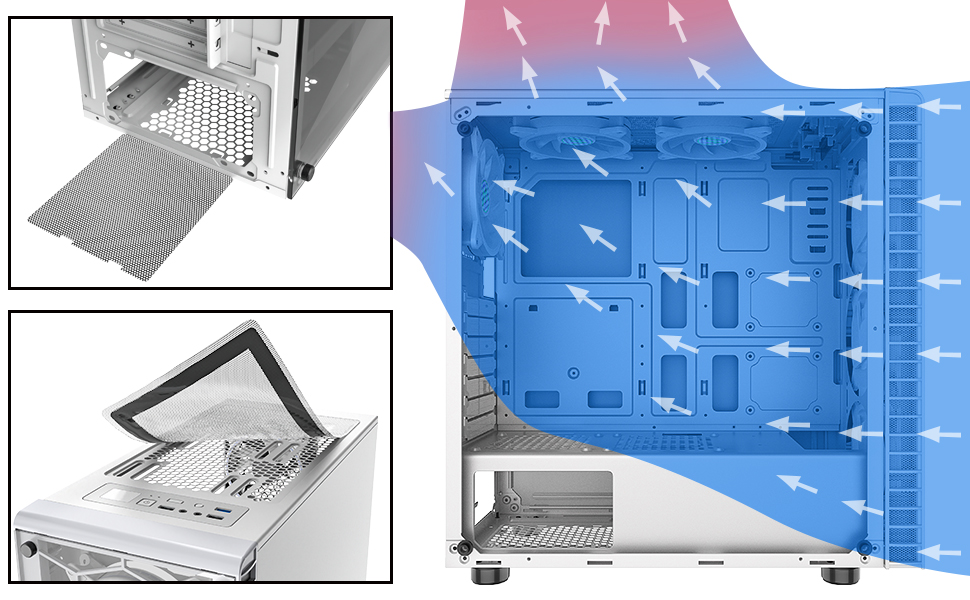
Figure 6: Illustration of the magnetic dust filters on the top and bottom of the case, designed for easy removal and cleaning.
6.2. Limpeza xeral
Use a soft, dry cloth to wipe down the exterior of the case. For tempered glass panels, use a glass cleaner and a microfiber cloth to avoid streaks.
7 Solución de problemas
7.1. Os ventiladores non se acenderon
- Ensure the fan controller is properly connected to the power supply (SATA power).
- If using motherboard sync, verify the 5V 3-PIN ARGB cable is securely connected to the correct header on your motherboard.
- Check your motherboard's RGB software settings to ensure ARGB control is enabled and configured correctly.
- If using the case button, press it to cycle through modes; it might be on a static or off setting.
7.2. Poor Airflow/High Temperatures
- Ensure all pre-installed fans are spinning correctly.
- Clean the magnetic dust filters regularly to prevent airflow restriction.
- Verify that cables are neatly managed and not obstructing airflow paths.
- Consider optimizing fan direction for intake and exhaust to create positive or negative pressure as desired.
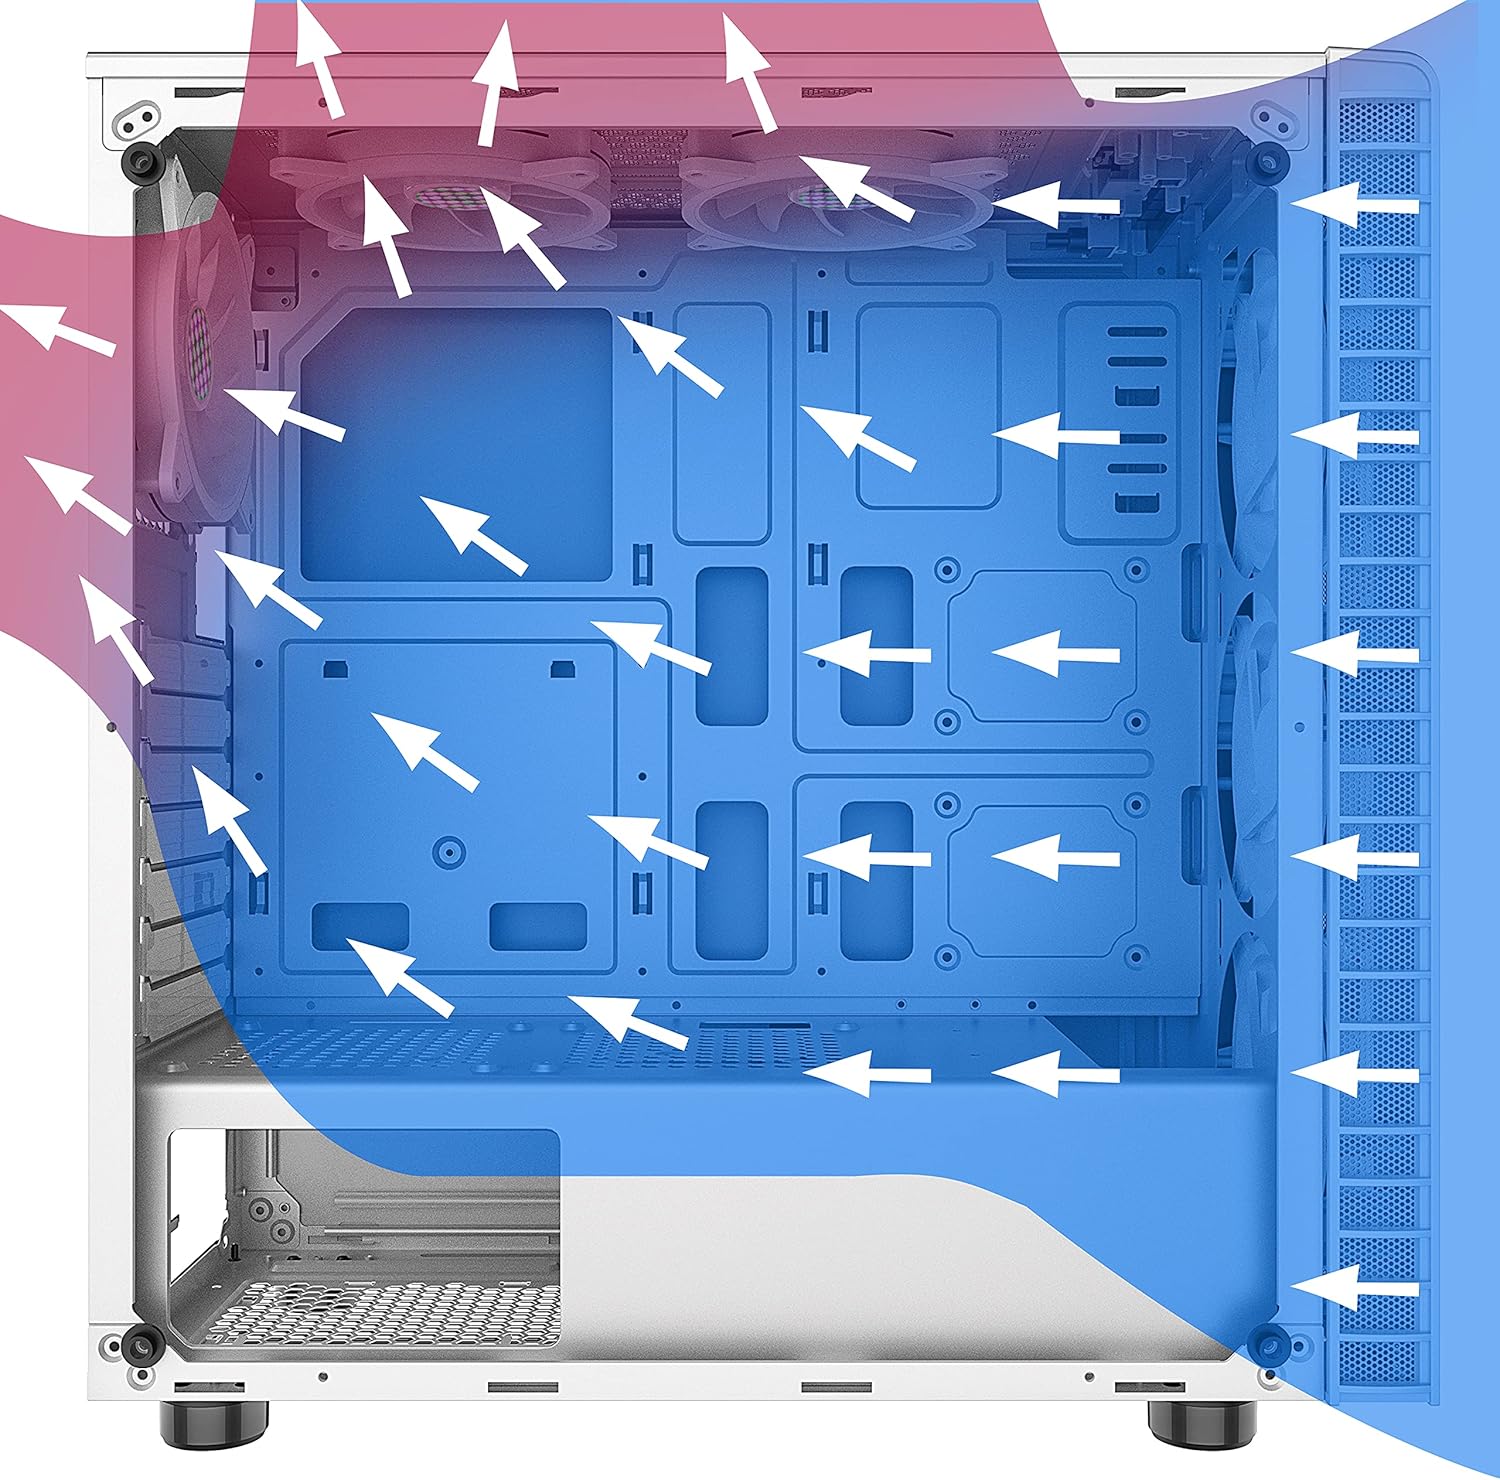
Figure 7: Diagram illustrating optimal airflow paths within the case for efficient cooling.
8. Garantía e soporte
For warranty information, technical support, or further assistance, please refer to the official MUSETEX websitio web ou póñase en contacto directamente co servizo de atención ao cliente. Garde o comprobante de compra para reclamacións de garantía.